What is Earthdata Search?
Earthdata Search provides easy-to-use access to EOSDIS services for Earth science data discovery, filtering, visualization, and access. It also serves as a platform to feature planned EOSDIS services as they become available. Through these services, Earthdata Search allows users to:
- Search for Earth observation data: Earthdata Search uses the Common Metadata Repository (CMR) for sub-second search across the EOSDIS metadata catalog and simpler, faster access to faceted metadata. As CMR evolves to provide parameter, visualization, and service metadata, Earthdata Search will take advantage of the new features.
- Preview Earth observation data: Using Global Imagery Browse Services (GIBS), Earthdata Search enables high-performance, highly available data visualization. Earthdata Search provides data visualizations on a web-based map using the GIBS tile service. As GIBS adds support for granule-based visualizations, Earthdata Search will enable users to view even more precise map imagery and thumbnails for GIBS-enabled data collections.
- Download and access Earth observation data: In addition to direct download, Earthdata Search surfaces OPeNDAP services for simpler spatial and parameter subsetting. Planned EOSDIS-sponsored updates to OPeNDAP provide opportunities to dramatically improve user experience for data subsetting, download, and transformation. Earthdata Search will bring these changes to end-users as they become available.
- How do I Download Data Using Earthdata Search?
-
Earthdata Search enables users to download data through various methods. These methods include:
- Single Granule - Direct download of a single granule. The selected granule will download immediately.
- Direct Download - Direct download of all data associated with the selected granules. The desired data will be available for download immediately. Files will be accessed from a list of links displayed in the browser or by using a download script.
- Stage for Delivery - Submit a request for data to be staged for delivery. Data files will be compressed in zip format and stored for retrieval via HTTP. The user will receive an email from the data provider when the files are ready to download.
- Customized - Select options like variables, transformations, and output formats to customize the data. The desired data files will be made available for access after the data provider has finished processing the request. The user will receive an email from the data provider when the files are ready to download.
The available download methods will vary. All methods may not be available for every collection. STEP-BY-STEP INSTRUCTIONS
The user must be logged in to download data using any of the methods described below. All instructions assume the collection and granule(s) the user is interested in has already been searched for. For instructions on how to search using Earthdata Search, please see the section on How to Search using Earthdata Search. Single Granule
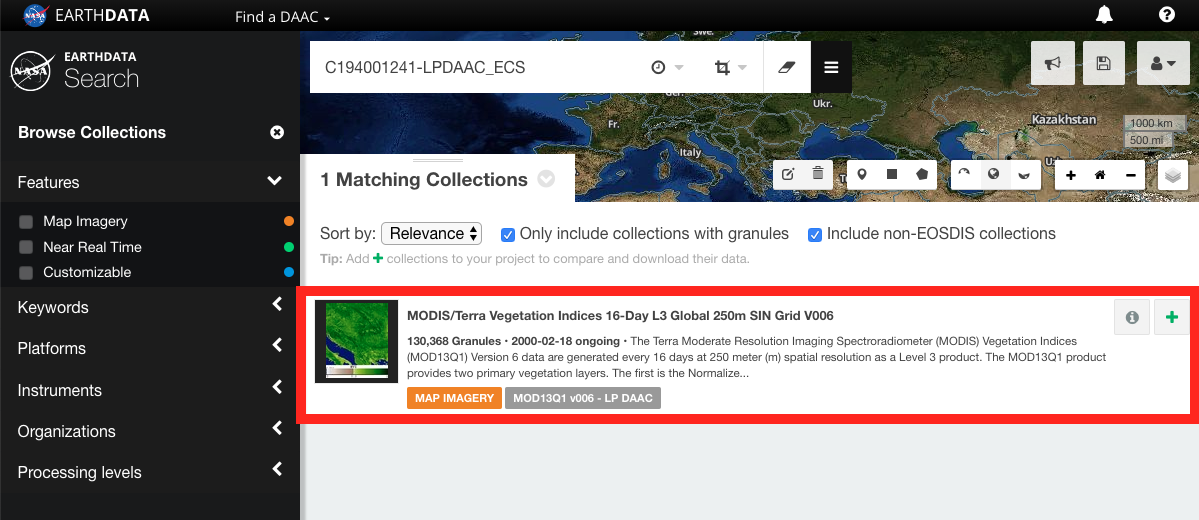
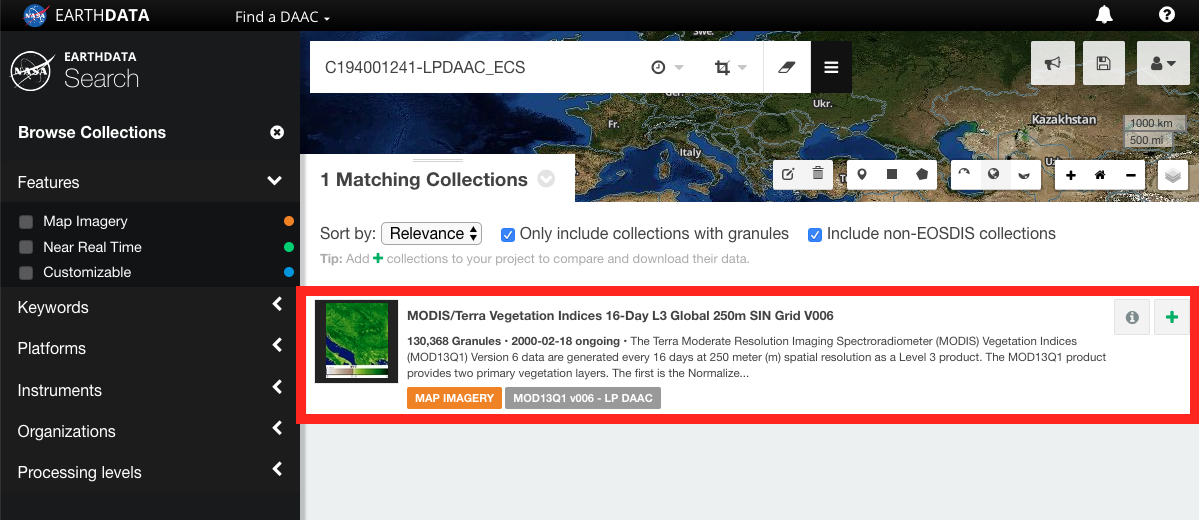
Single Granule- CLICK on a collection to view the granules.
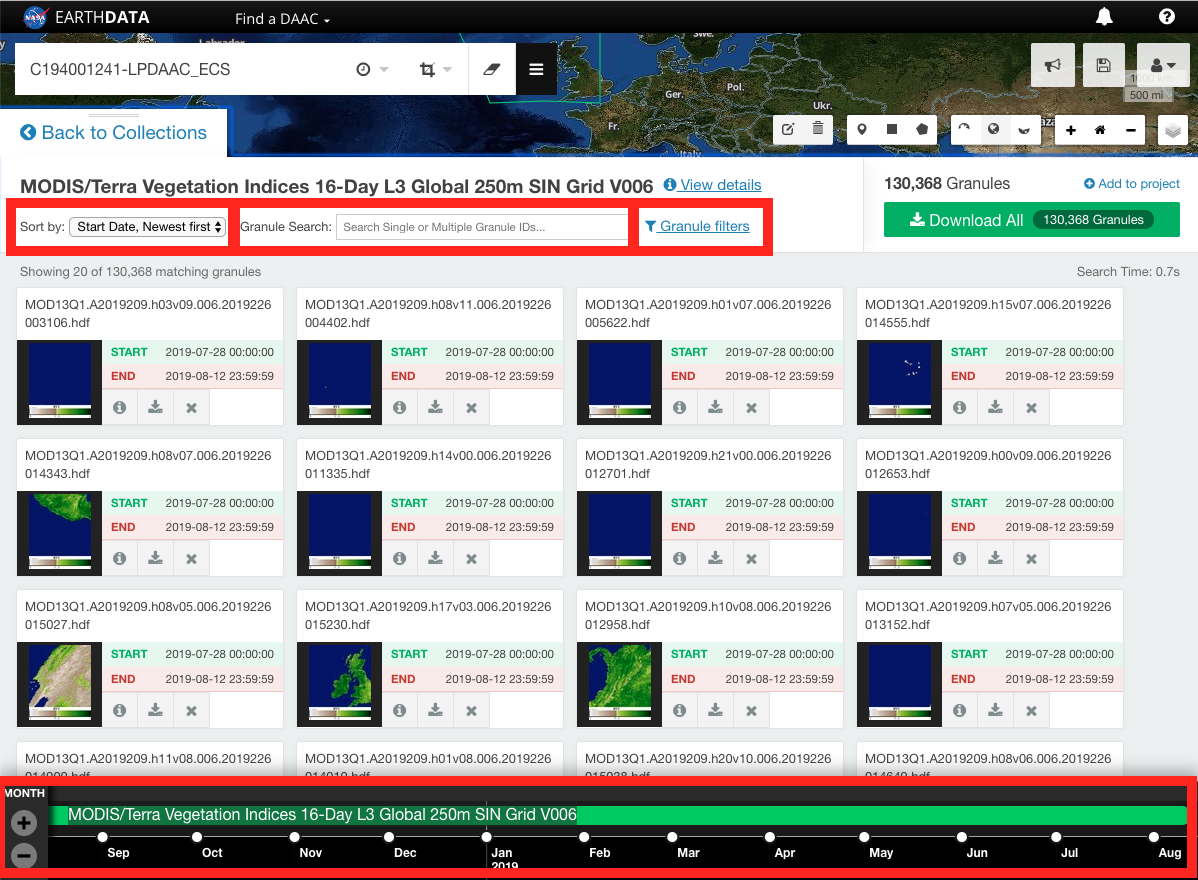
- SORT, SEARCH, and/or FILTER the granules as needed.
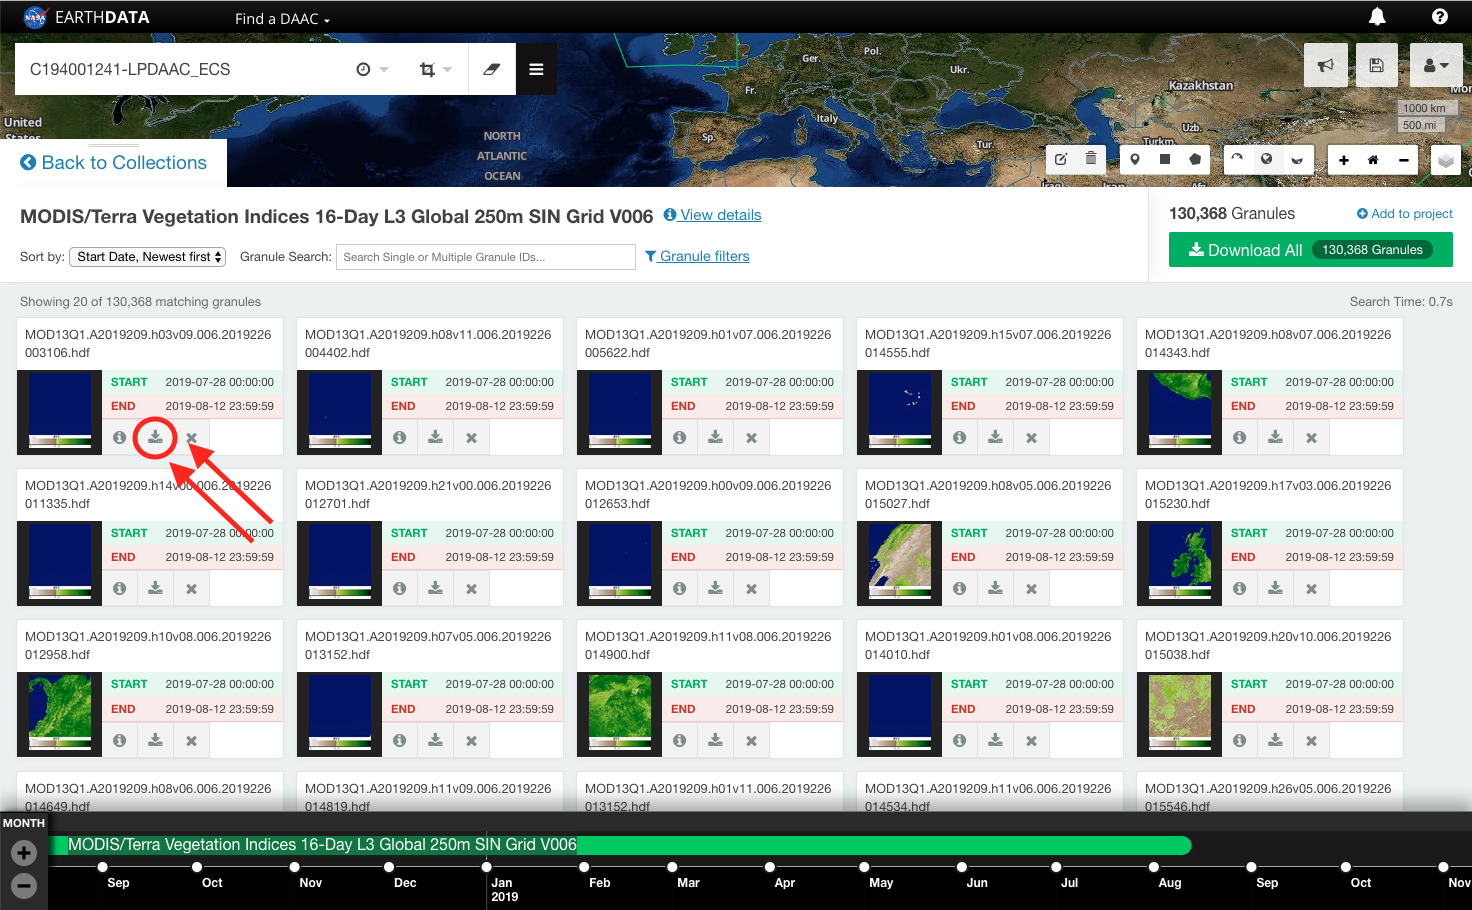
User can also FILTER temporarily using the time scale at the bottom of the page.` - CLICK on the Download single granule data button on the granule of interest.
- REPEAT the above steps for each granule of interest.
Direct Download
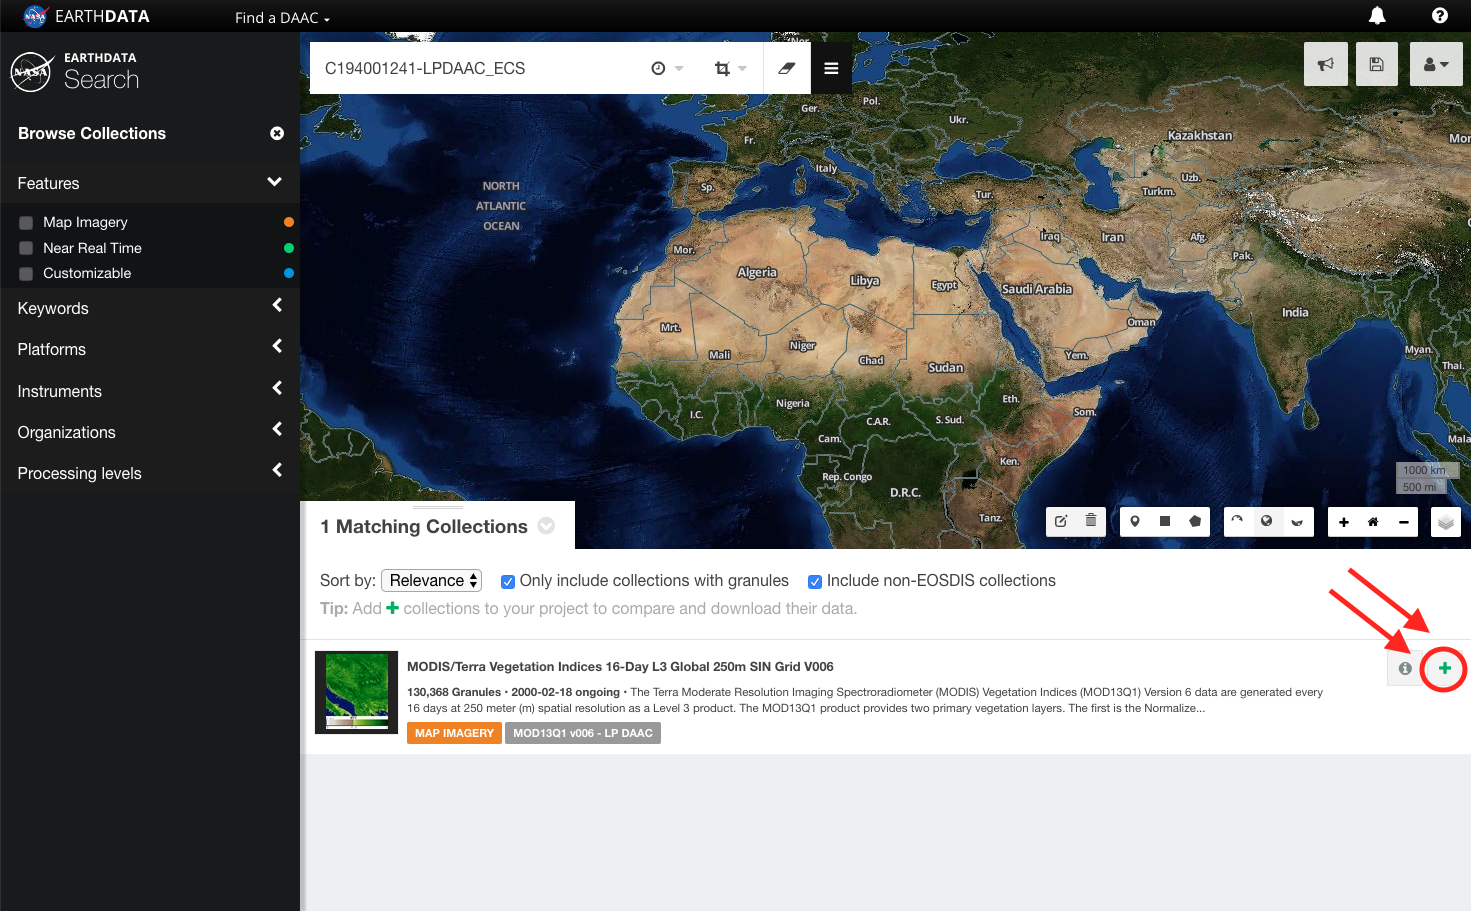
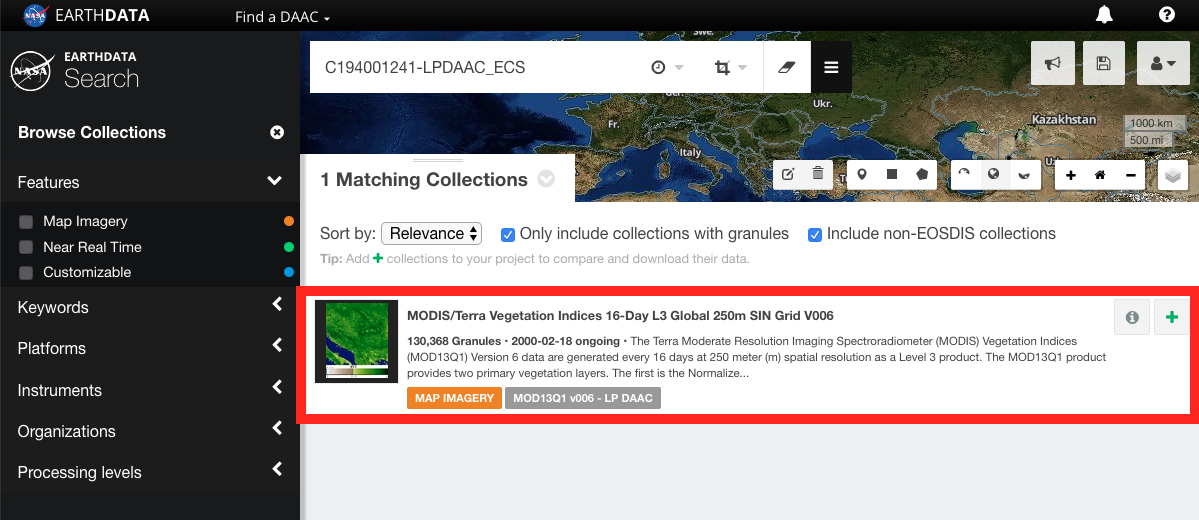
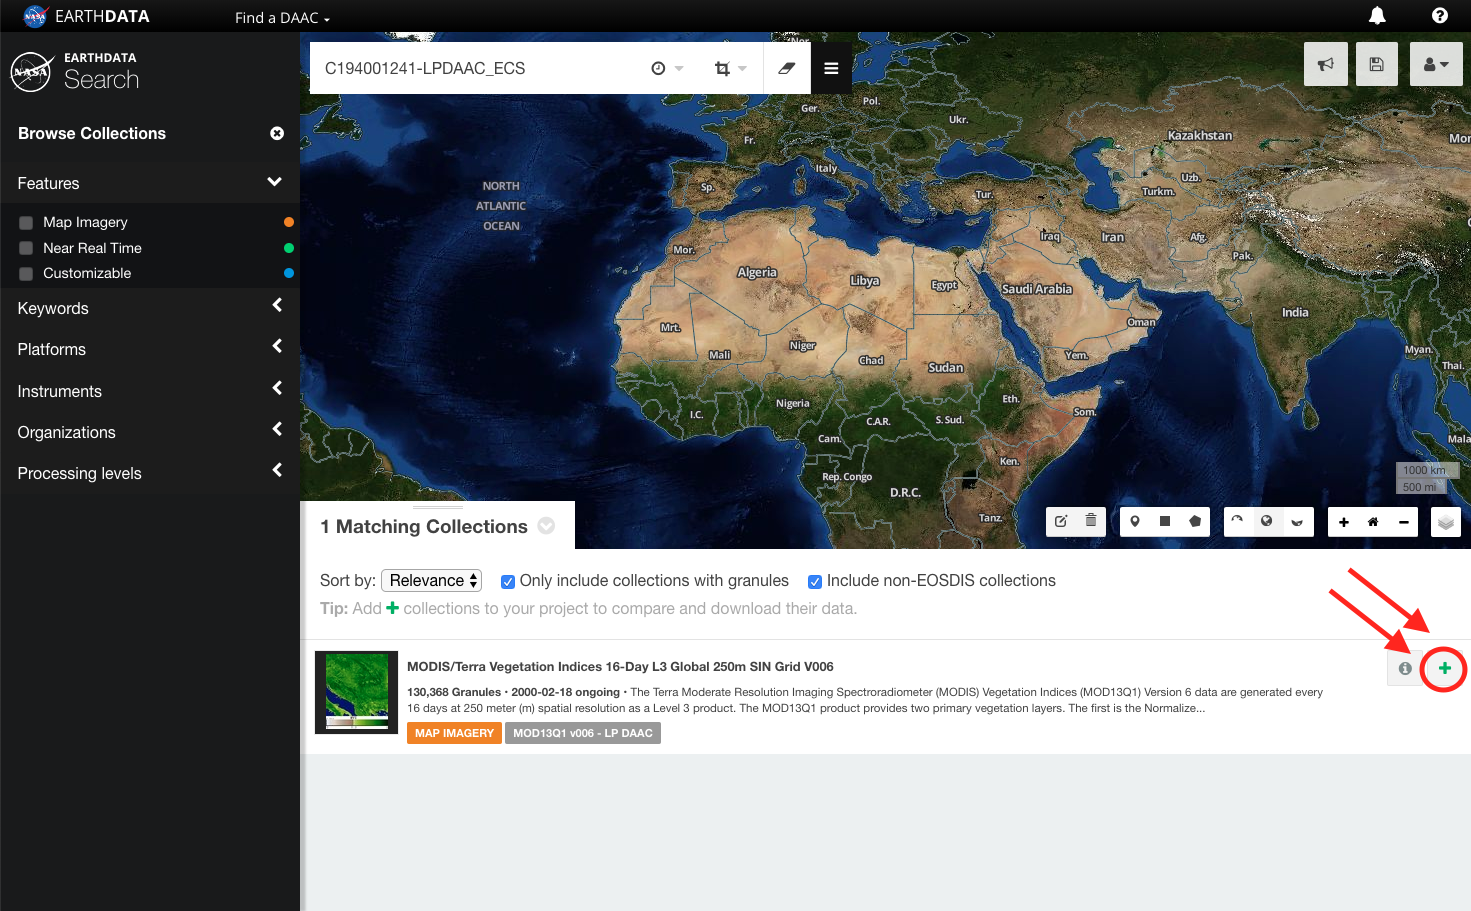
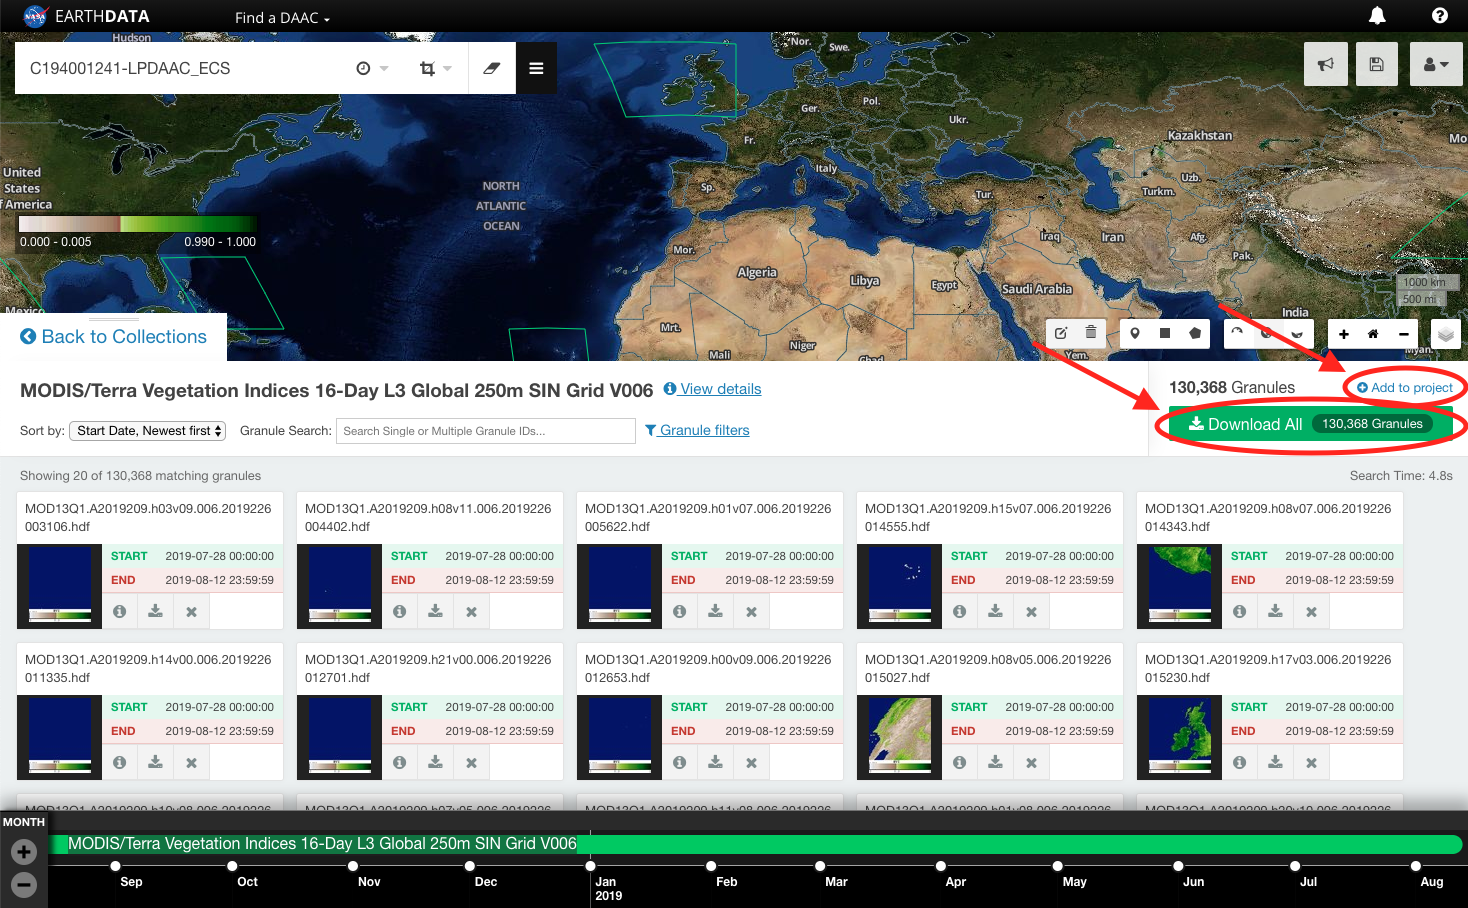
Direct Download- CLICK on a collection to view the granules. Alternatively, CLICK on Add collection to current project to add all of the granules in the collection that match the spatial and temporal restraints to "My Project".
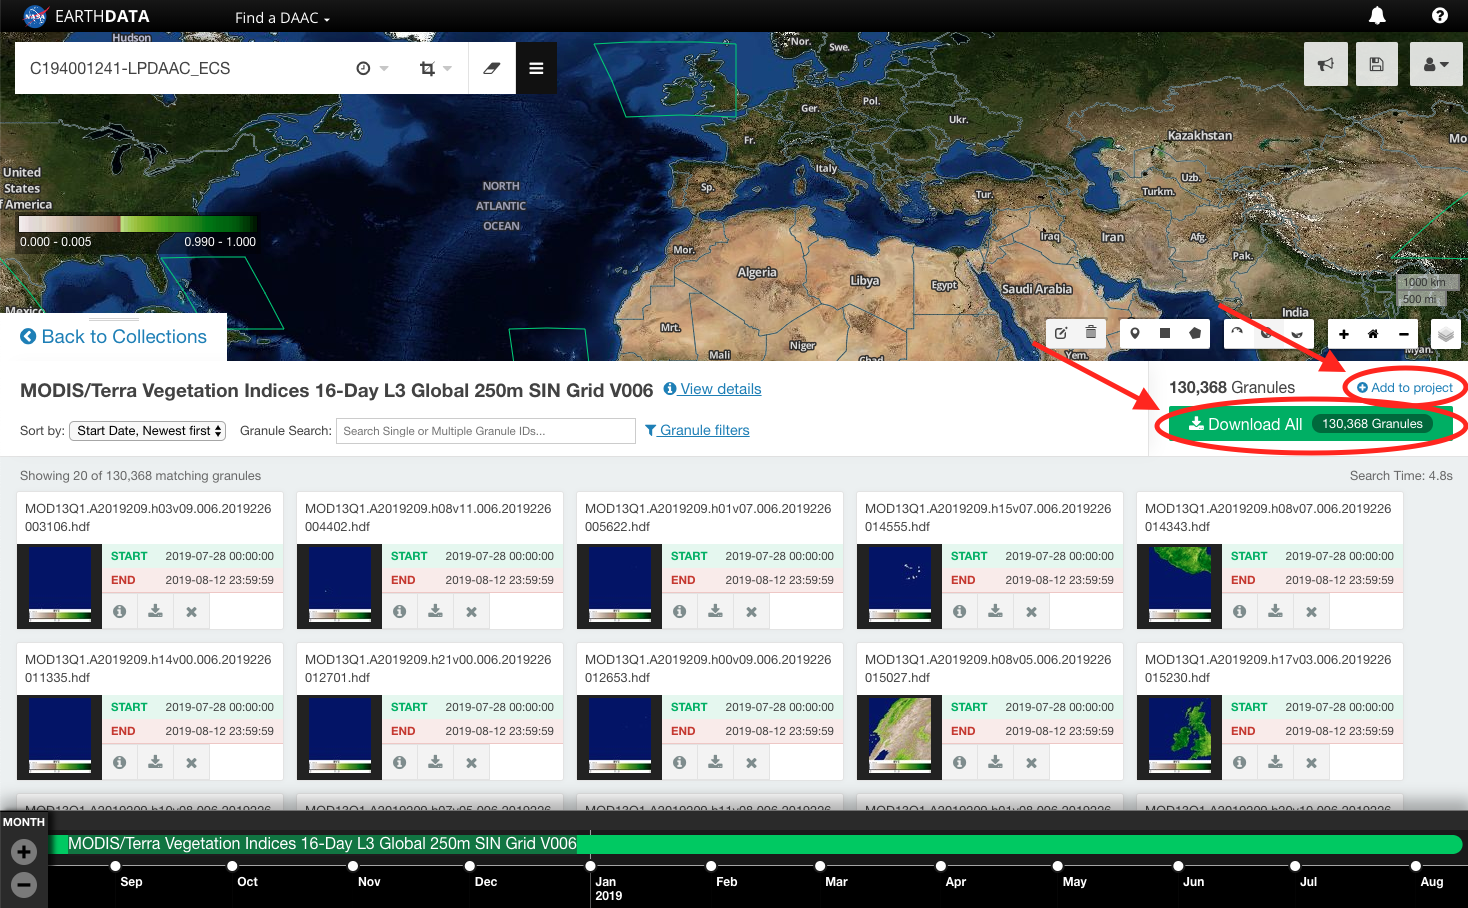
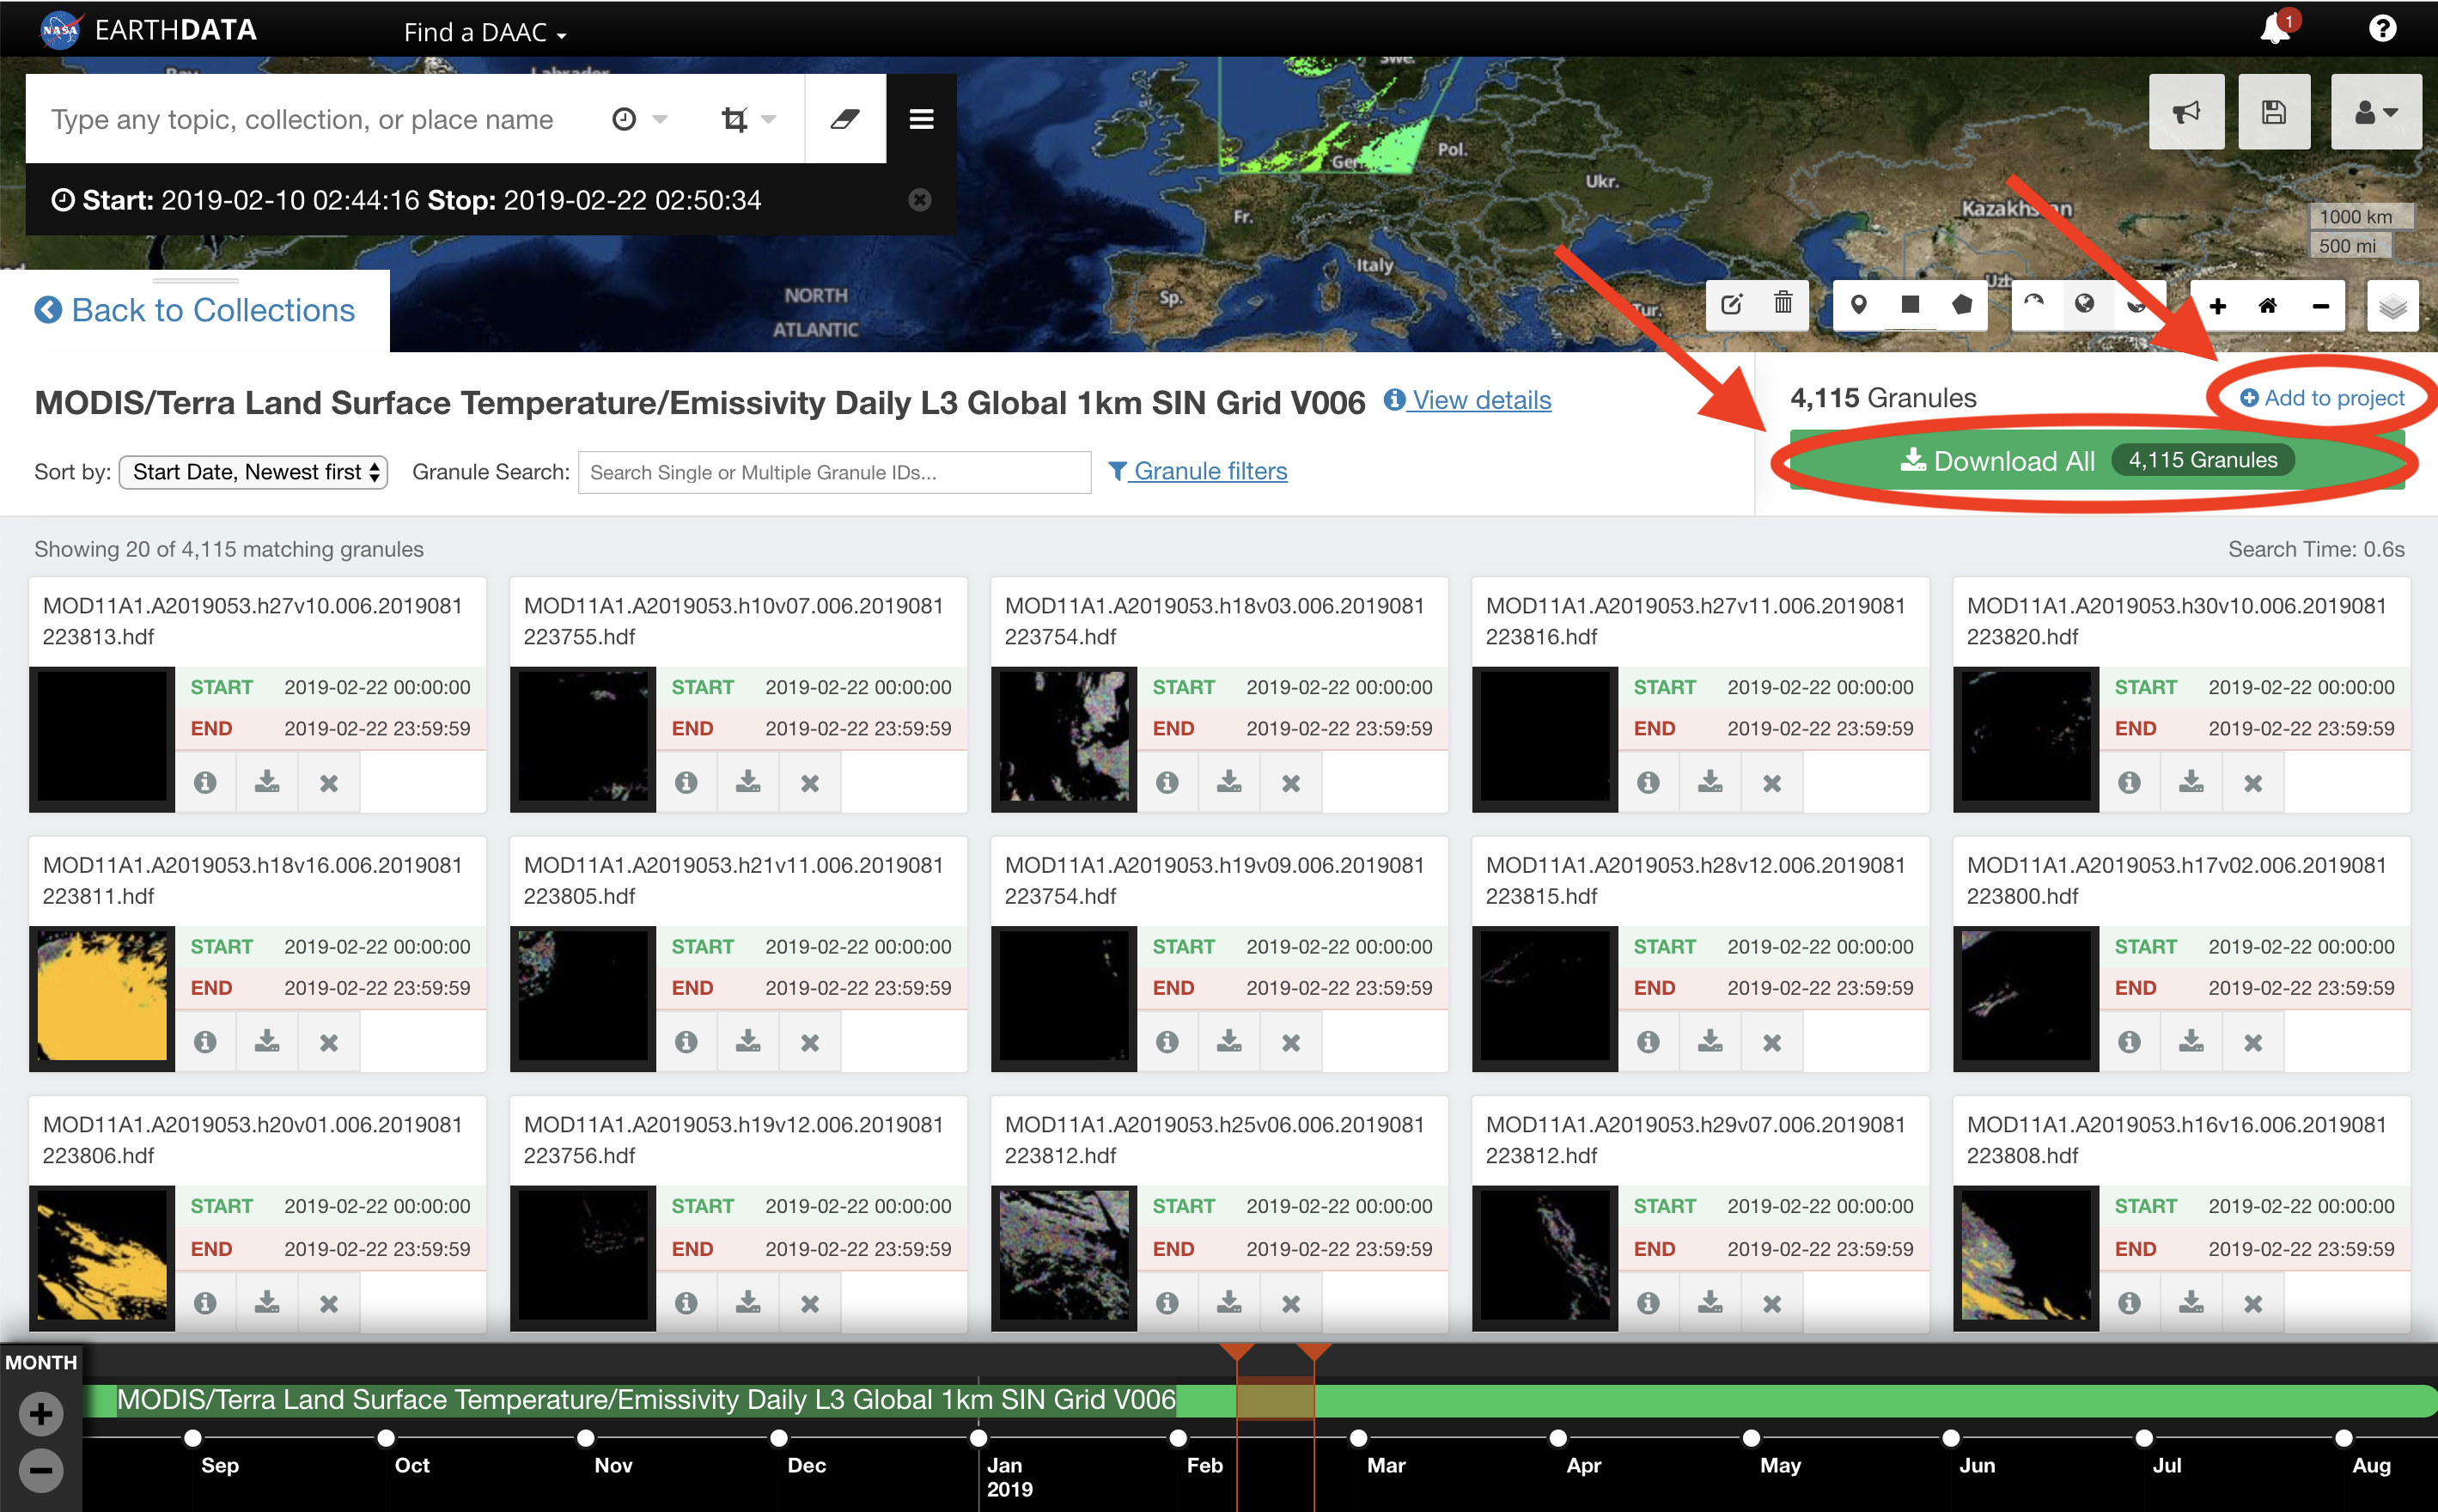
- CLICK on Download All to add all of the collection's matching granules to "My Project".
Alternatively, filter the granules as necessary and CLICK Add to project. Only the granules that match the spatial and temporal filter parameters will be downloaded or added to the project. - REPEAT step 1 and step 2 as necessary to add additional collections and/or granules to "My Project".
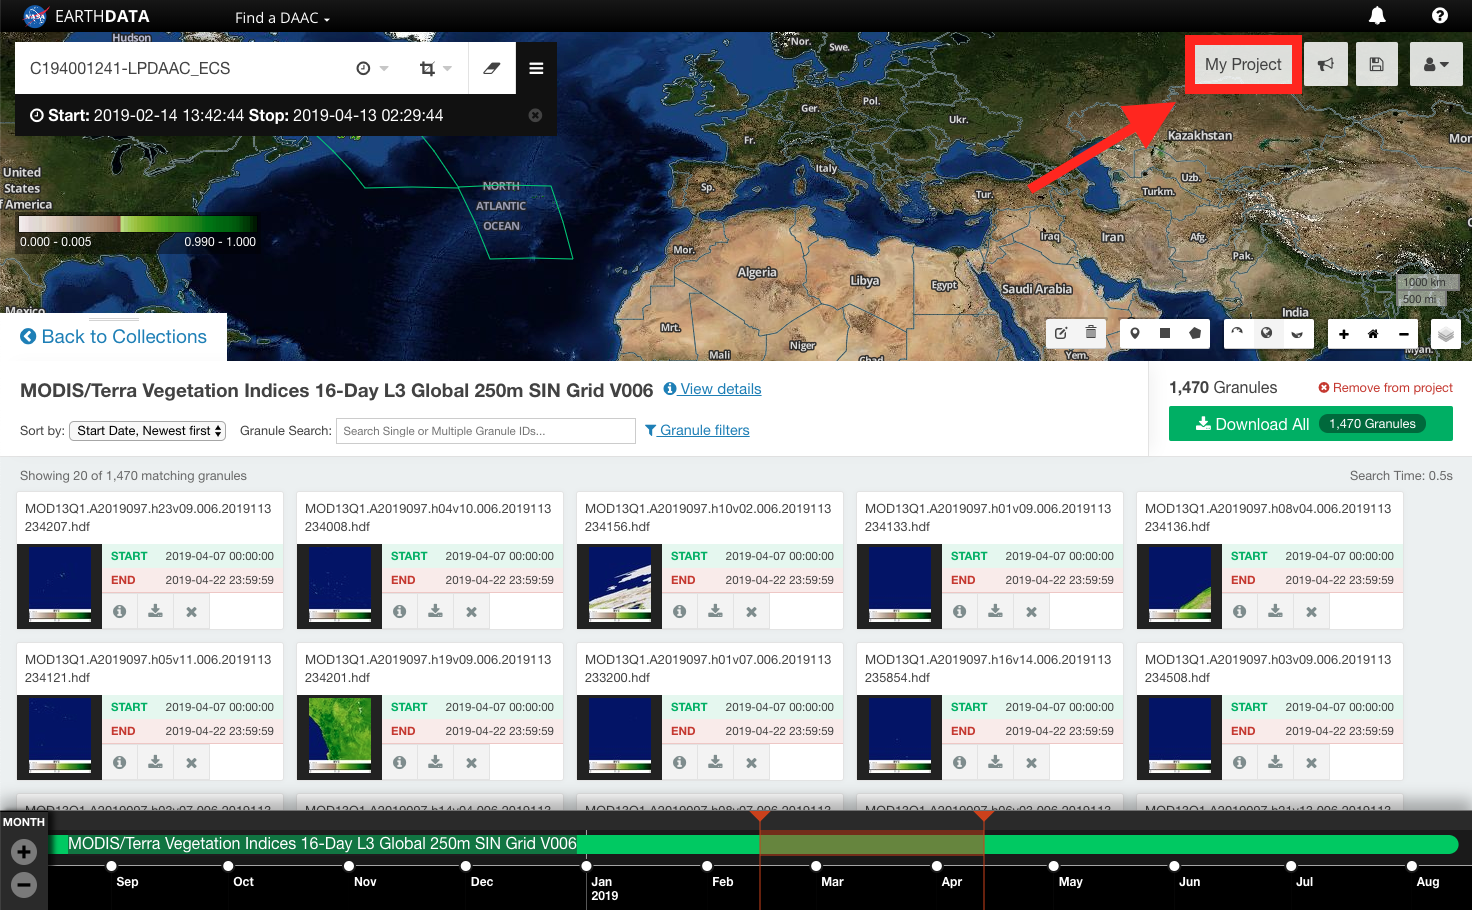
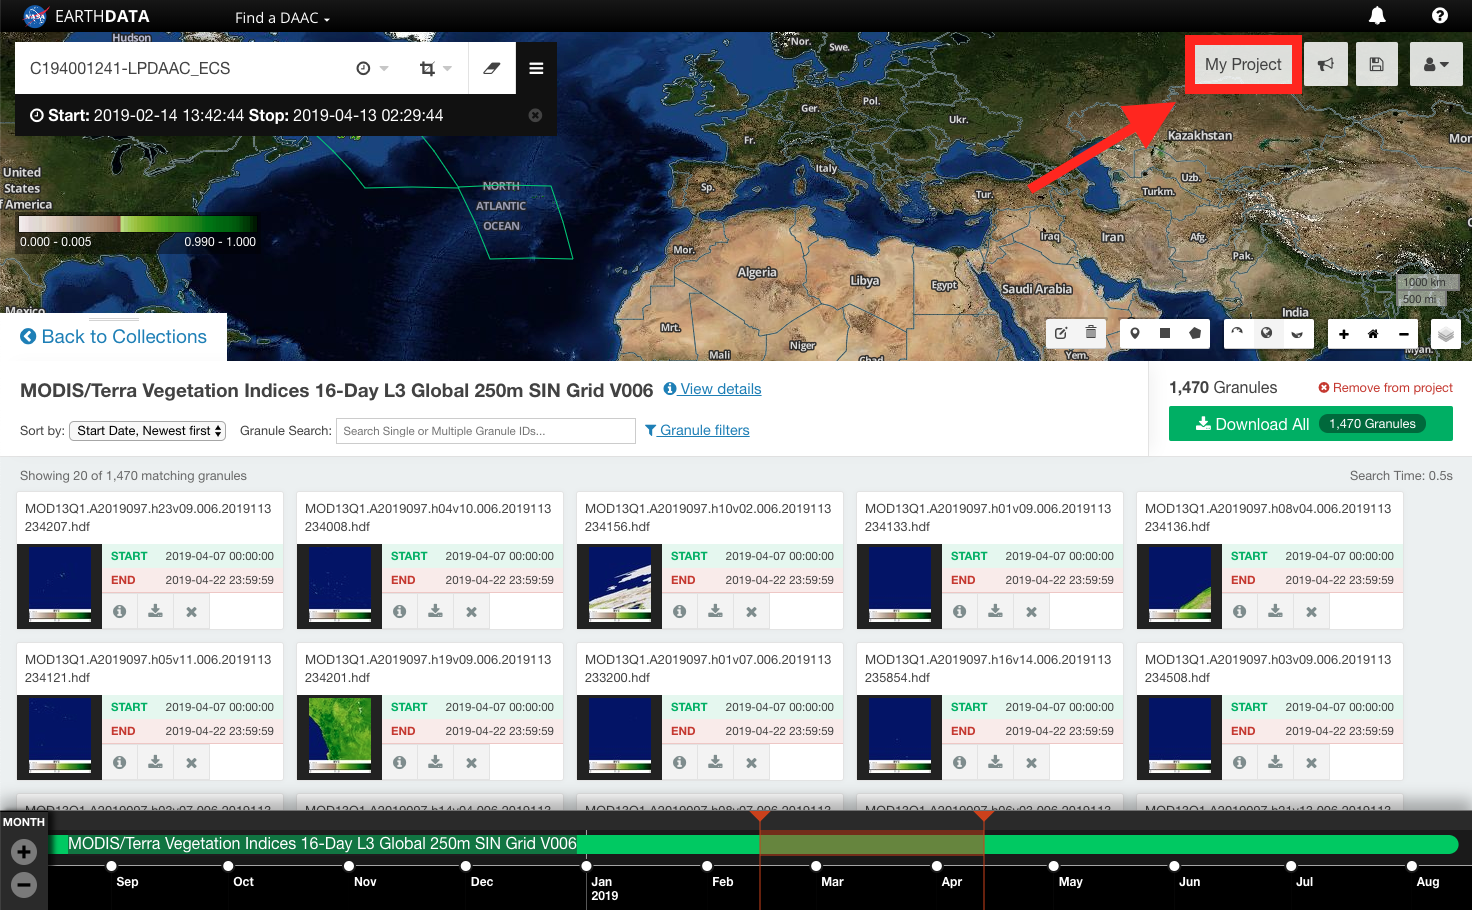
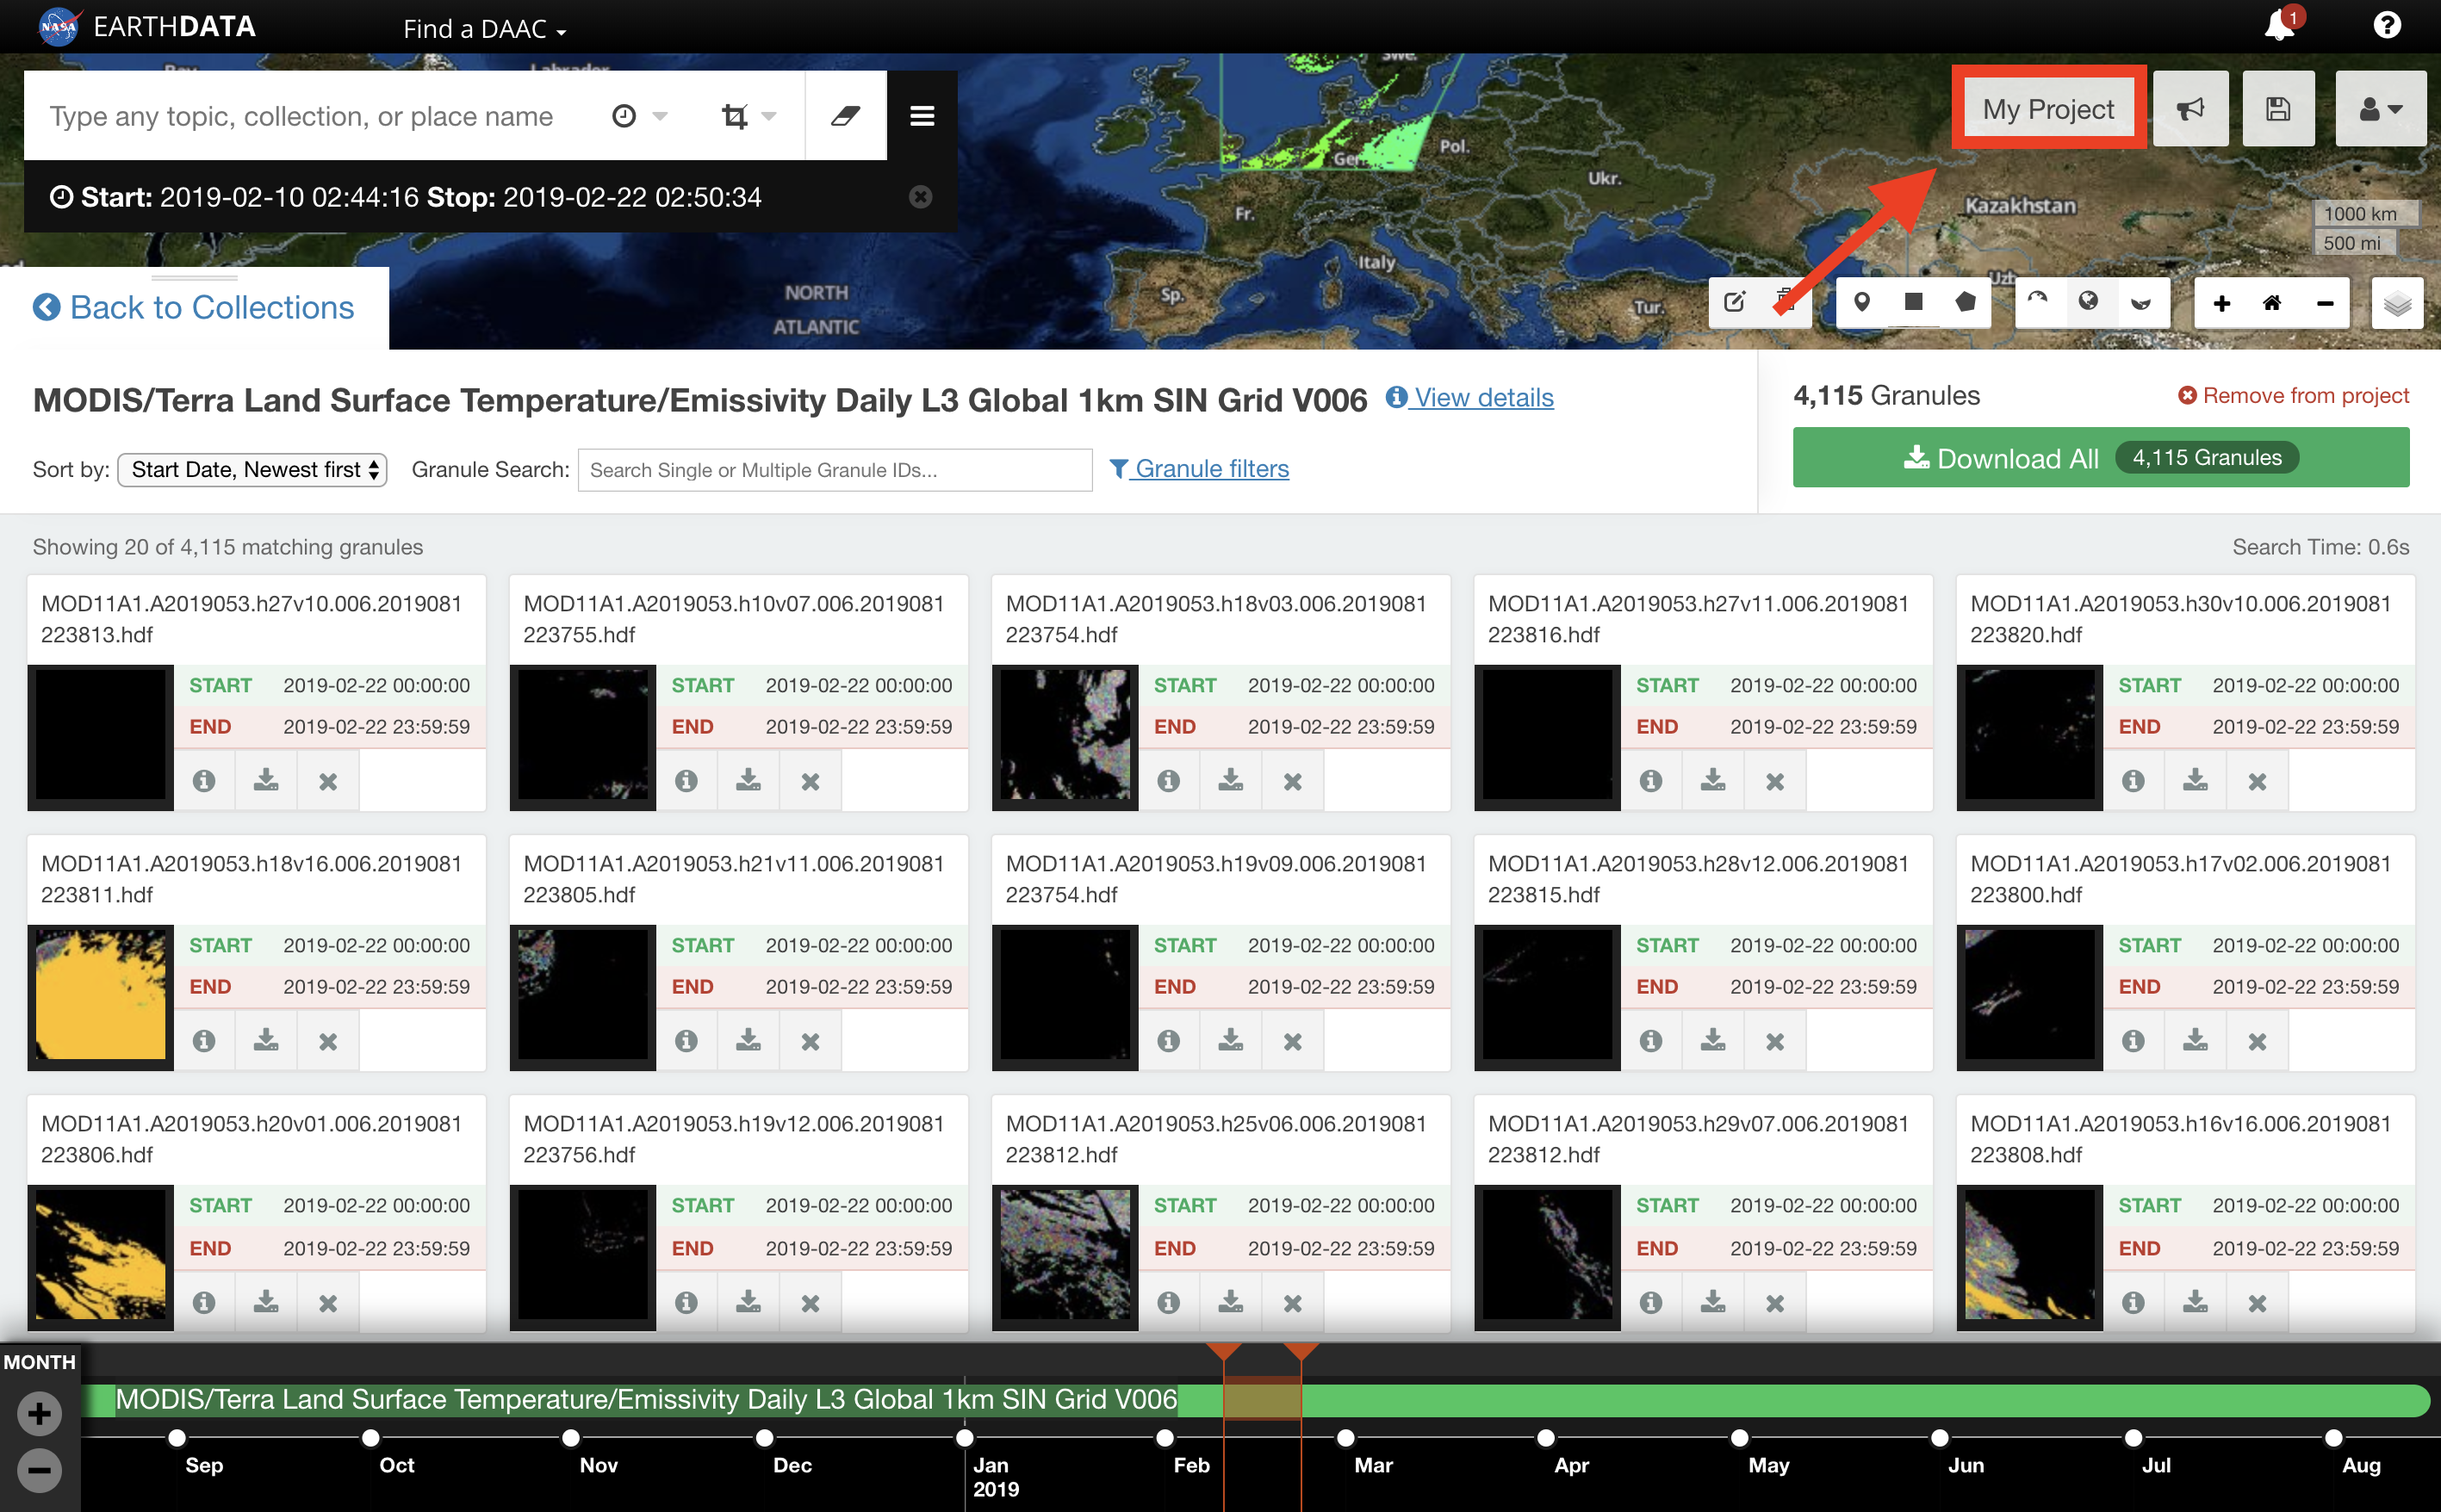
- CLICK on My Project to view download options.
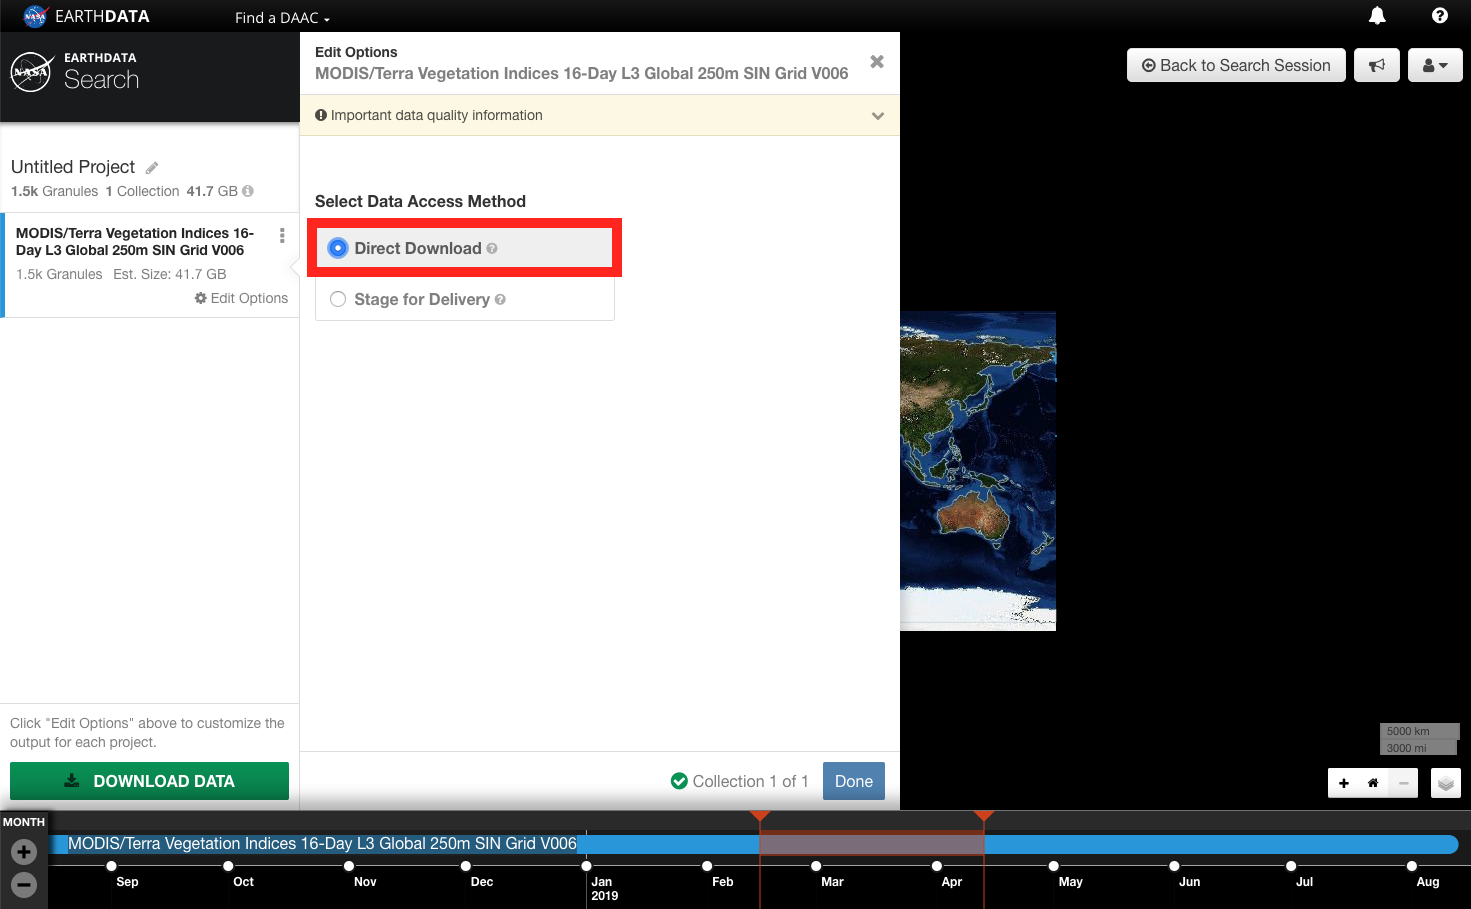
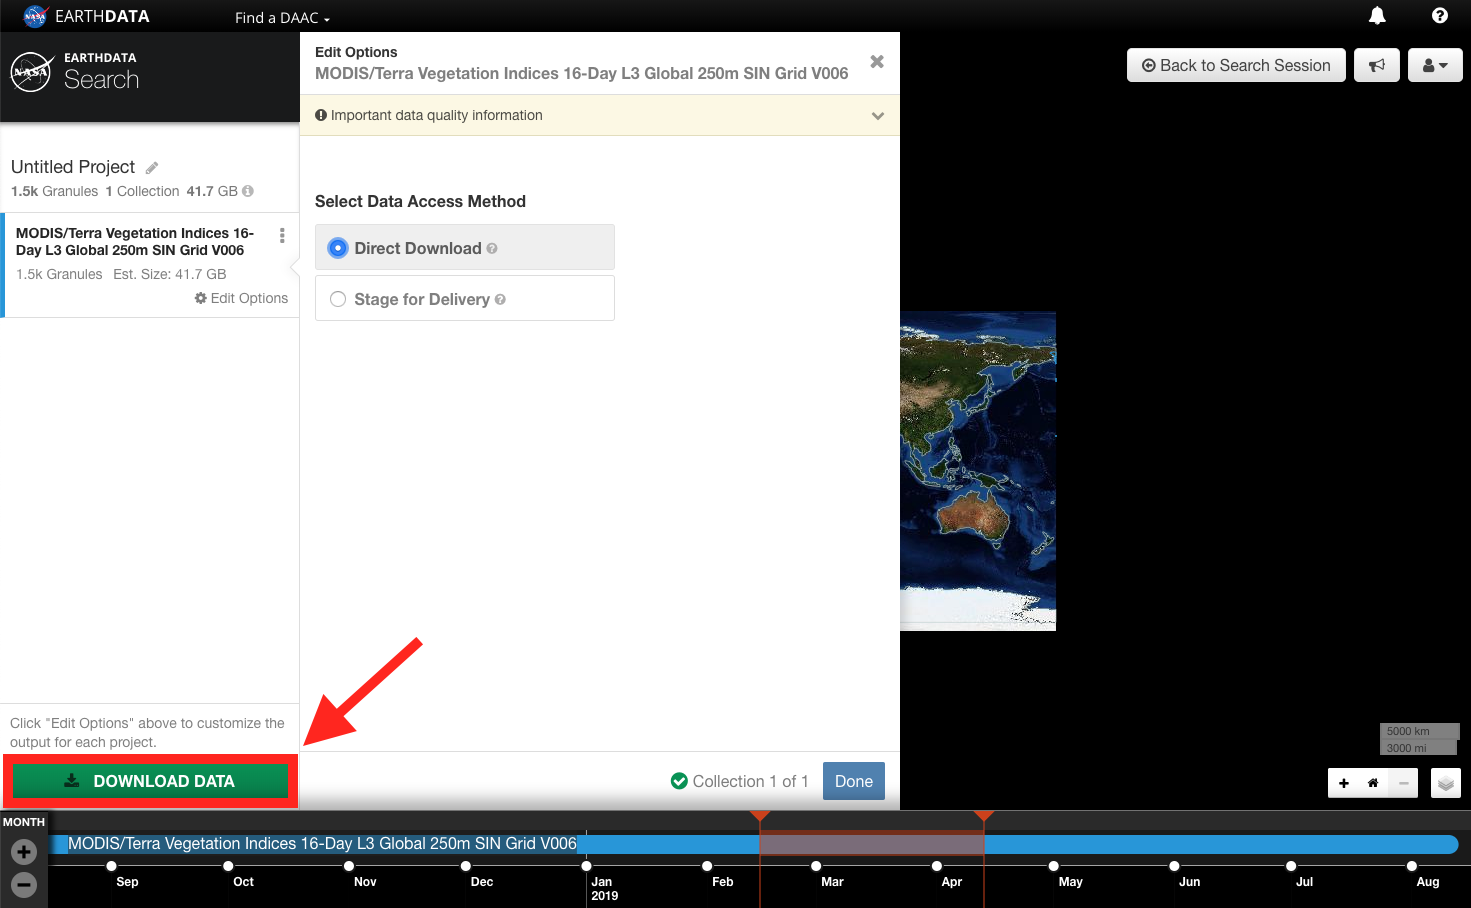
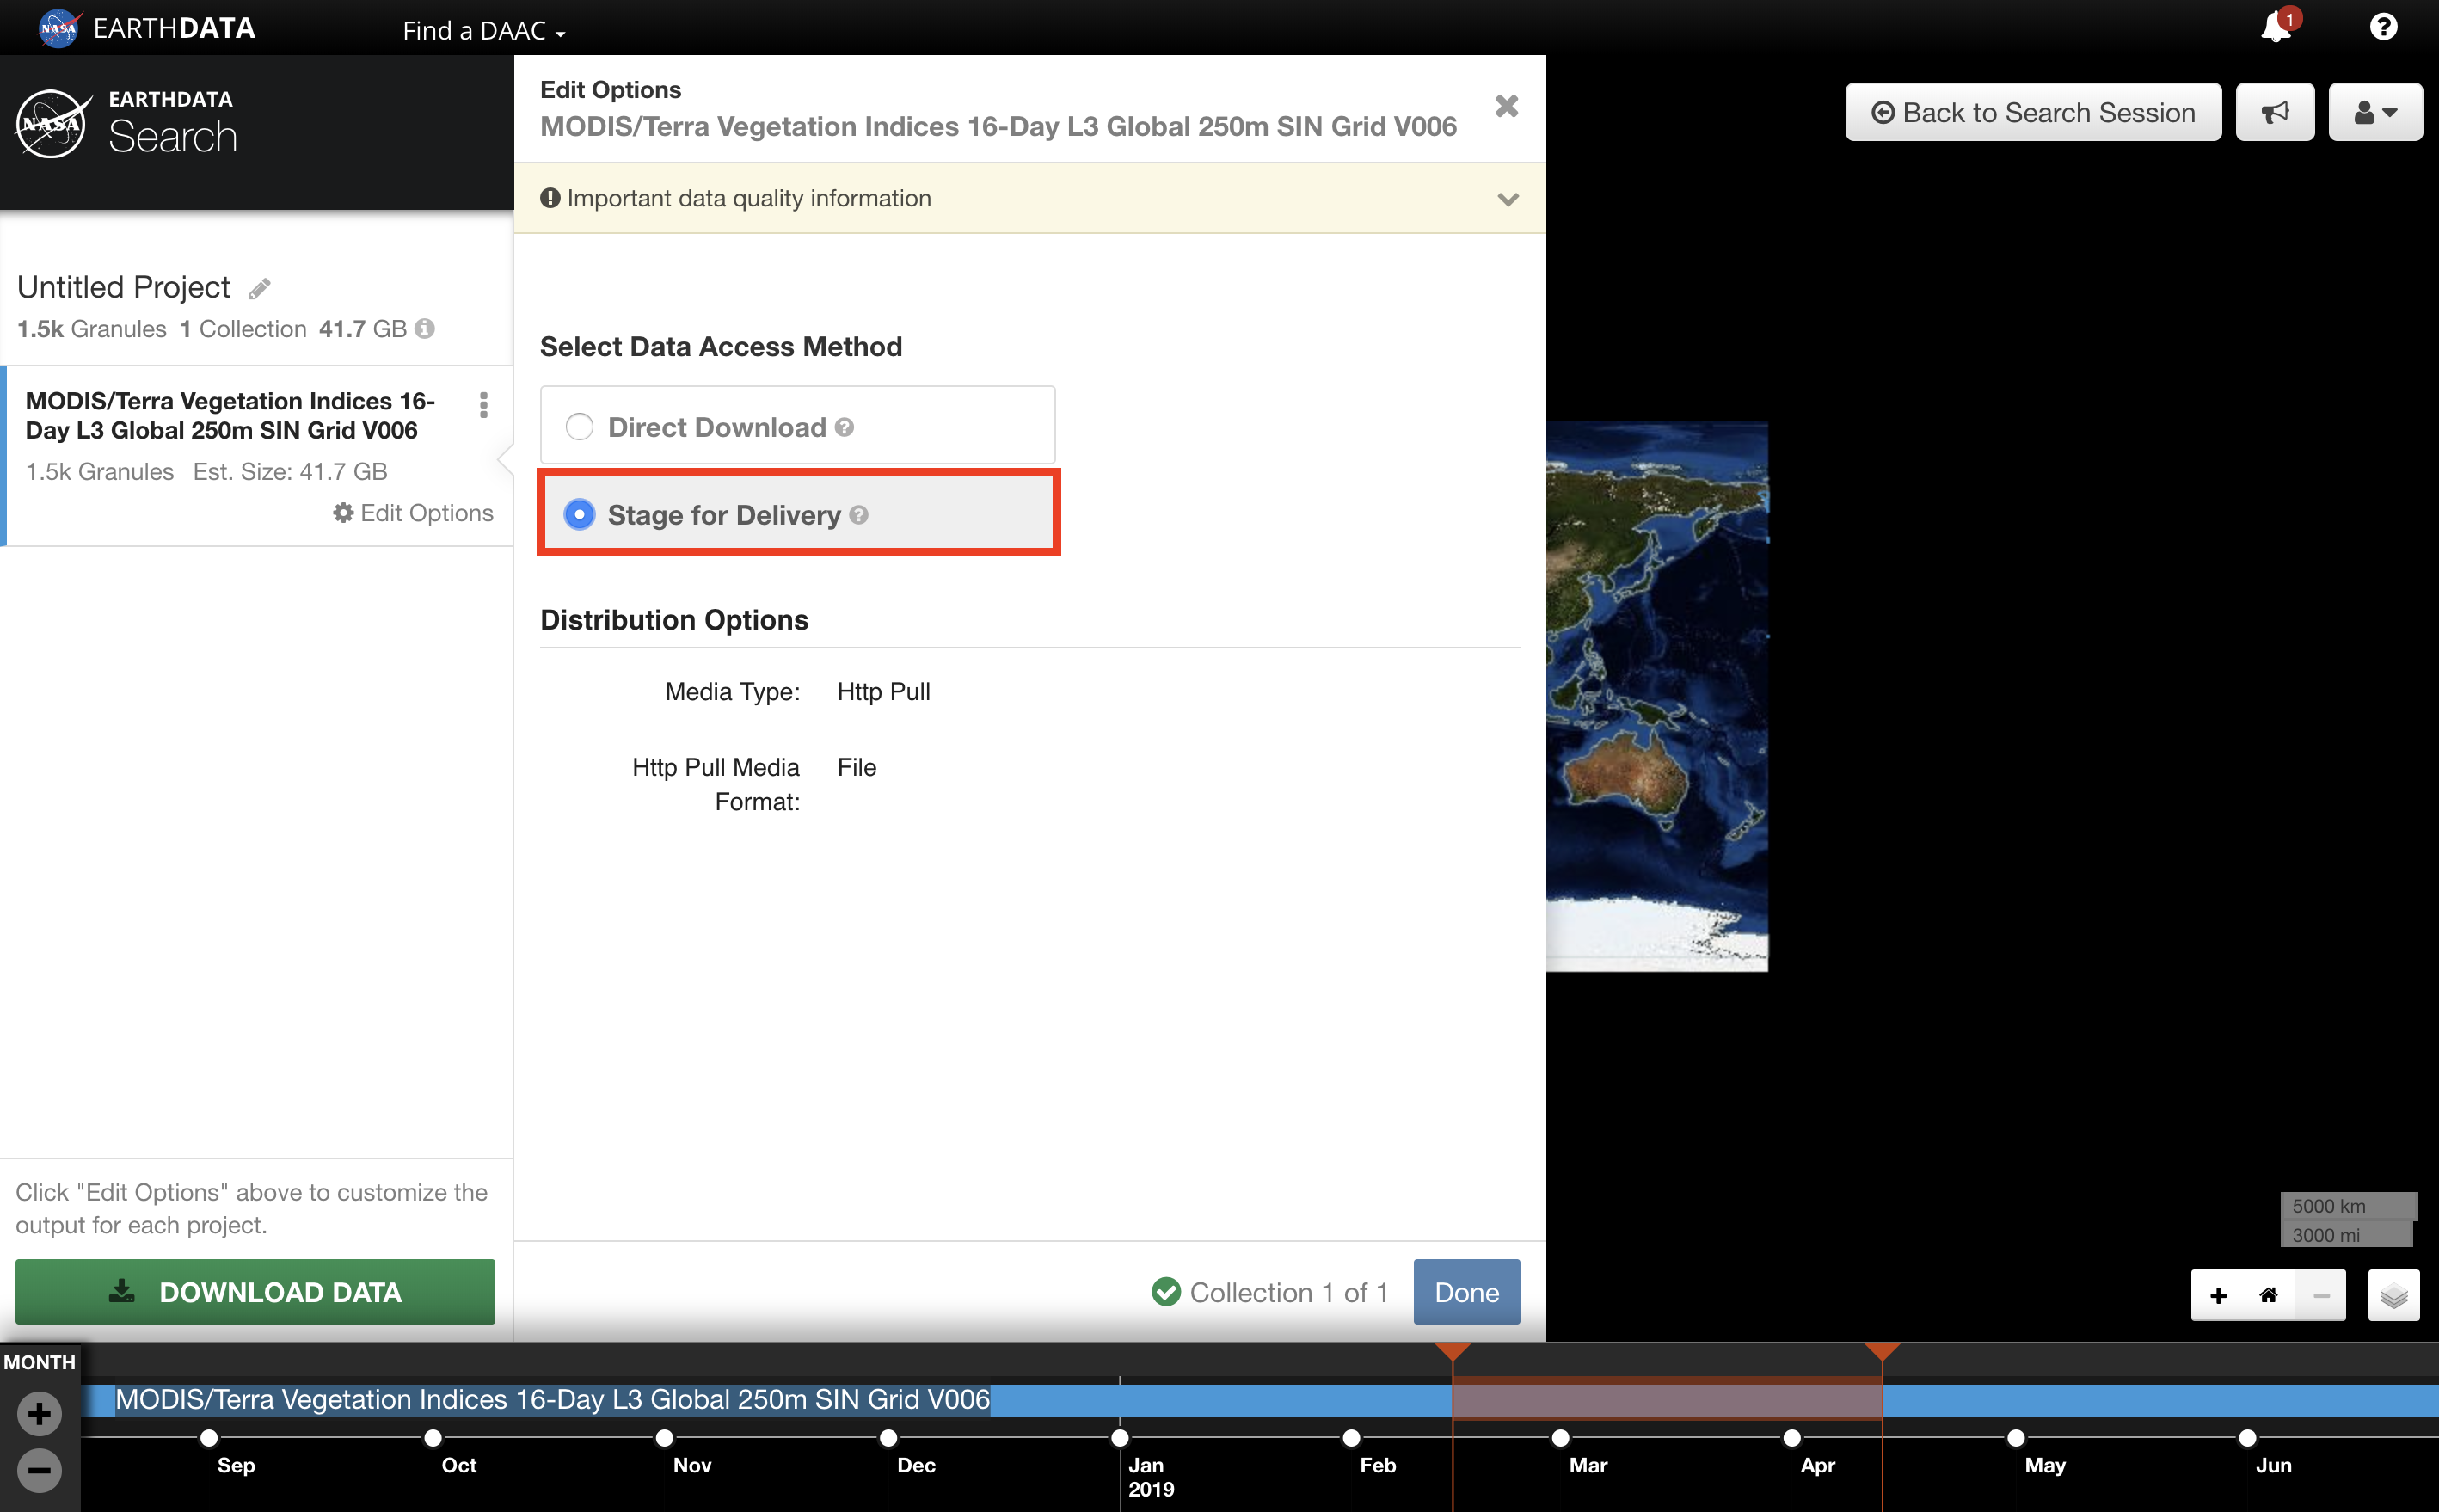
- CLICK on Direct Download.
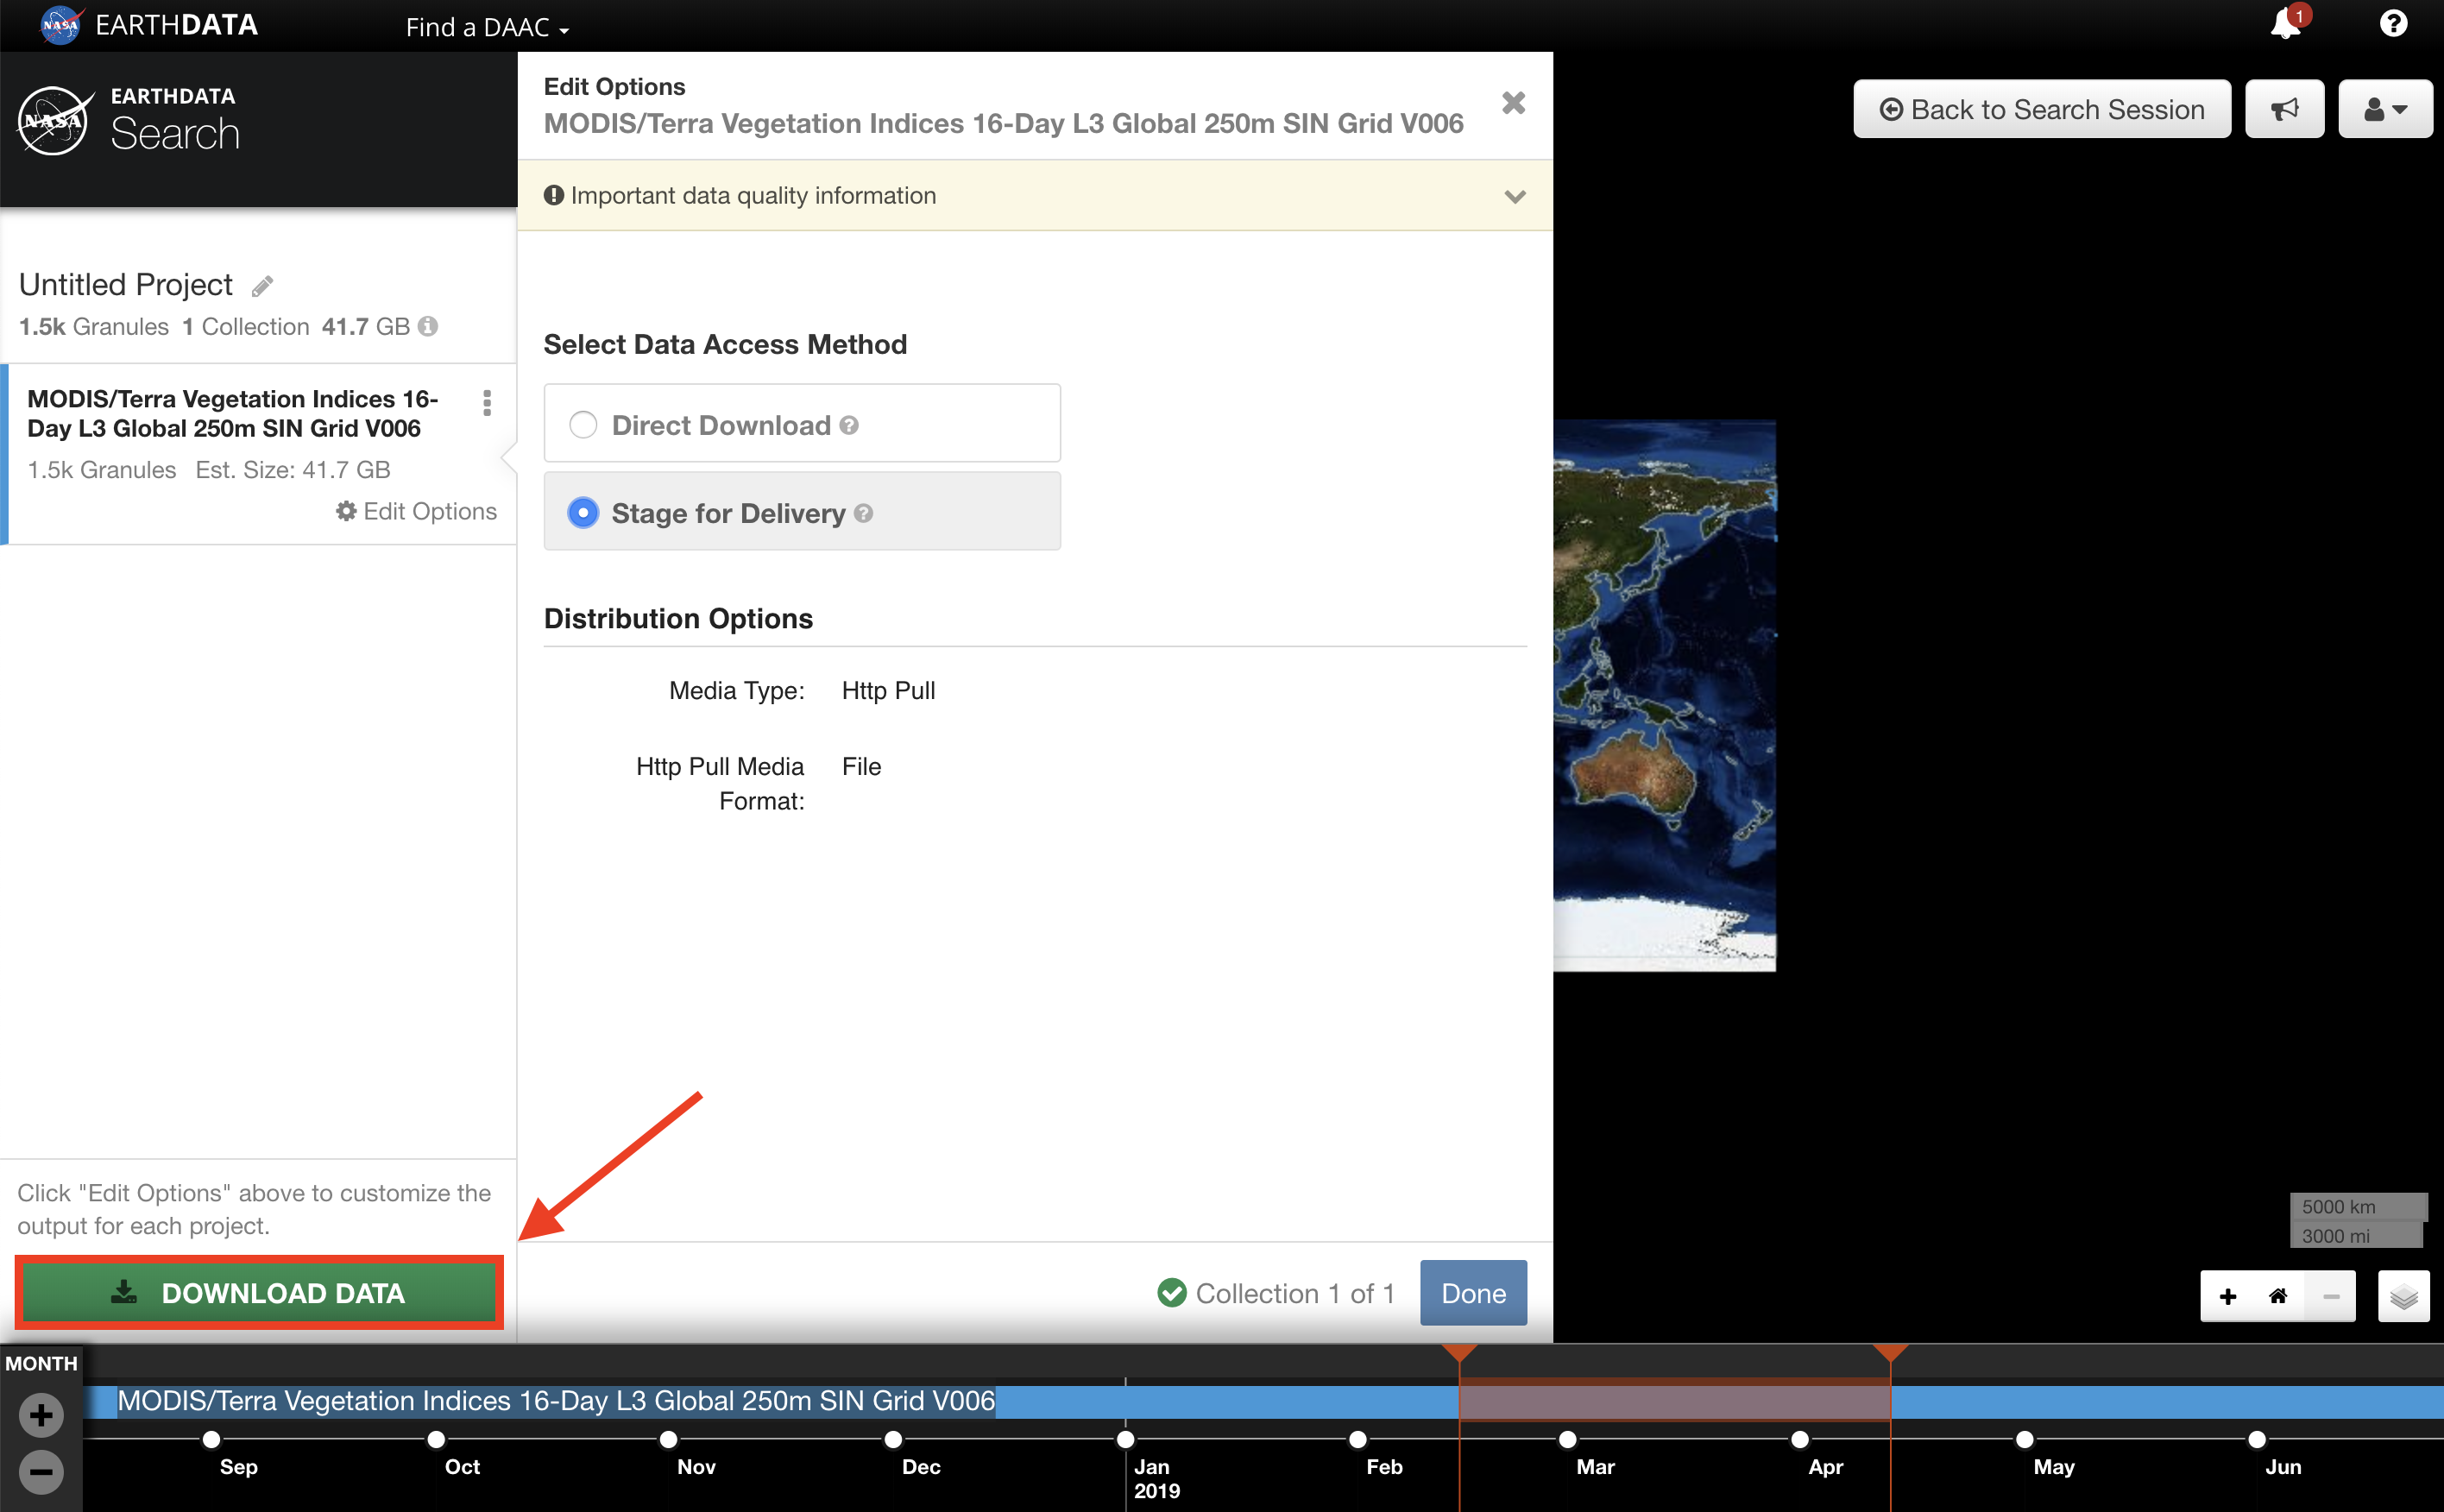
- CLICK on DOWNLOAD DATA.
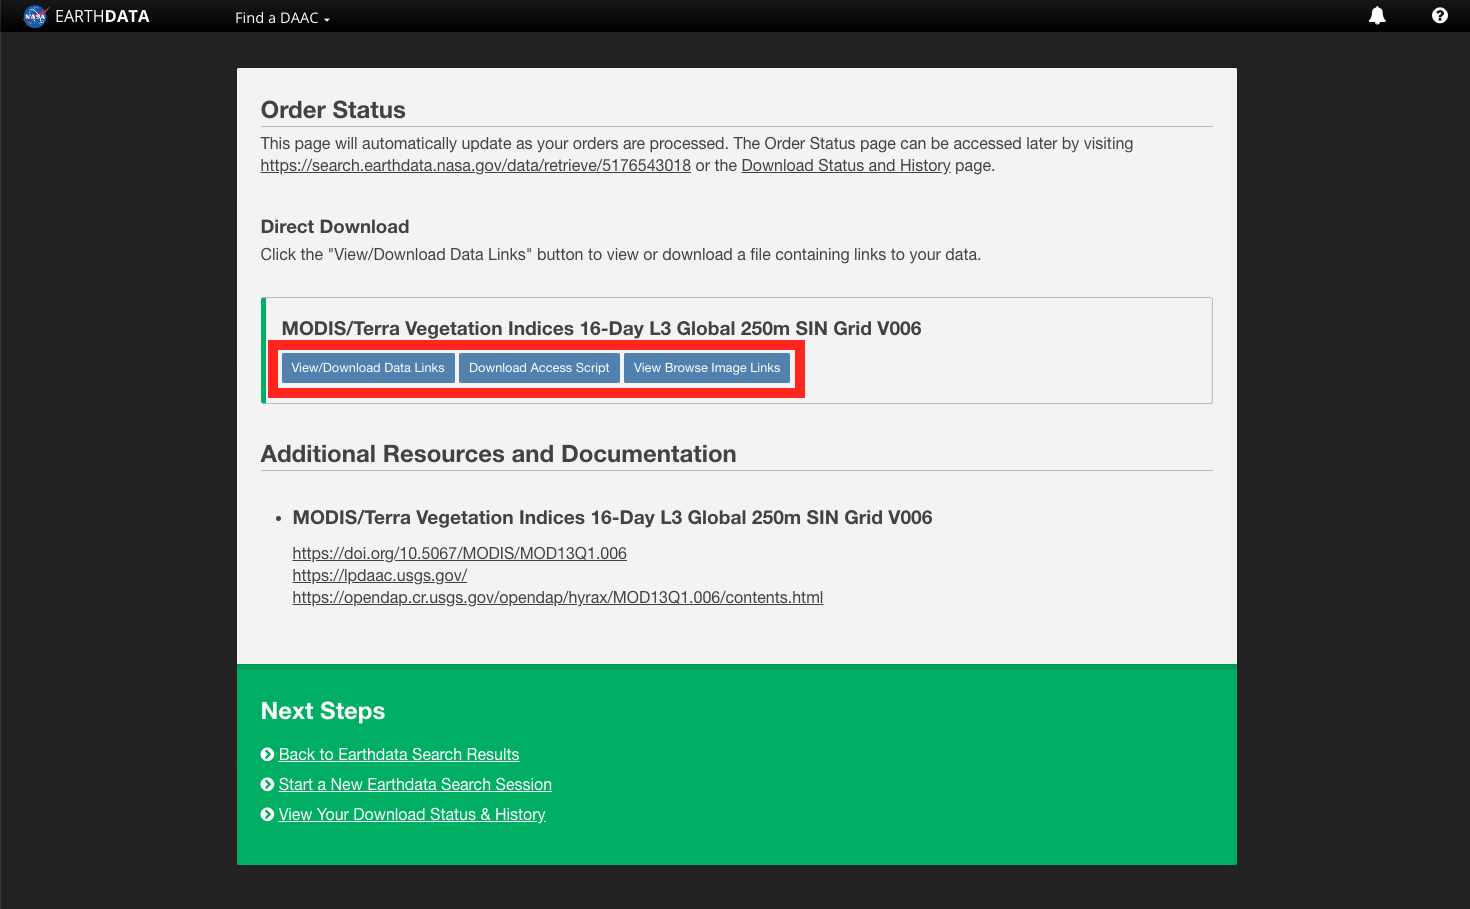
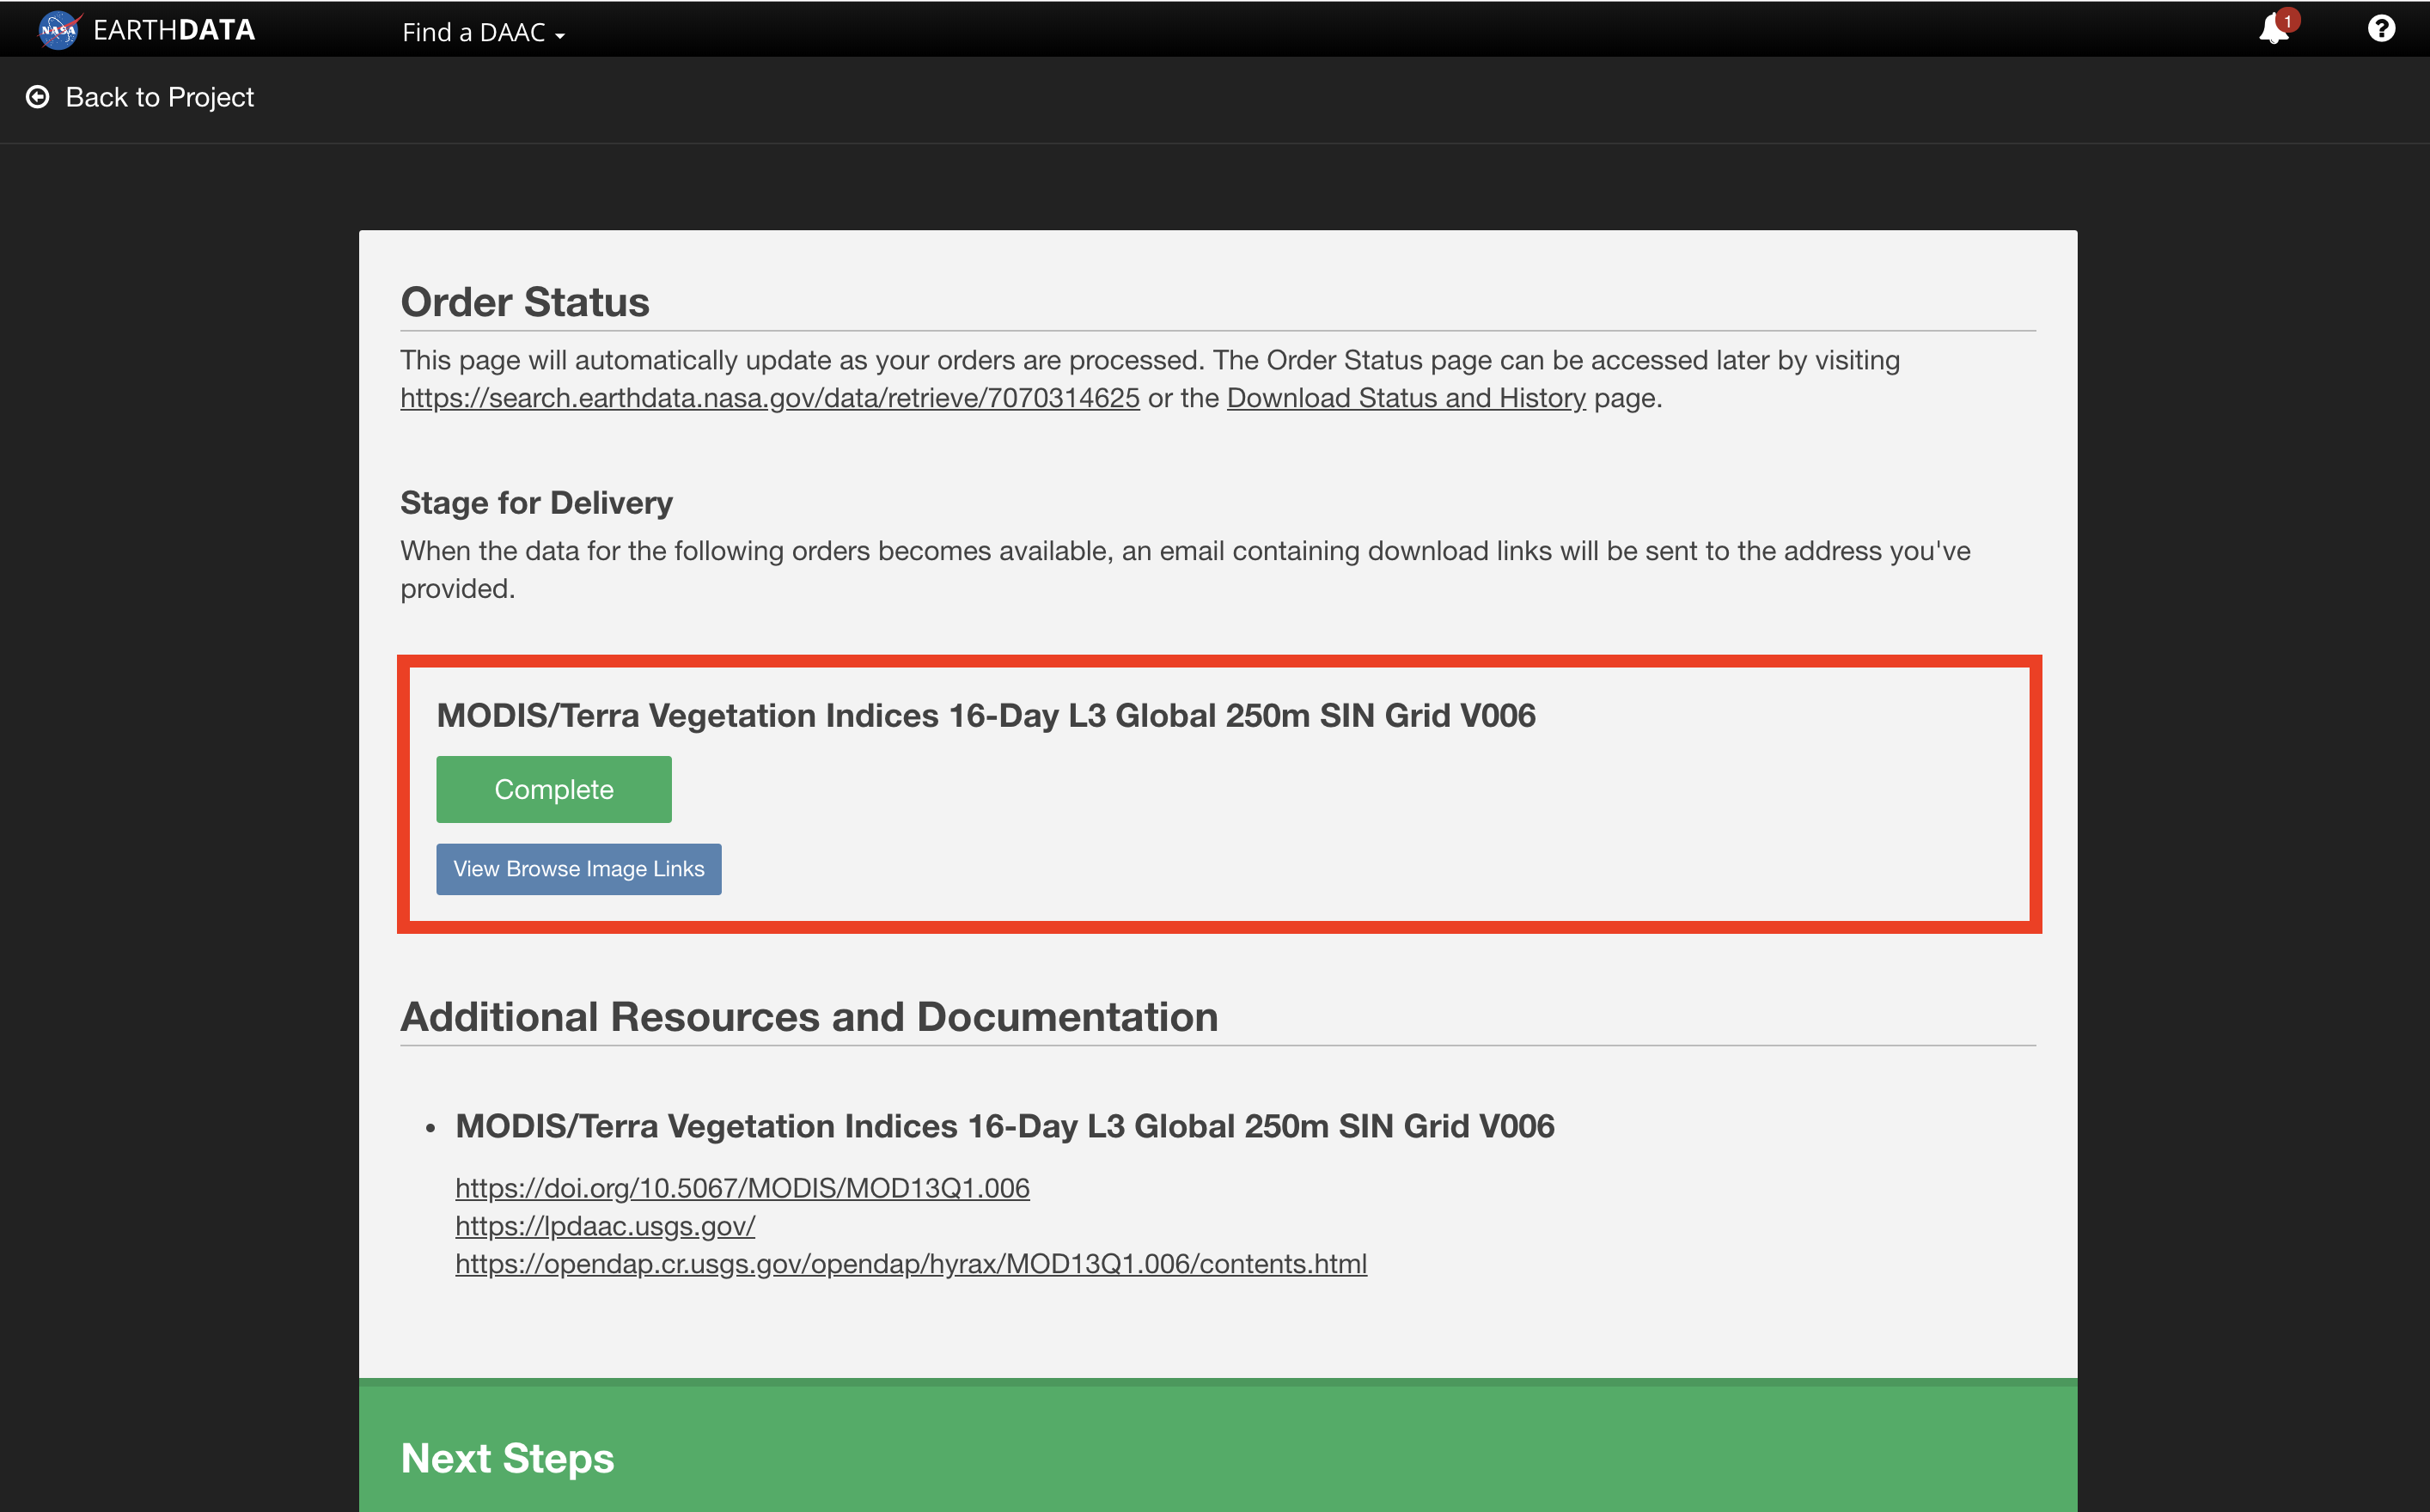
- The "Order Status" page will appear. CLICK on View/Download Data Links, Download Access Script, or View Browse Image Links to download the data.
To download a large number of files, use the download access script. FOr additional information, view the How to Use the Download Access Script section.
Stage for Delivery
Stage for Delivery- CLICK on a collection to view the granules. Alternatively, CLICK on Add collection to current project to add all of the granules in the collection to "My Project".
- CLICK on Download All to add all of the collection's granules to "My Project". Alternatively, filter the granules as necessary and CLICK Add to project.
- REPEAT step 1 and step 2 as necessary to add additional collections and/or granules to "My Project".
- CLICK on My Project to view download options.
- CLICK on Stage for Delivery
- CLICK on DOWNLOAD DATA
- The 'Order Status' page will appear. The 'Order Status' page will update the status of the Stage for Delivery order as it processes. When the data is ready to download the user will receive an email from the data provider, and the 'Order Status' page will list the order as Complete.
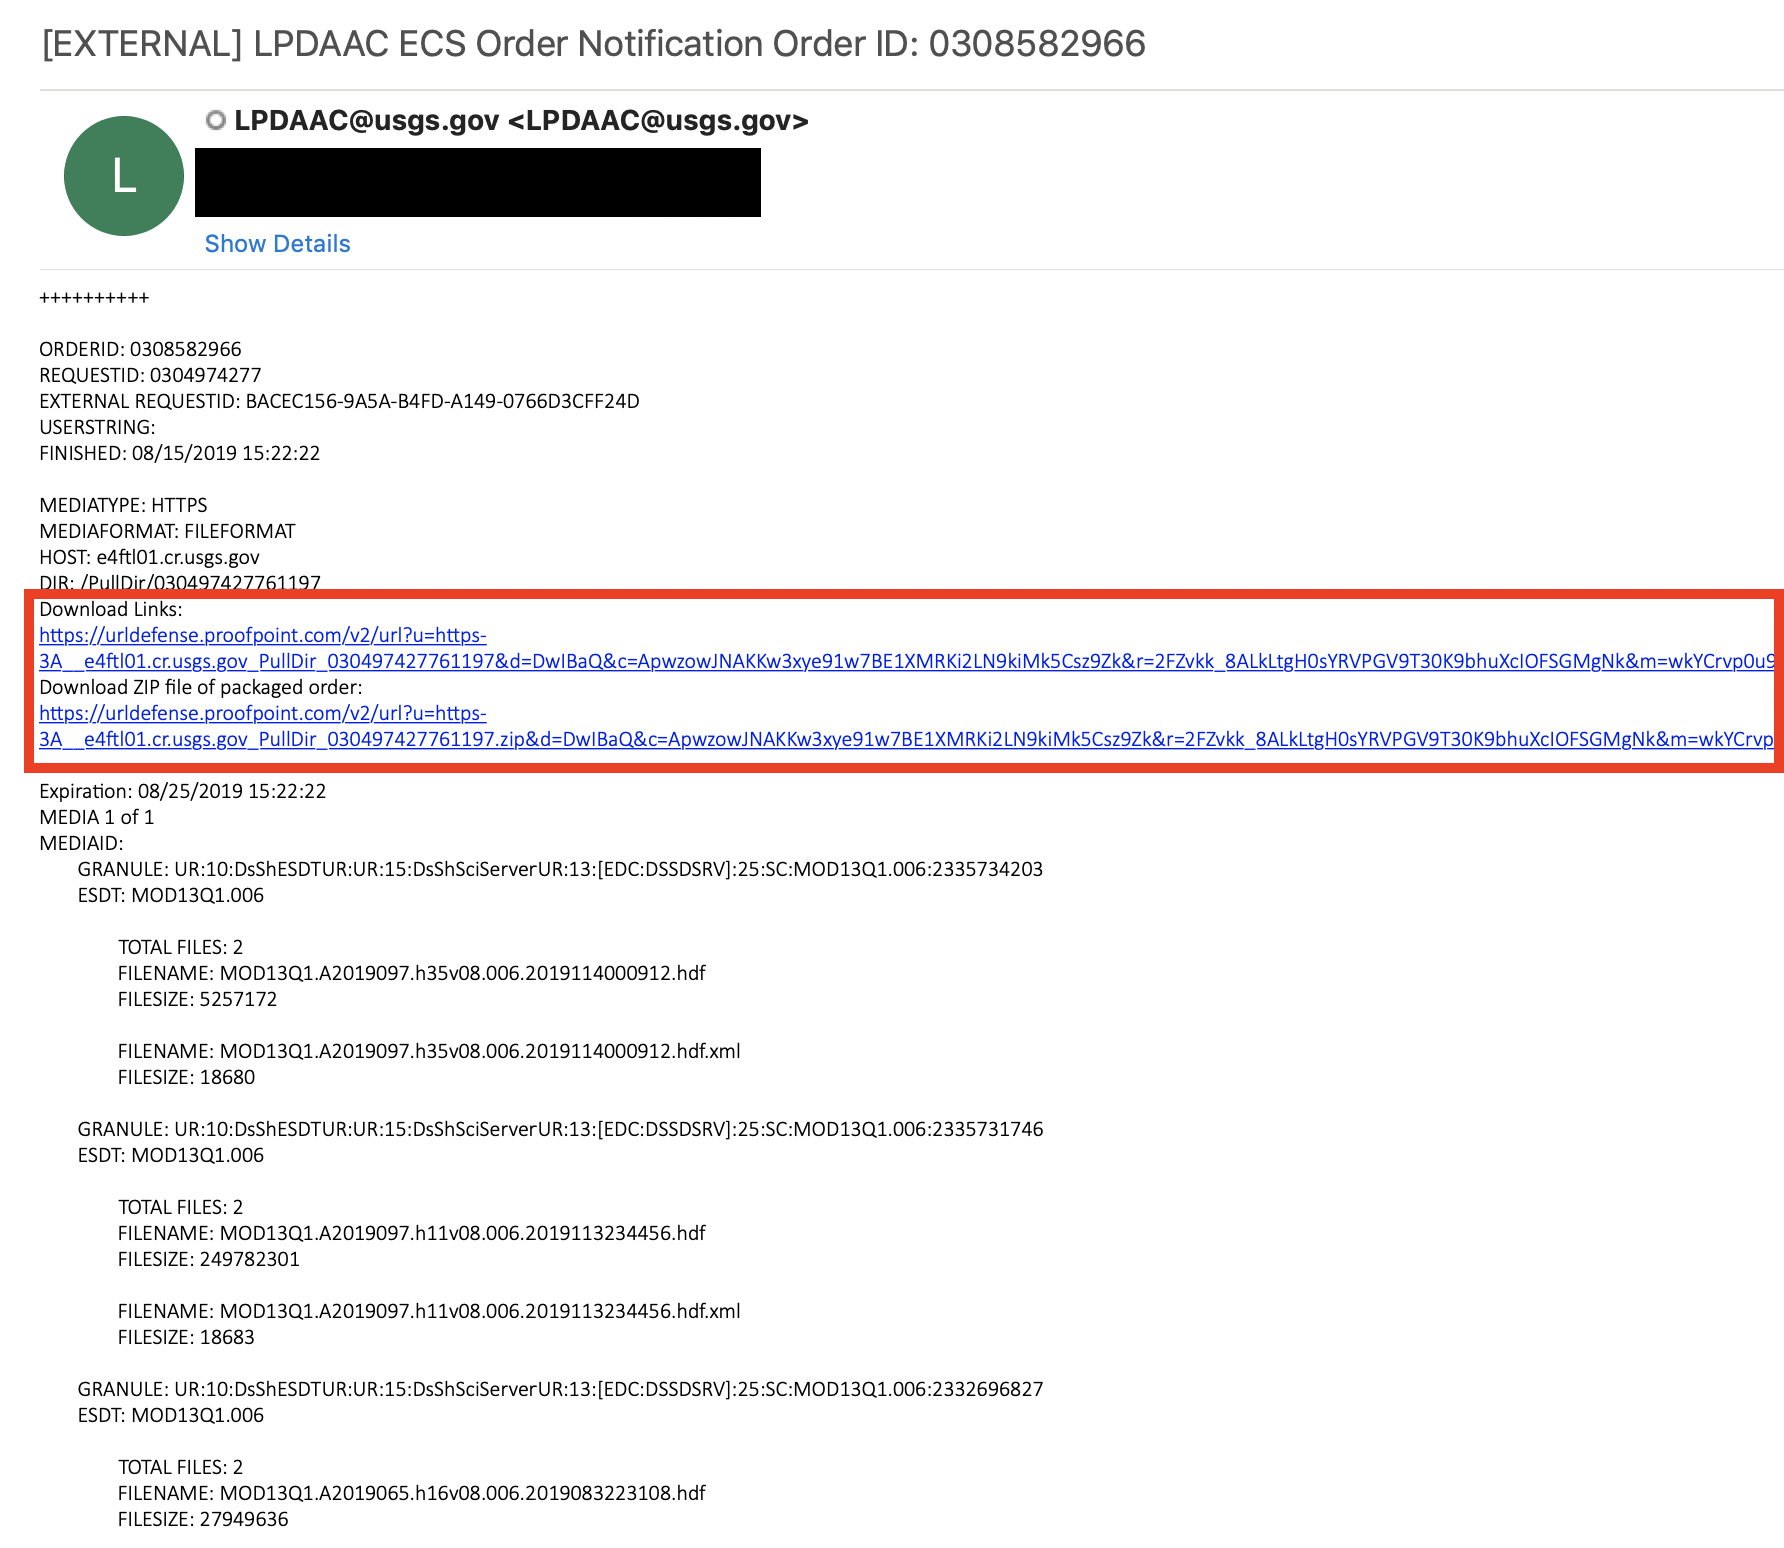
- Once the order is complete, the data will be delivered to the email address provided. The email will be from the data provider. ACCESS the downloaded data via email.
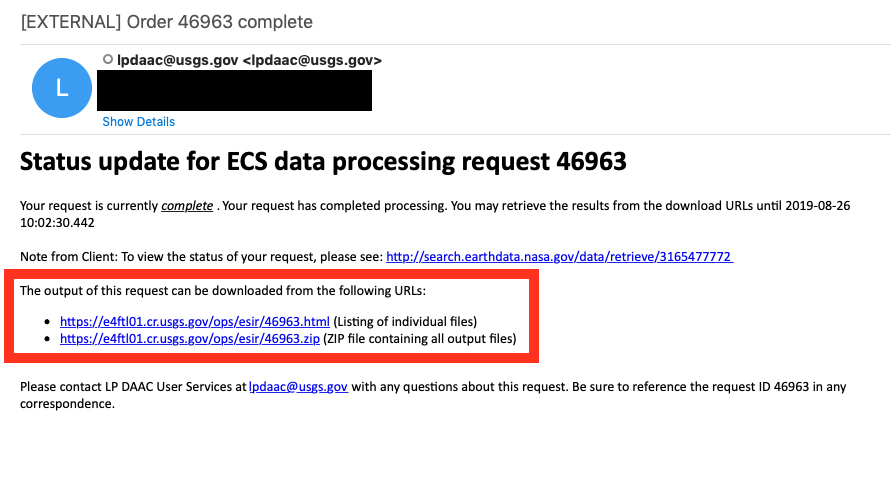
- CLICK on either the Download Links or the Download ZIP file of packaged order links within the email.
Customized
Customized- FIND a collection that supports customization.
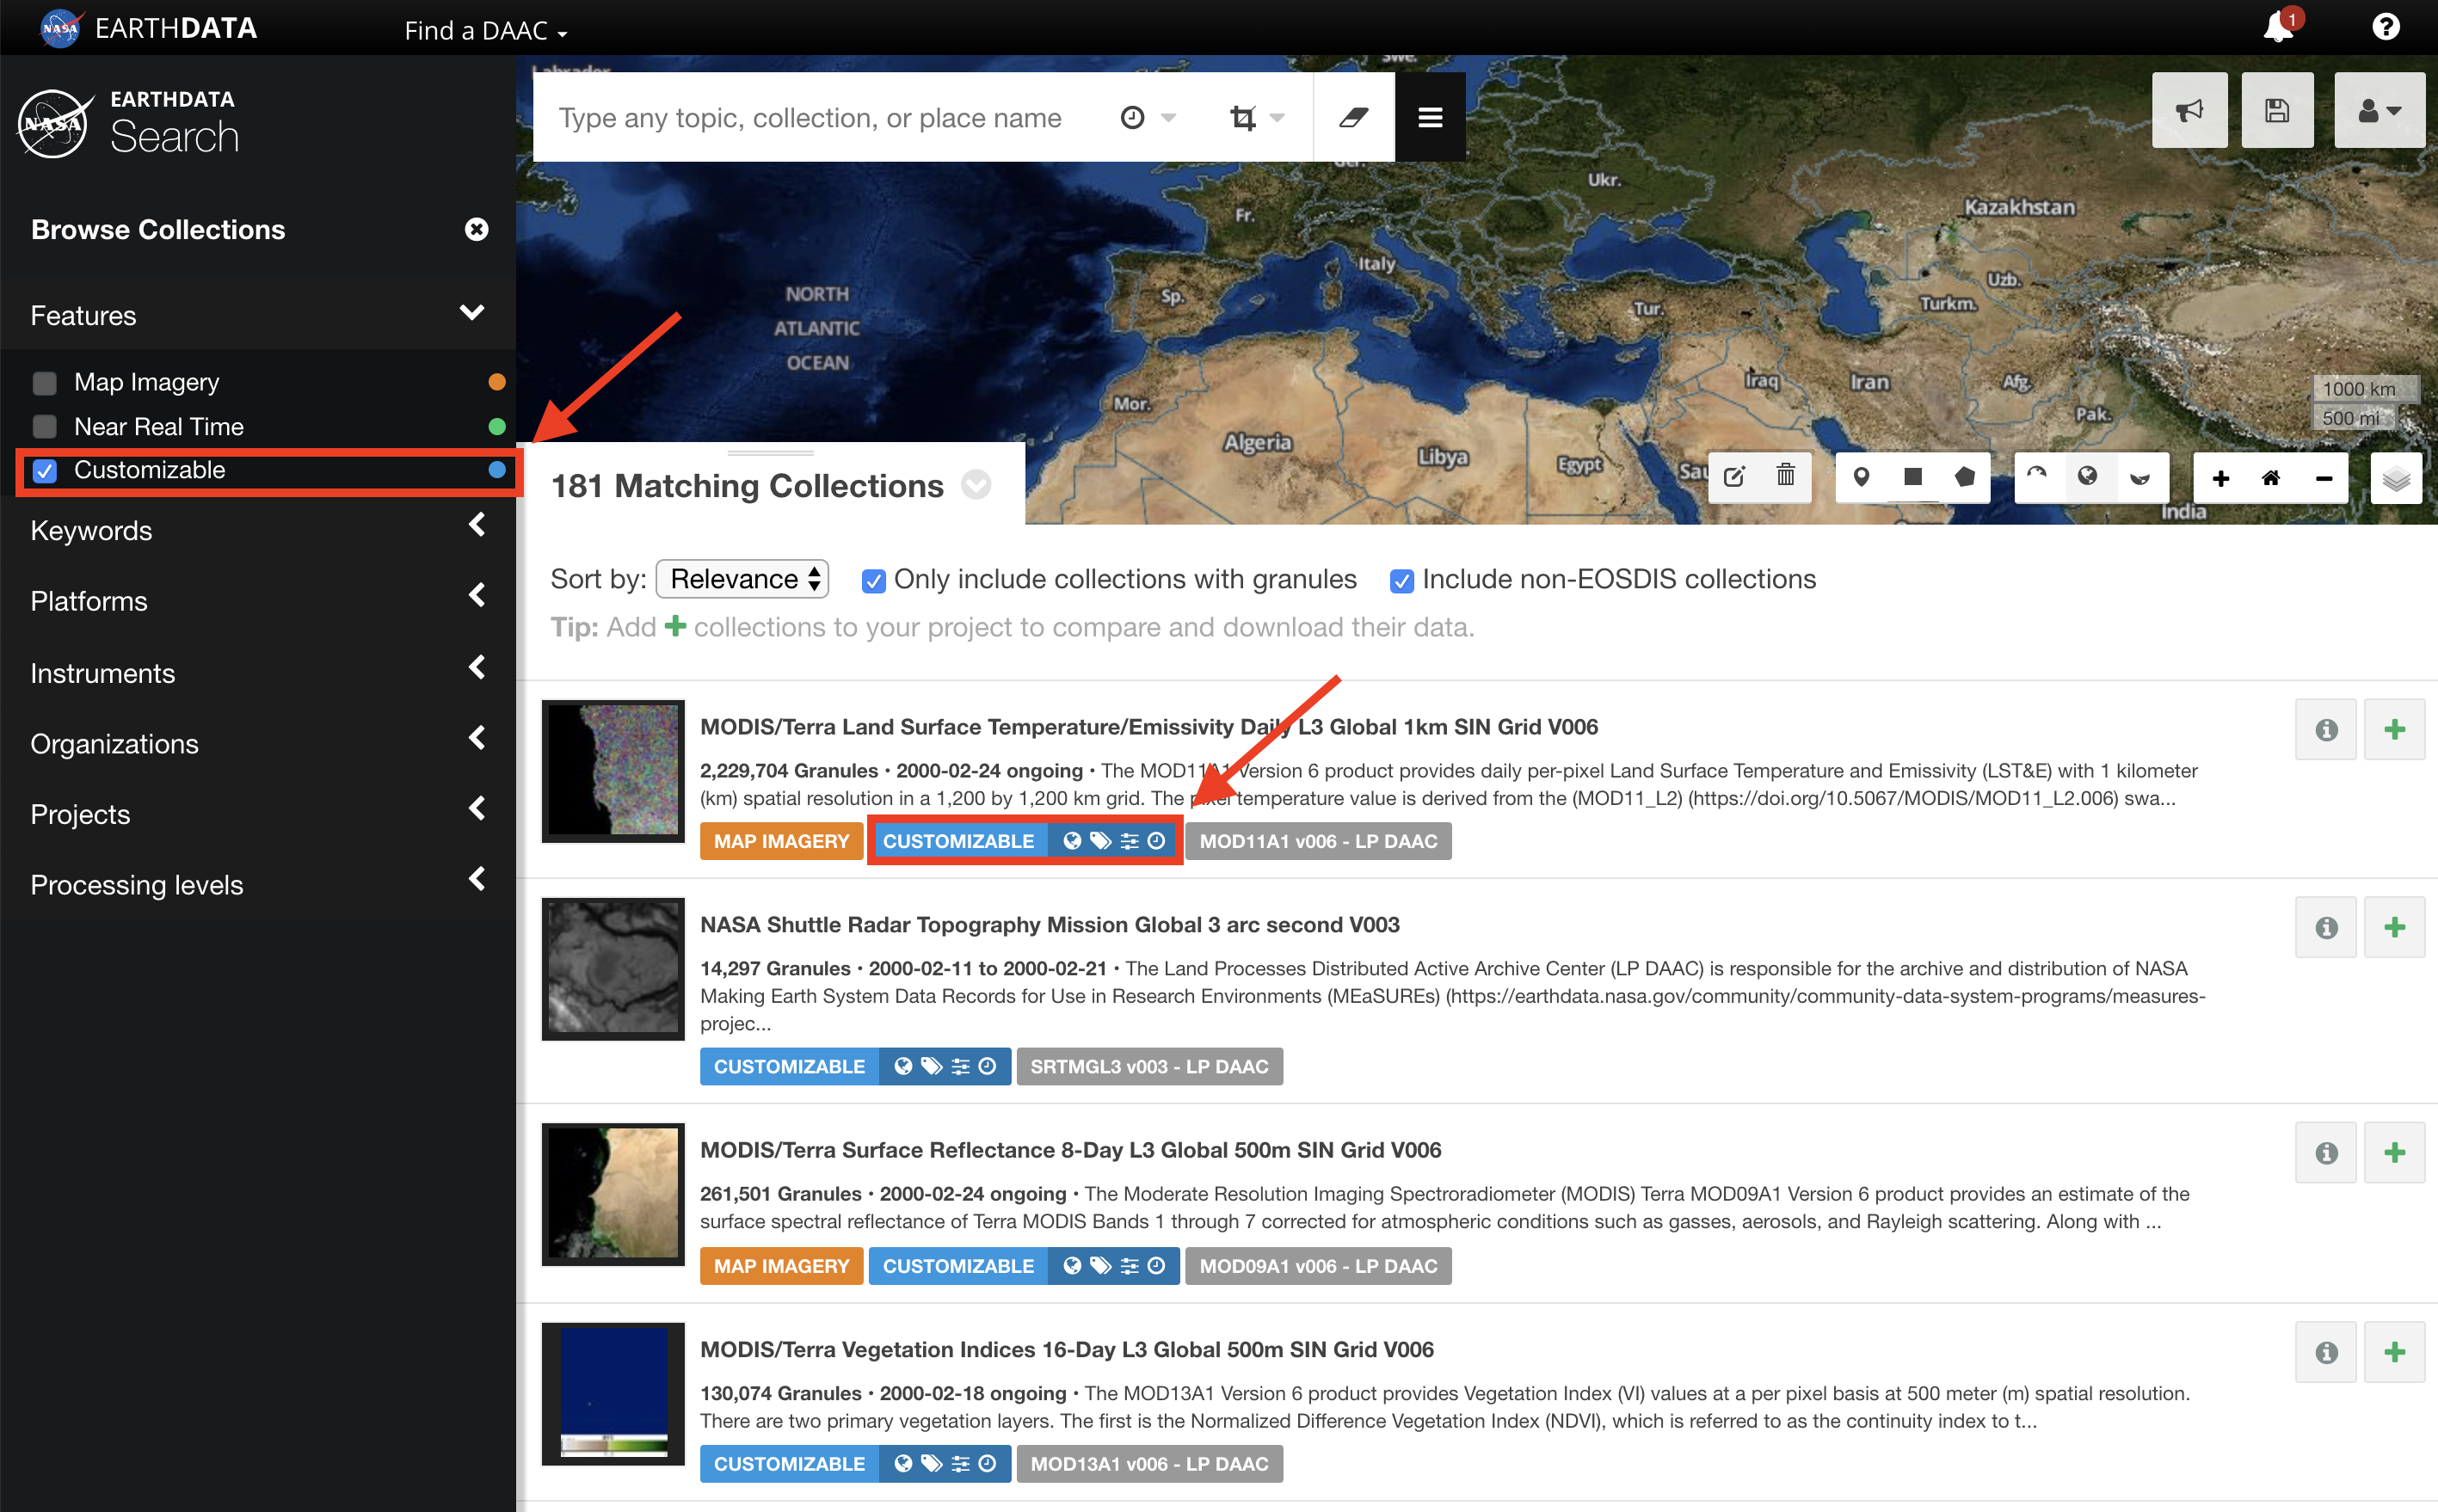
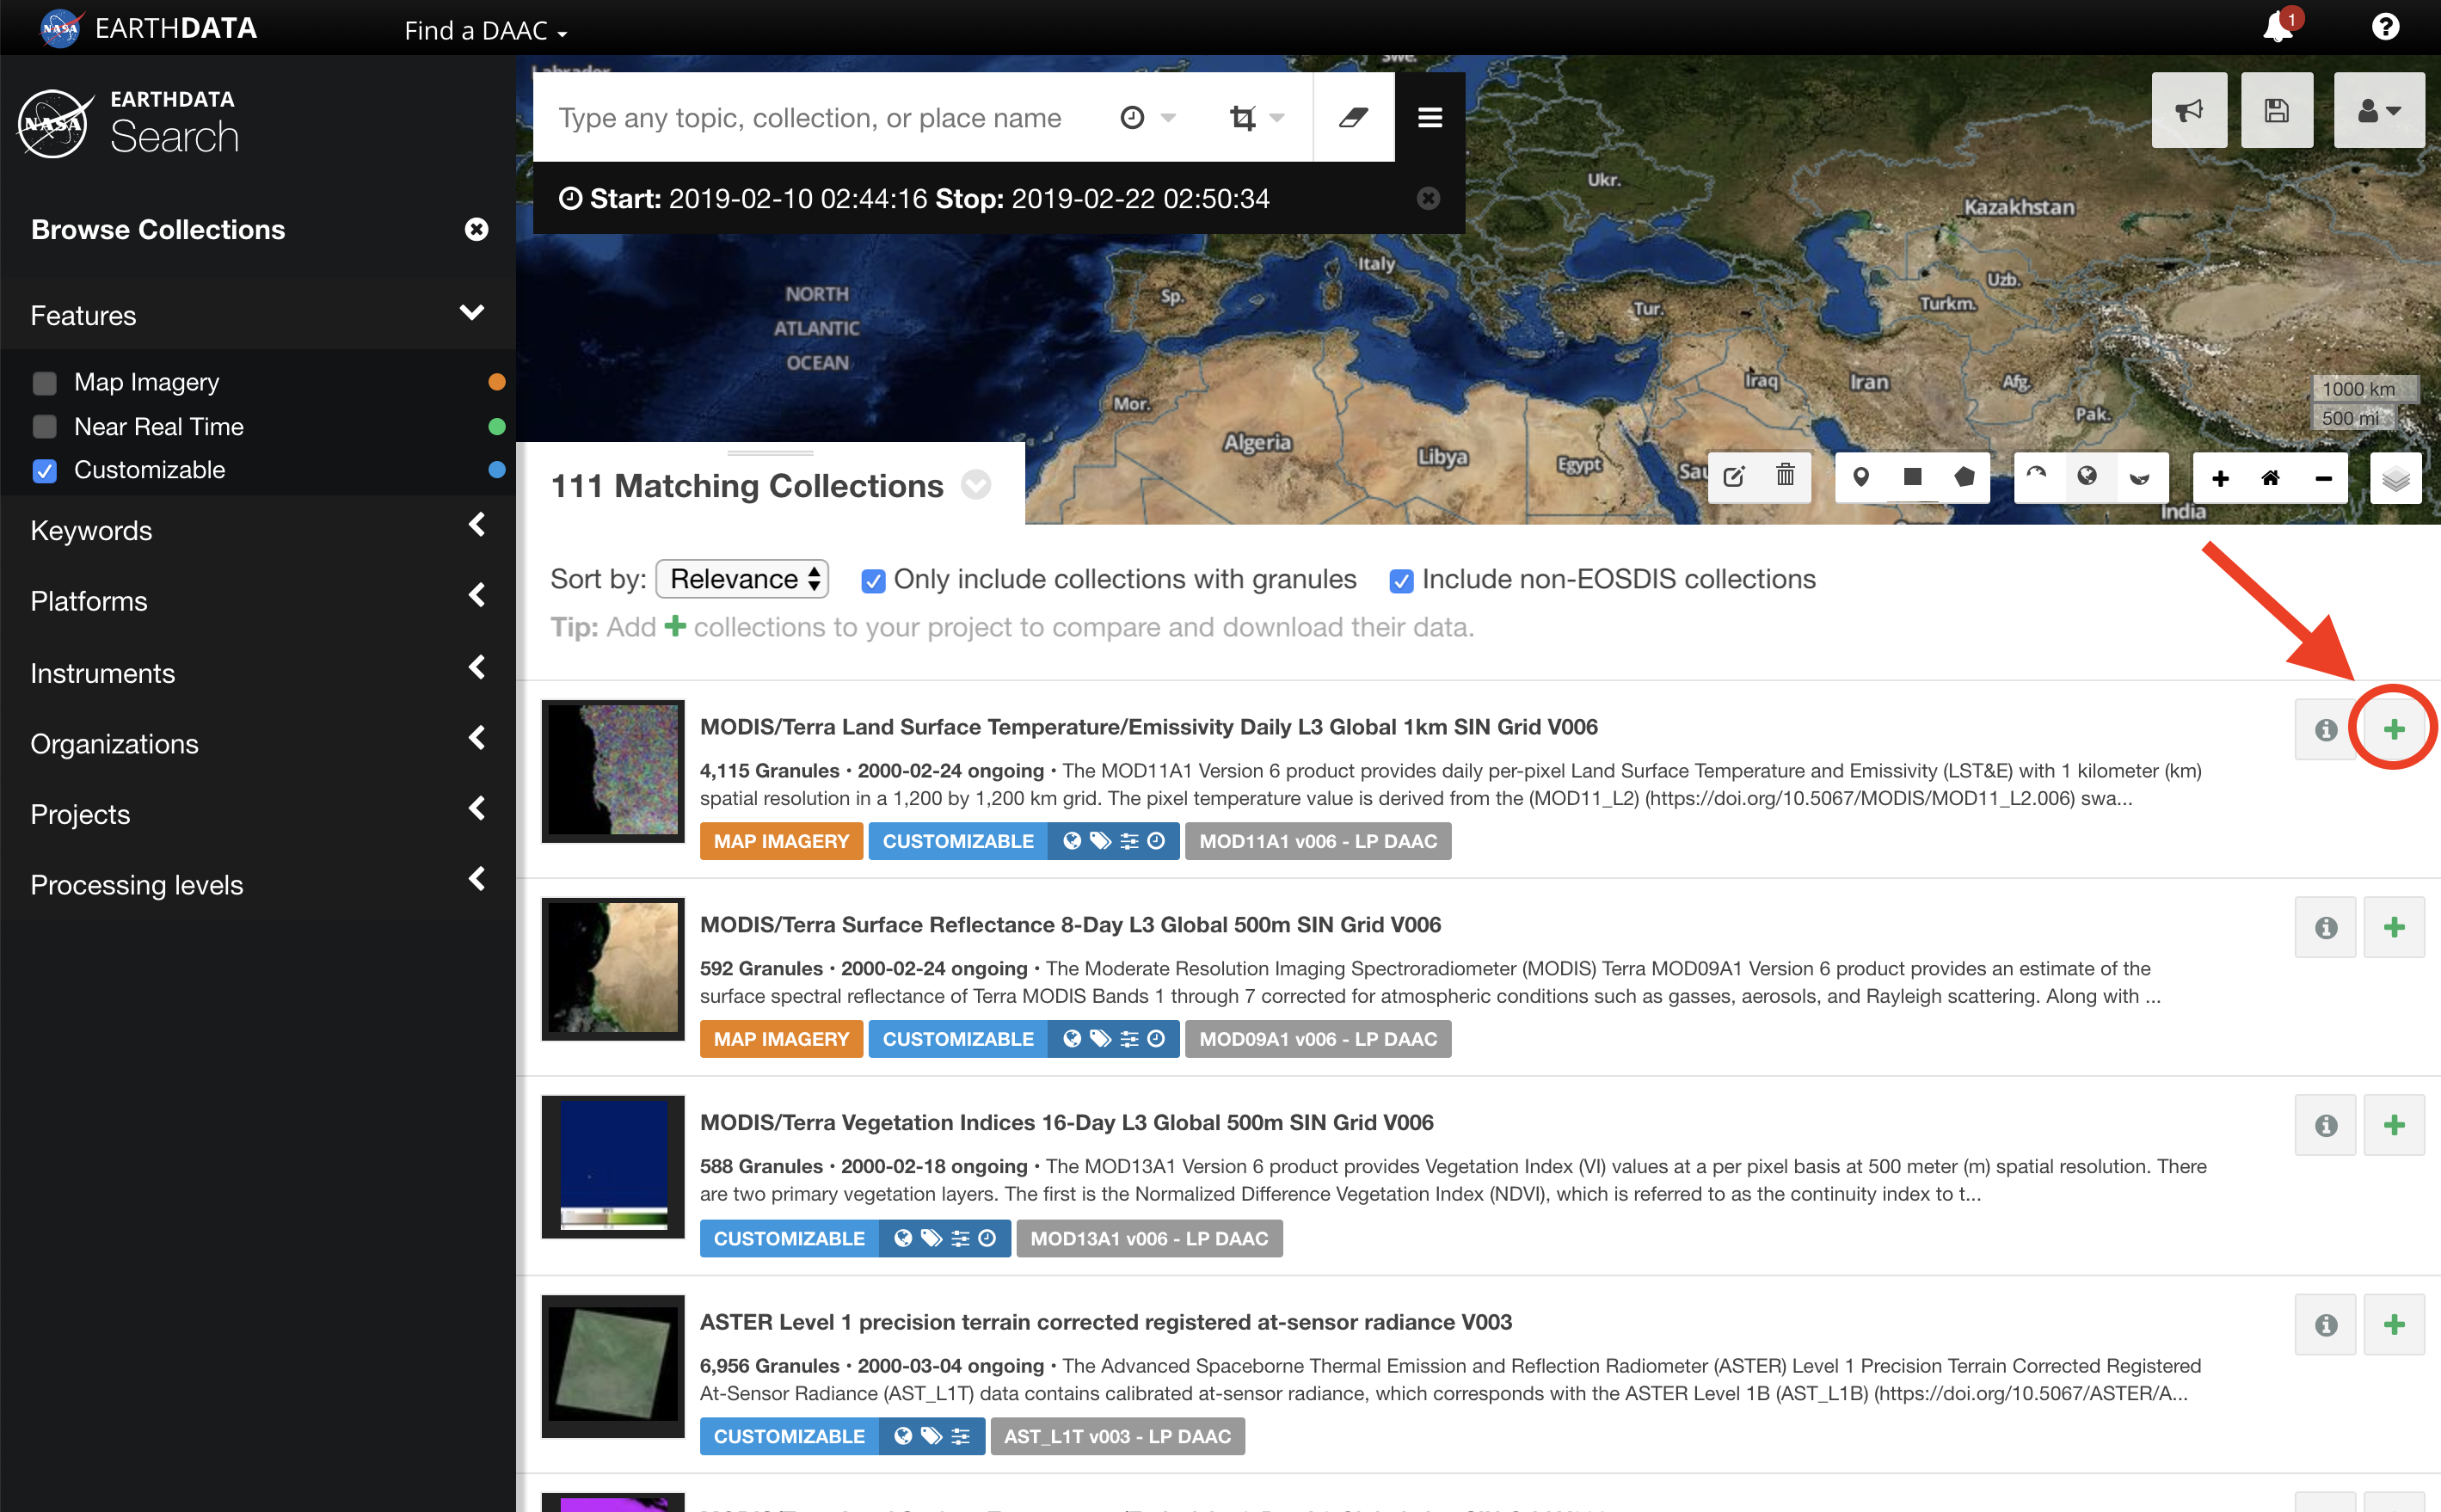
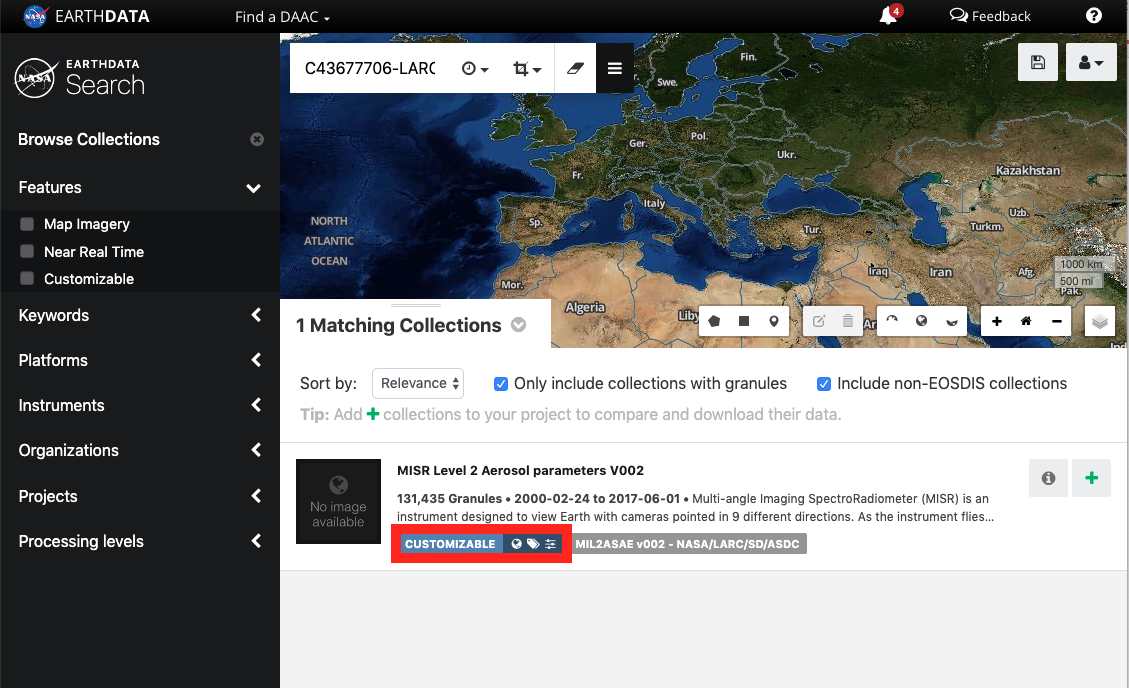
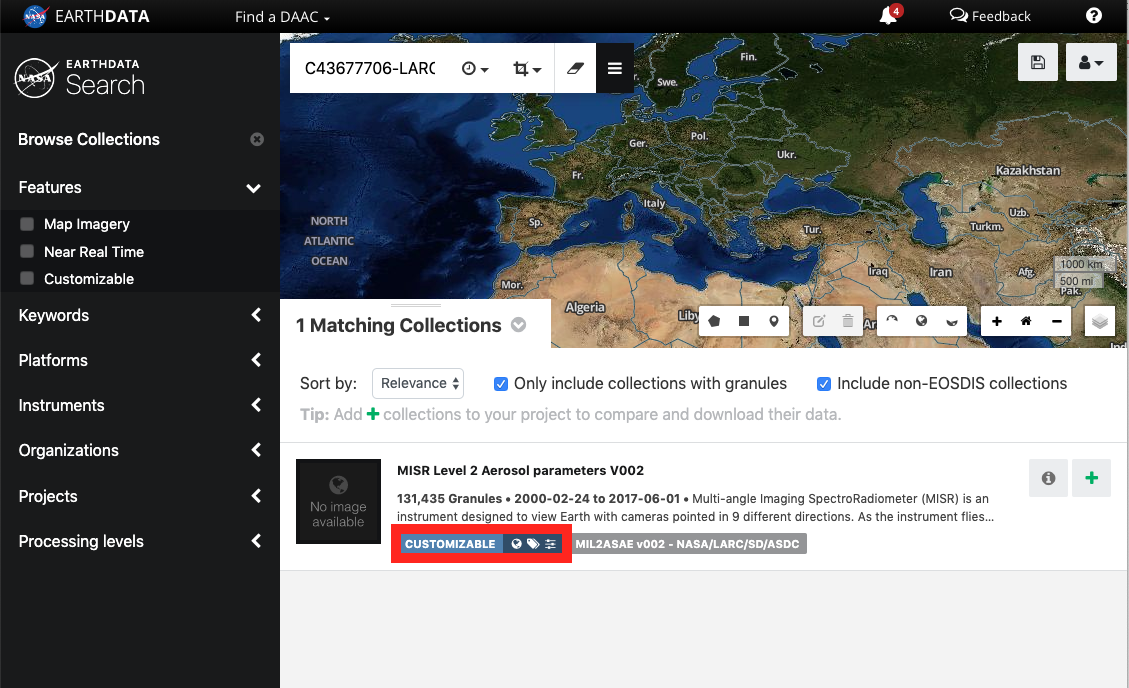
A box labeled CUSTOMIZABLE will appear under collections that support customization. To filter search results to only show customizable collections, select Customizable in the search facets under Features. - CLICK on a collection to view the granules. Alternatively, CLICK on Add collection to current project to add all of the granules in the collection to 'My Project'.
- CLICK on Download All to add all of the collection's granules to 'My Project'. Alternatively, filter the granules as necessary and CLICK Add to project.
- REPEAT step 1 through step 3 as necessary to add additional collections and/or granules to 'My Project'.
- CLICK on My Project to view download options.
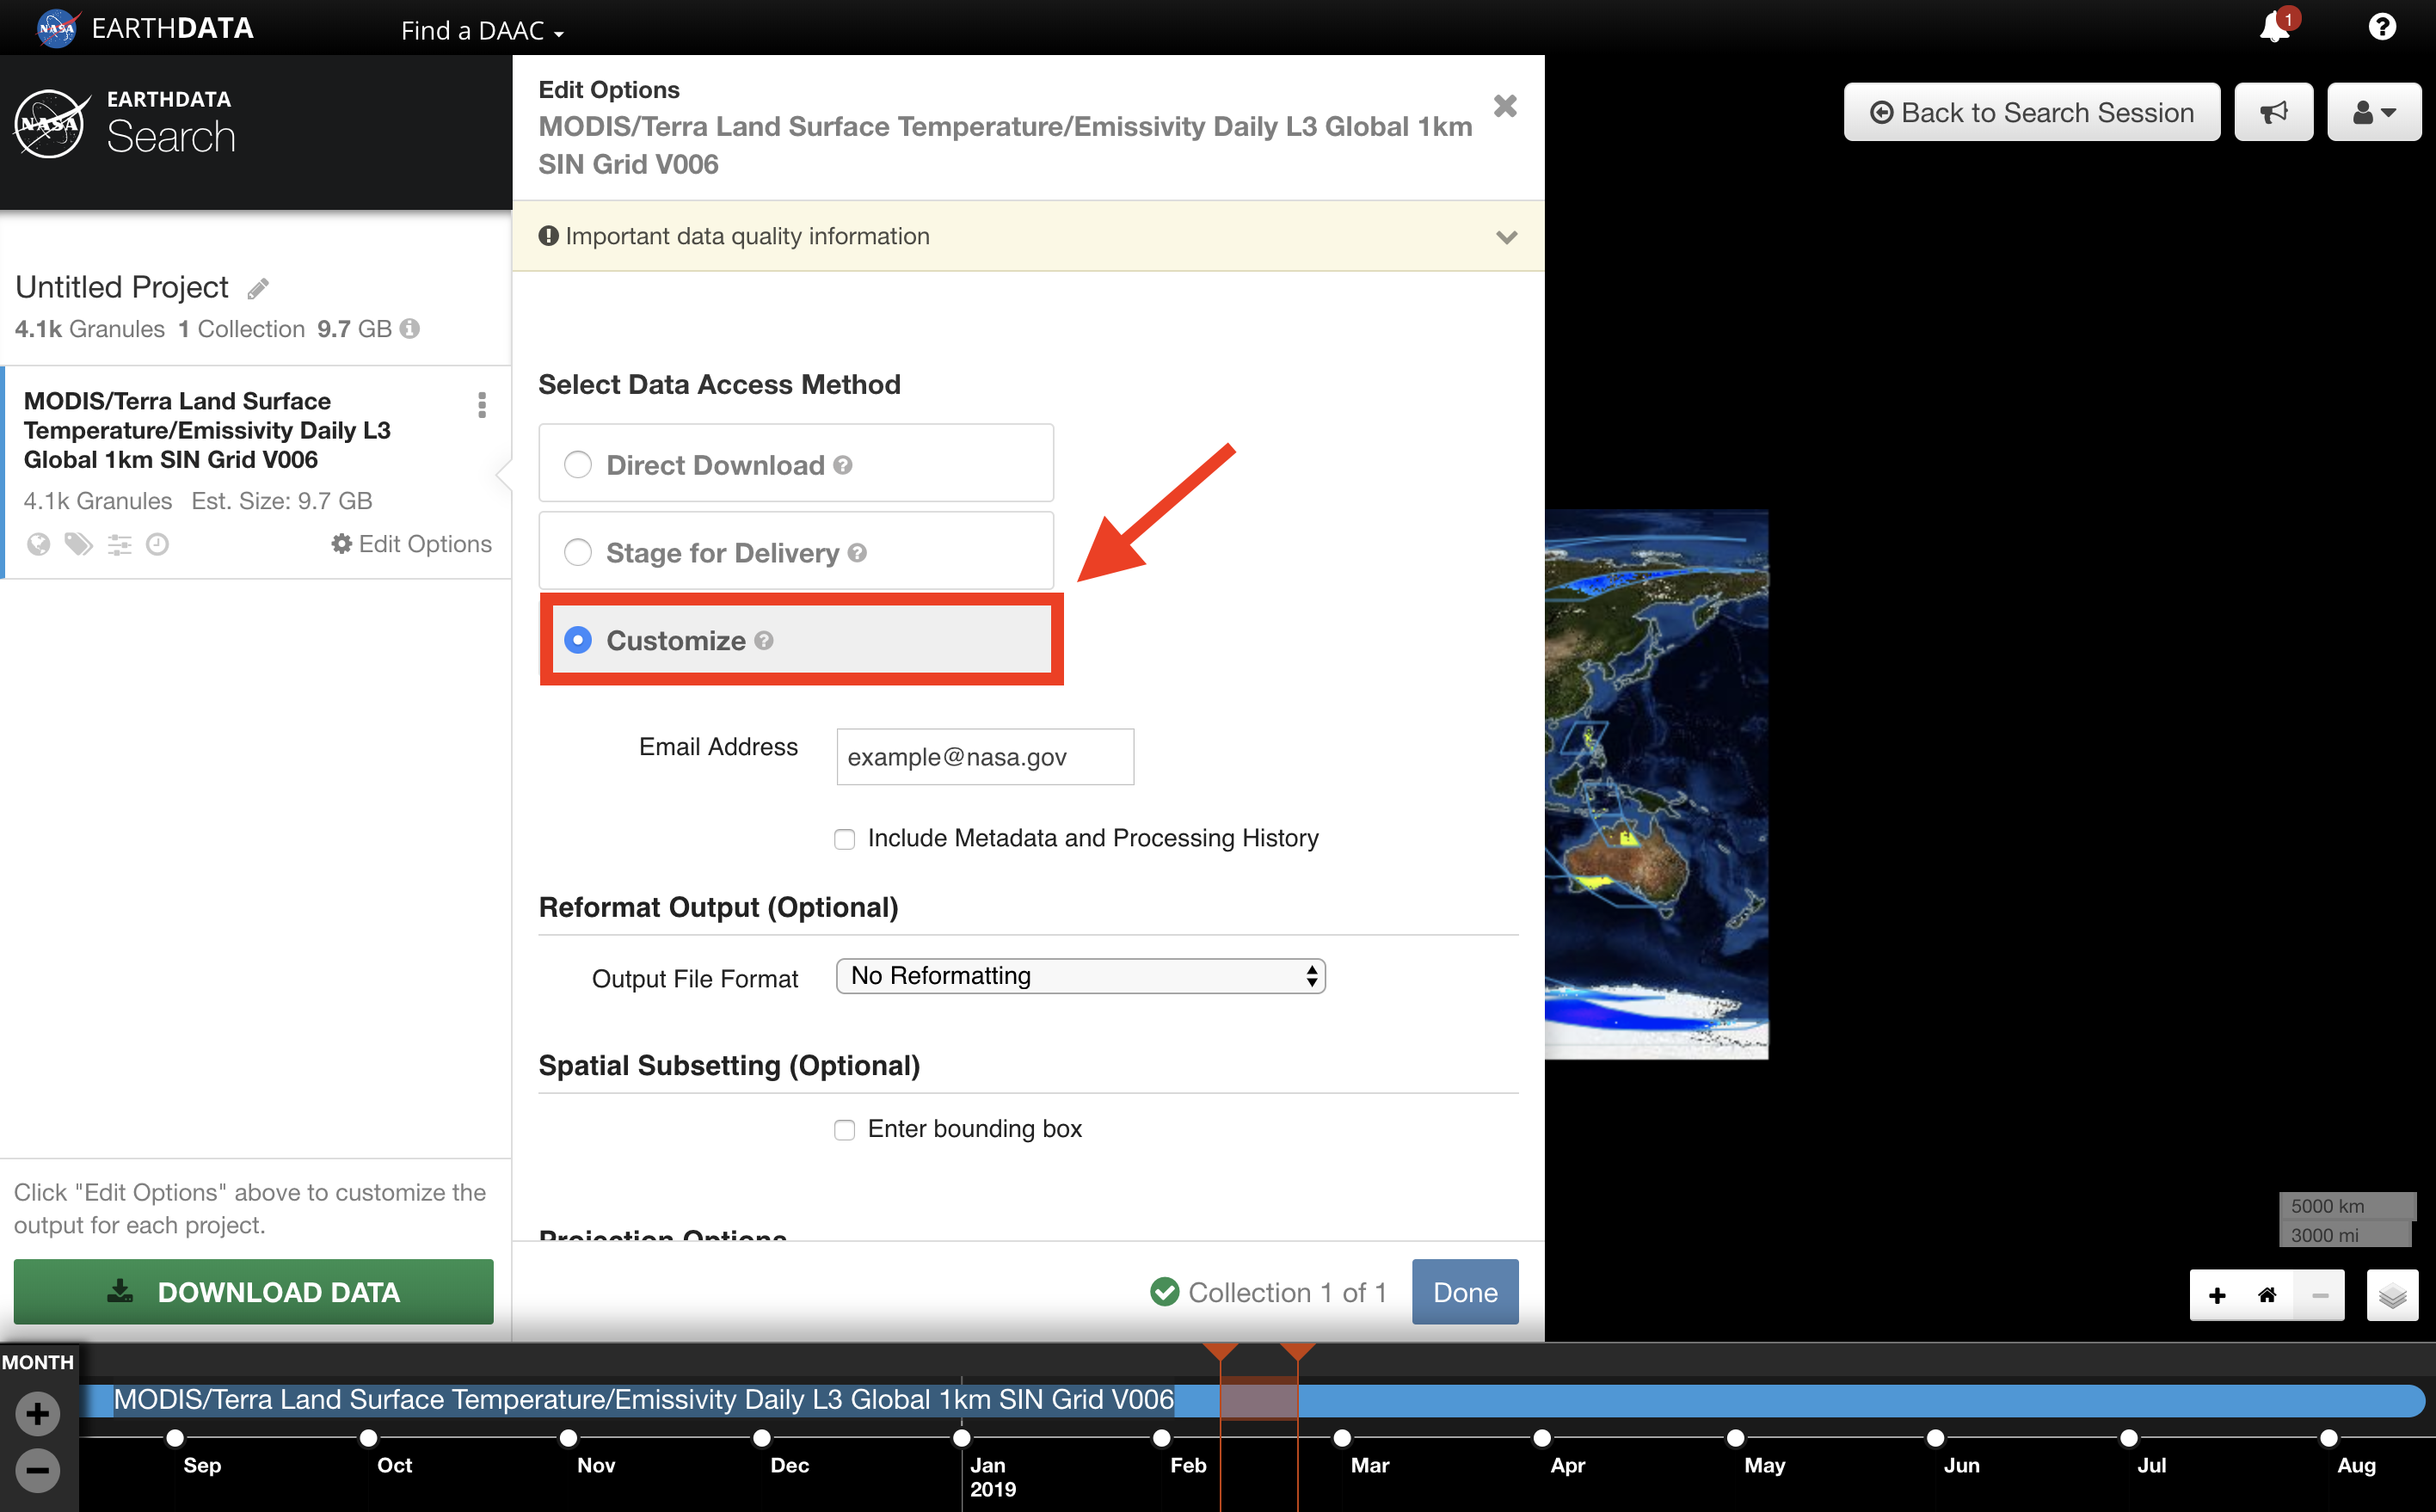
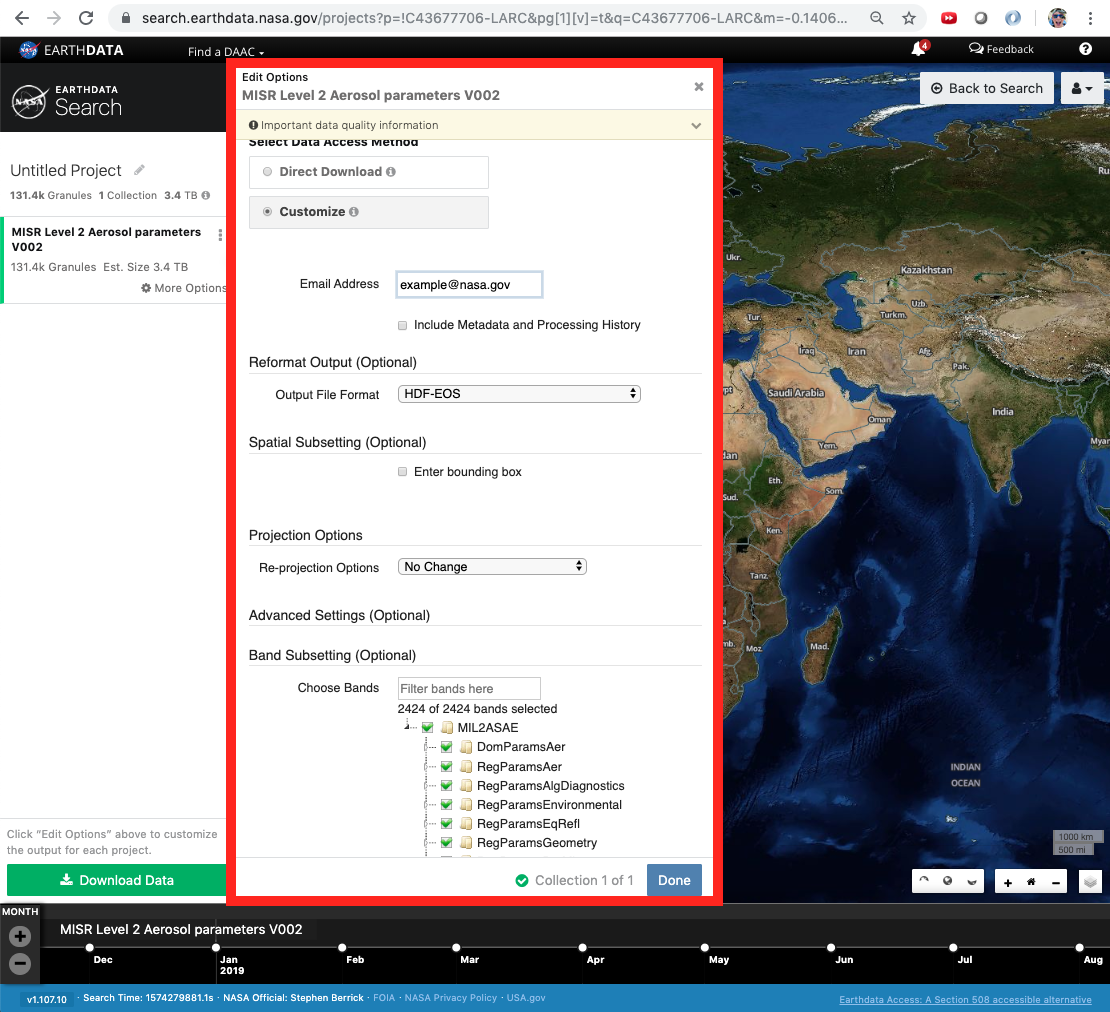
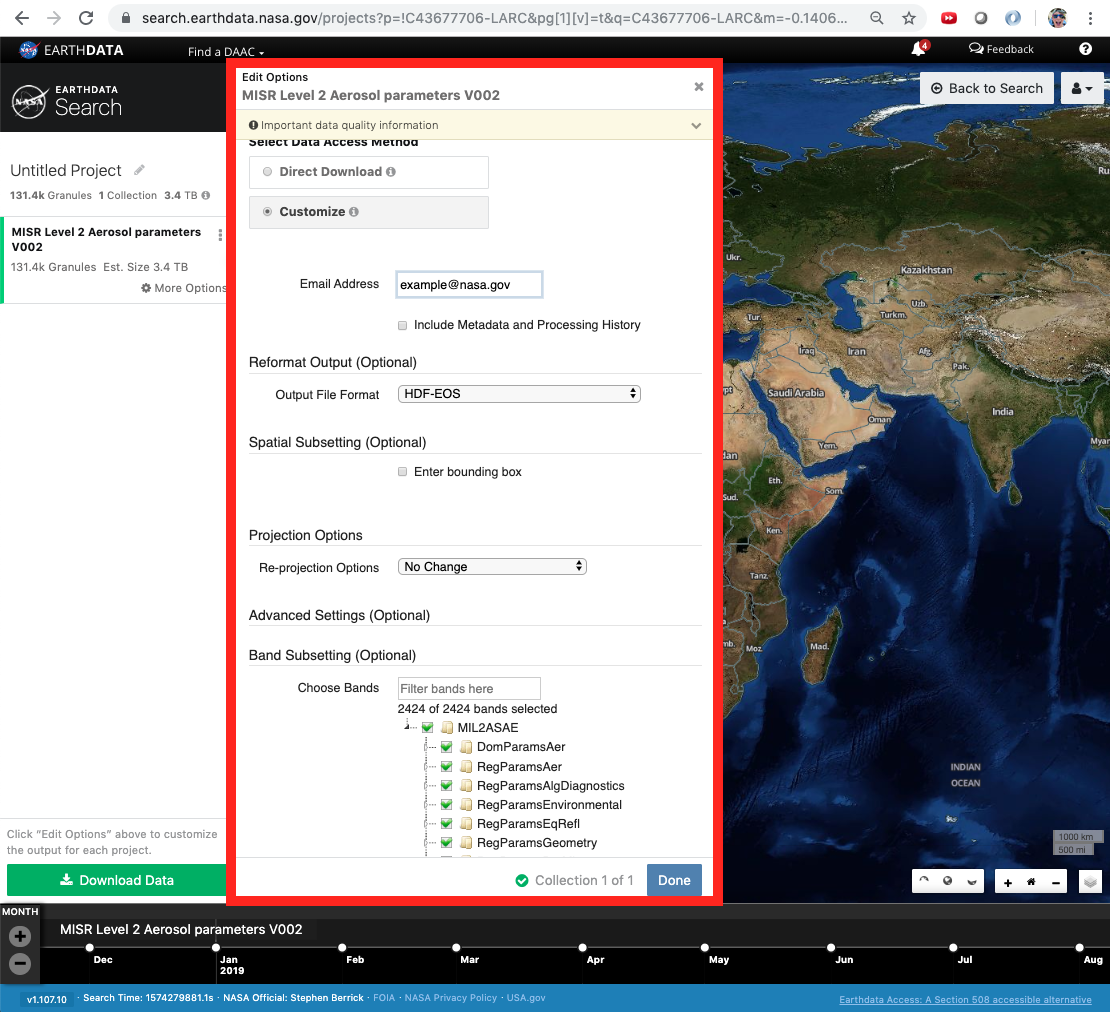
- CLICK on Customize.
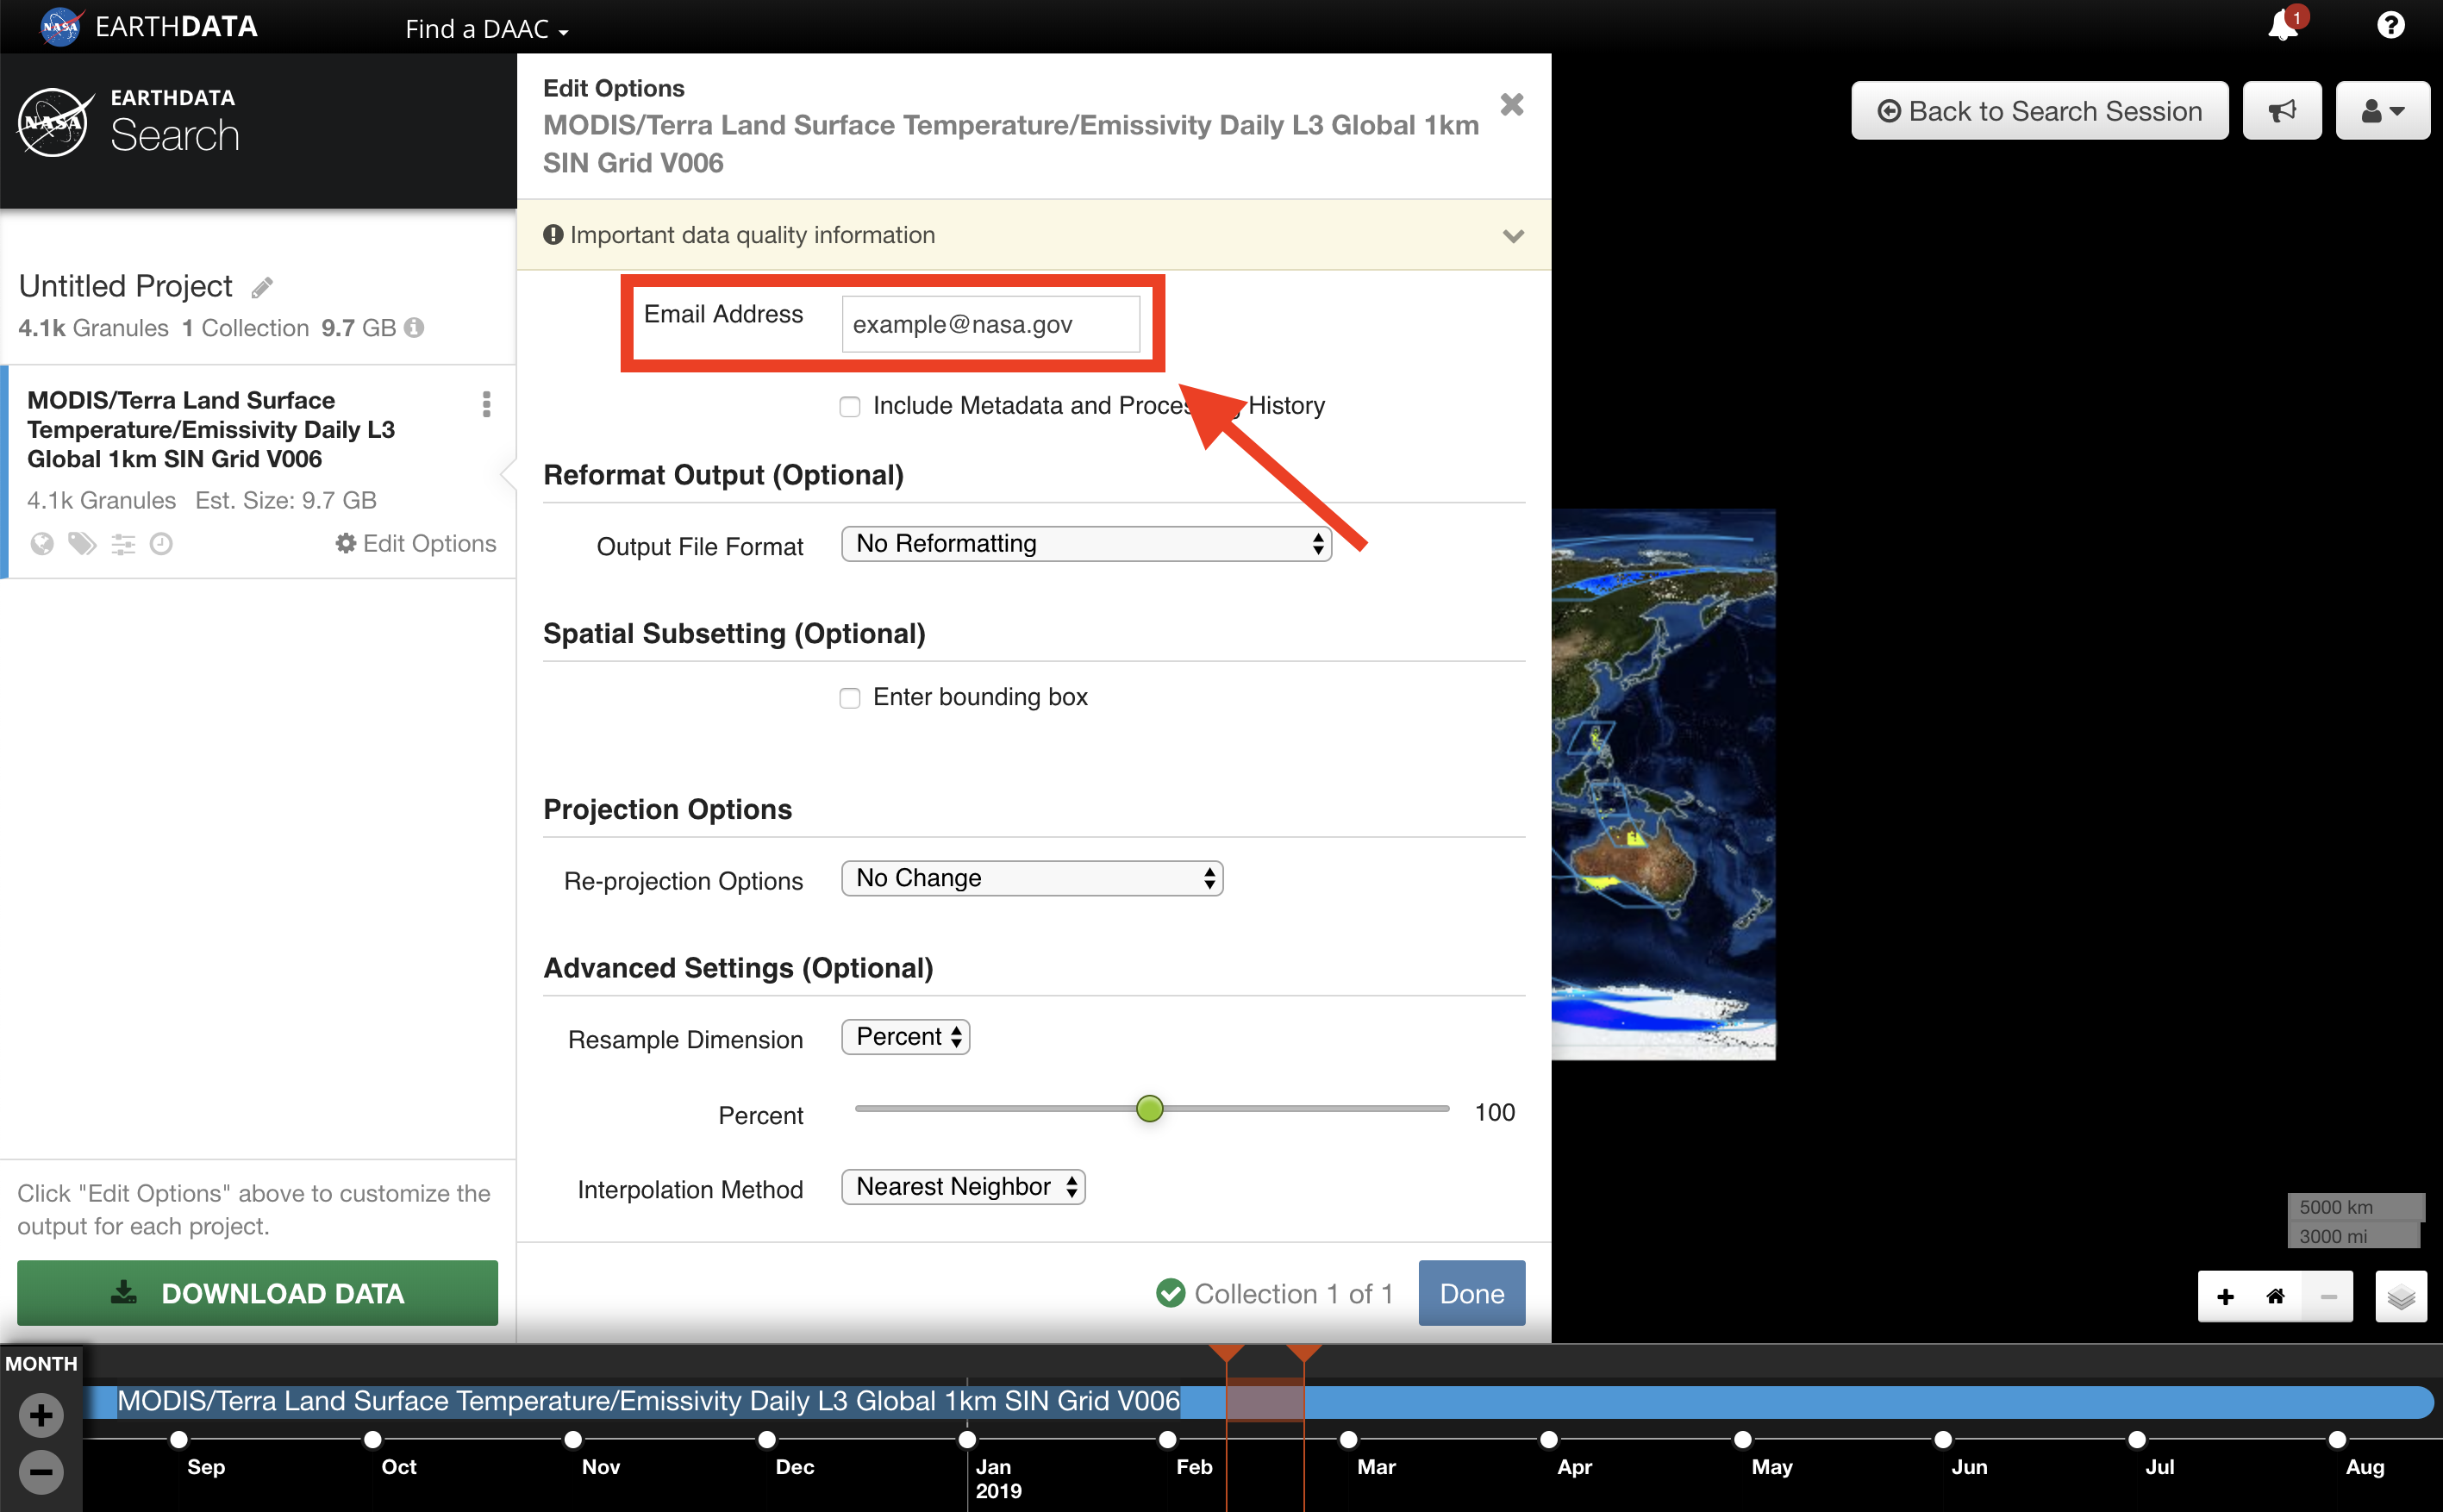
- ENTER the email address where the data link(s) will be delivered.
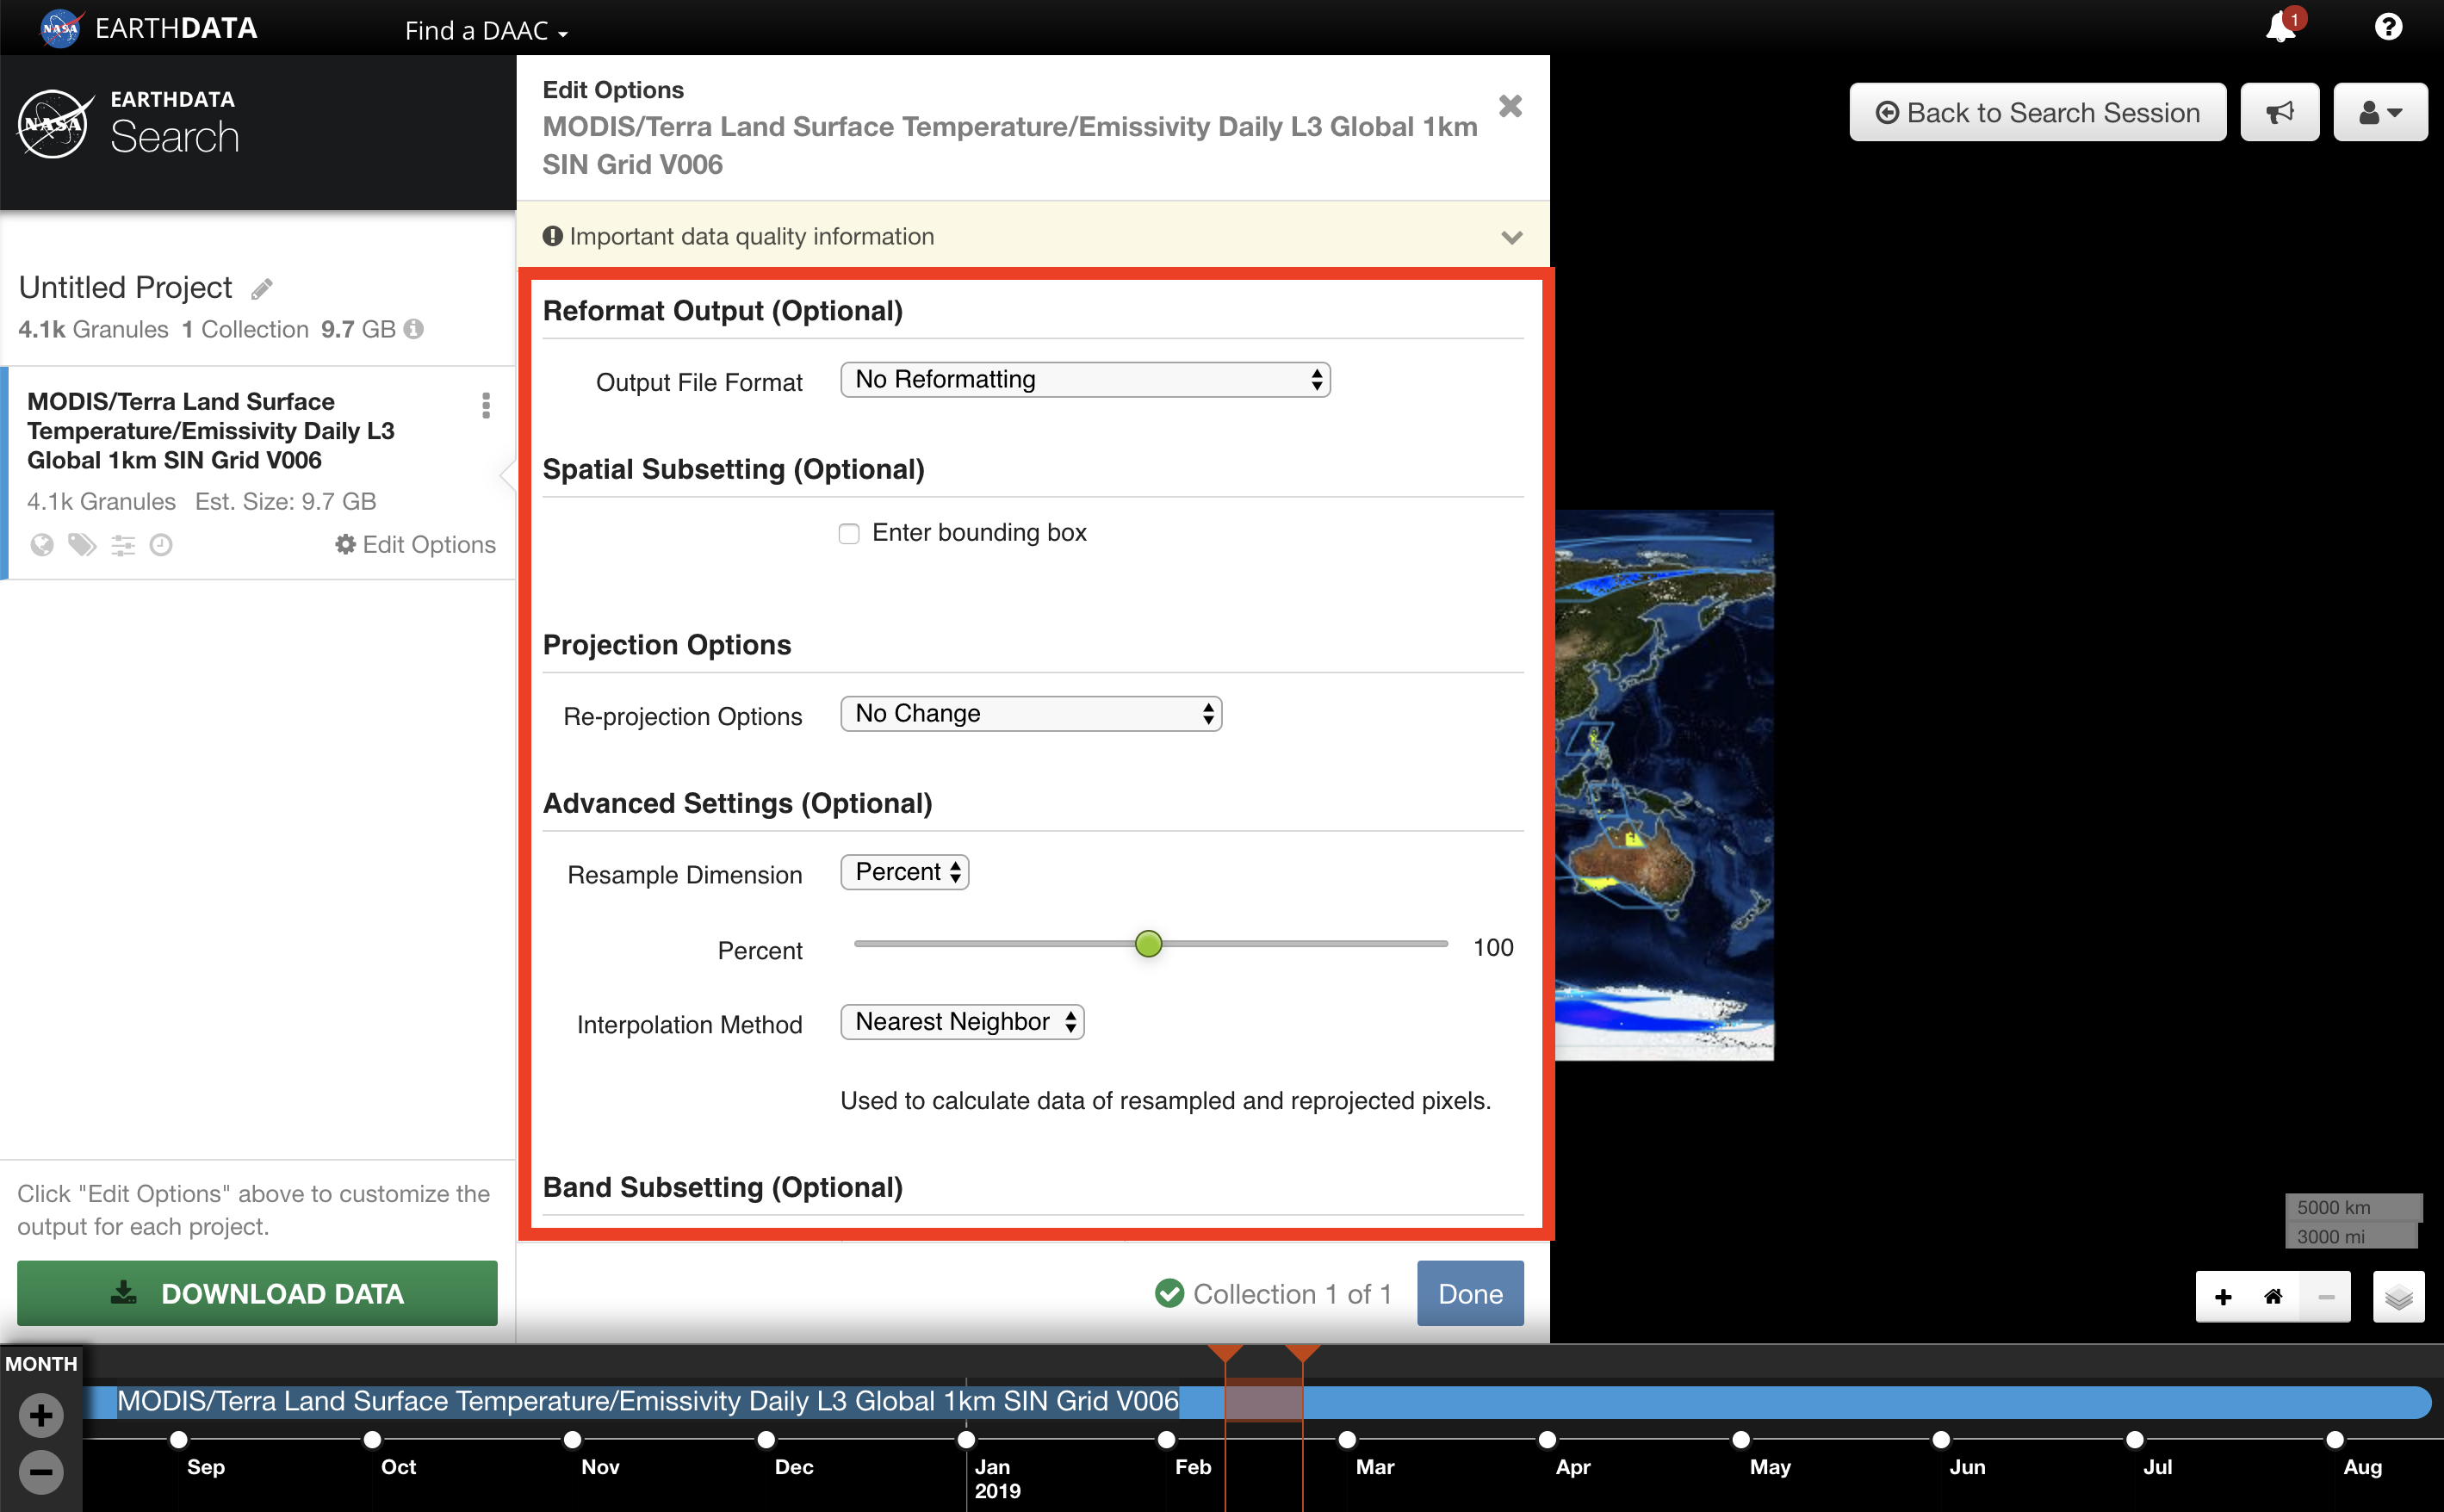
- CUSTOMIZE the available parameters as necessary.
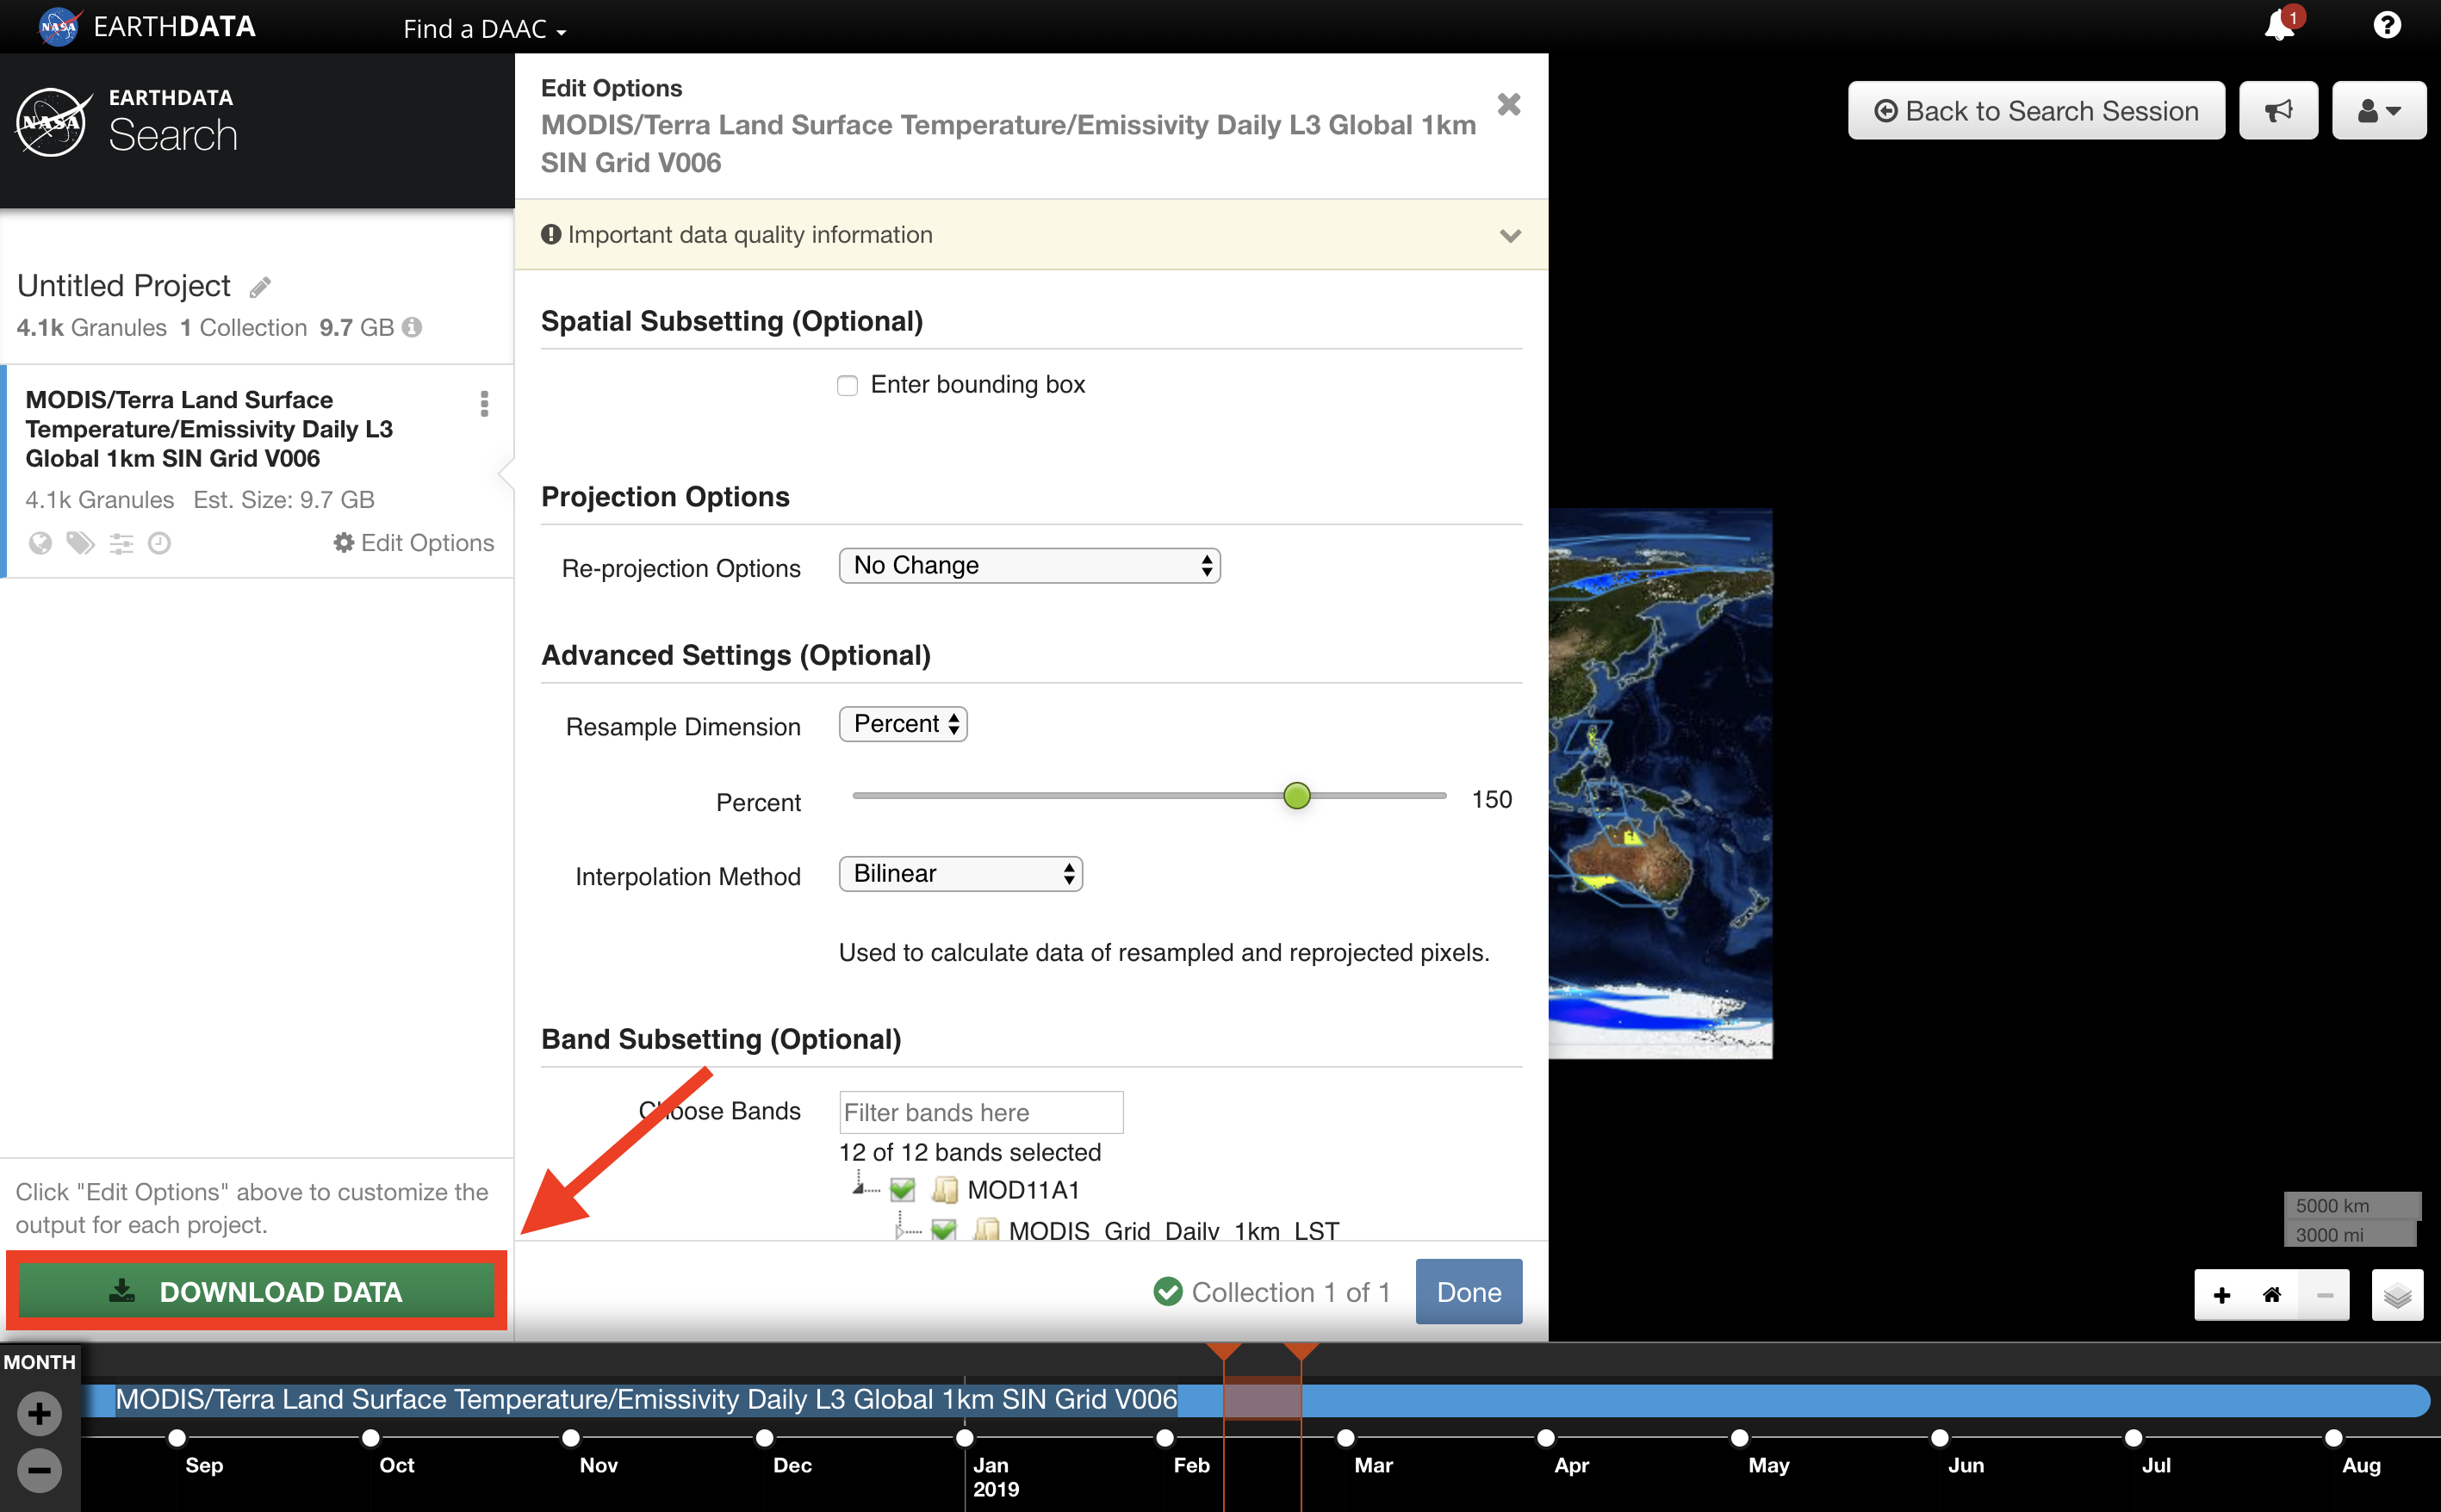
The customizable options vary by collection and are set by the data provider. - CLICK DOWNLOAD DATA.
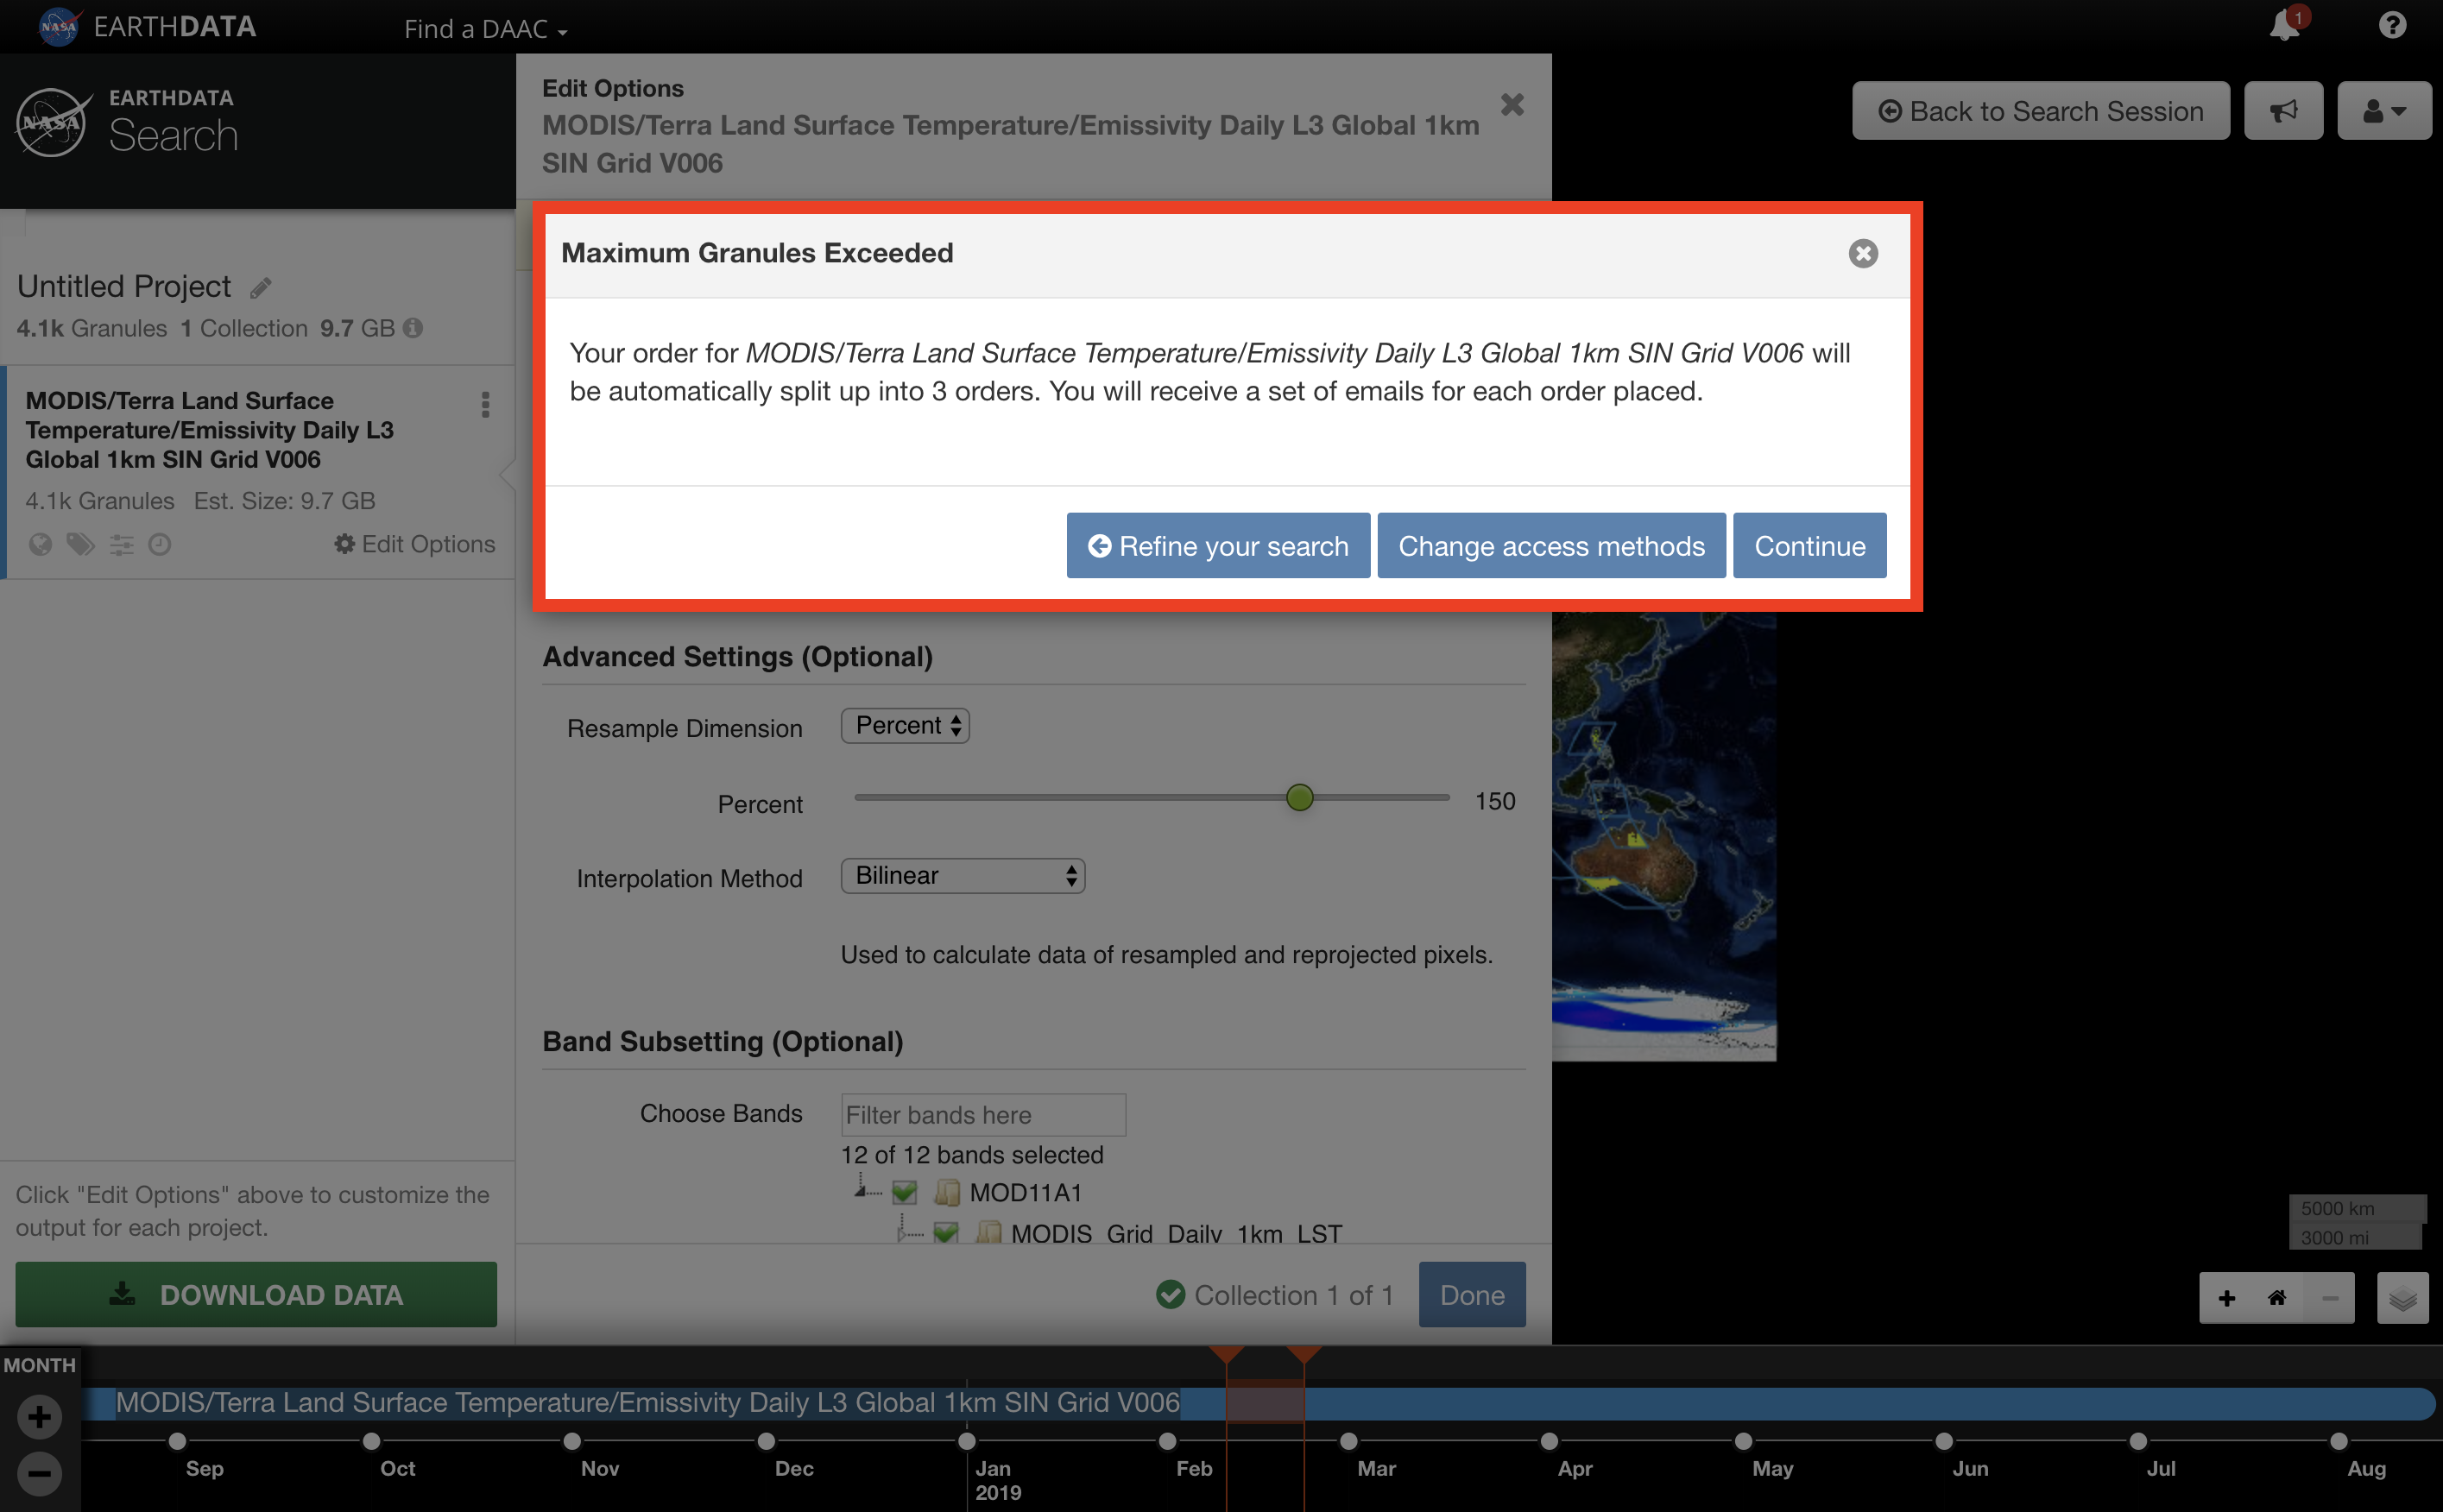
If the project contains a large number of granules, it may be split into several orders. - The 'Order Status' page will appear. The 'Order Status' page will update the status of the Customized order as it processes. When the data is ready to download the user will receive an email from the data provider, and the 'Order Status' page will list the order as Complete.
- Once the order is complete, the data will be delivered to the email address provided. The email will be from the data provider. ACCESS the downloaded data via email.
- CLICK on either the Listing of Individual Files or the ZIP file containing all output files links within the email to access and download the data.
- How to Search using Earthdata Search
-
Searching: in general
Earthdata Search's text search field attempts to understand complex queries like "land surface temperature over Uganda for the last 10 years."
Sometimes a text search does not return useful results. This happens most often when the search includes:
- an unrecognized, misspelled or ambiguous location name;
- the name of a body of water, river and/or landmark.
For best results,
- If you know the specific collection name, shortname, id or project you are looking for, start your search using the free text field;
- otherwise, skip the free text field, and start your search using the checkboxes on the left to specify the most relevant scientific keywords.
- Next, specify the location you are interested in using the spacial criteria button (the compass icon) located to the right of the free text field.
- Finally, specify the time you are interested in using the temporal criteria button (the clock icon) located to the right of the free text field.
So for example, to search for "land surface temperature over Uganda for the last 10 years"
- Check the following checkboxes on the left:
Keywords | Land Surface | Land Temperature
Keywords | Surface Radiative Properties | Land Surface Temperature
Keywords | Surface Thermal Properties | Land Surface Temperature - Enter temporal criteria: click the clock button next to the free text field, and enter Start: 2008-01-01 00:00:00 and Stop: Today.
- Enter spacial criteria: click the compass button next to the free text field, and draw a bounding rectangle around Uganda.
Getting data: in general
You can download a granule, multiple granules, a single collection, or multiple collections.
TO DOWNLOAD A GRANULE, MULTIPLE GRANULES, OR A COLLECTION:
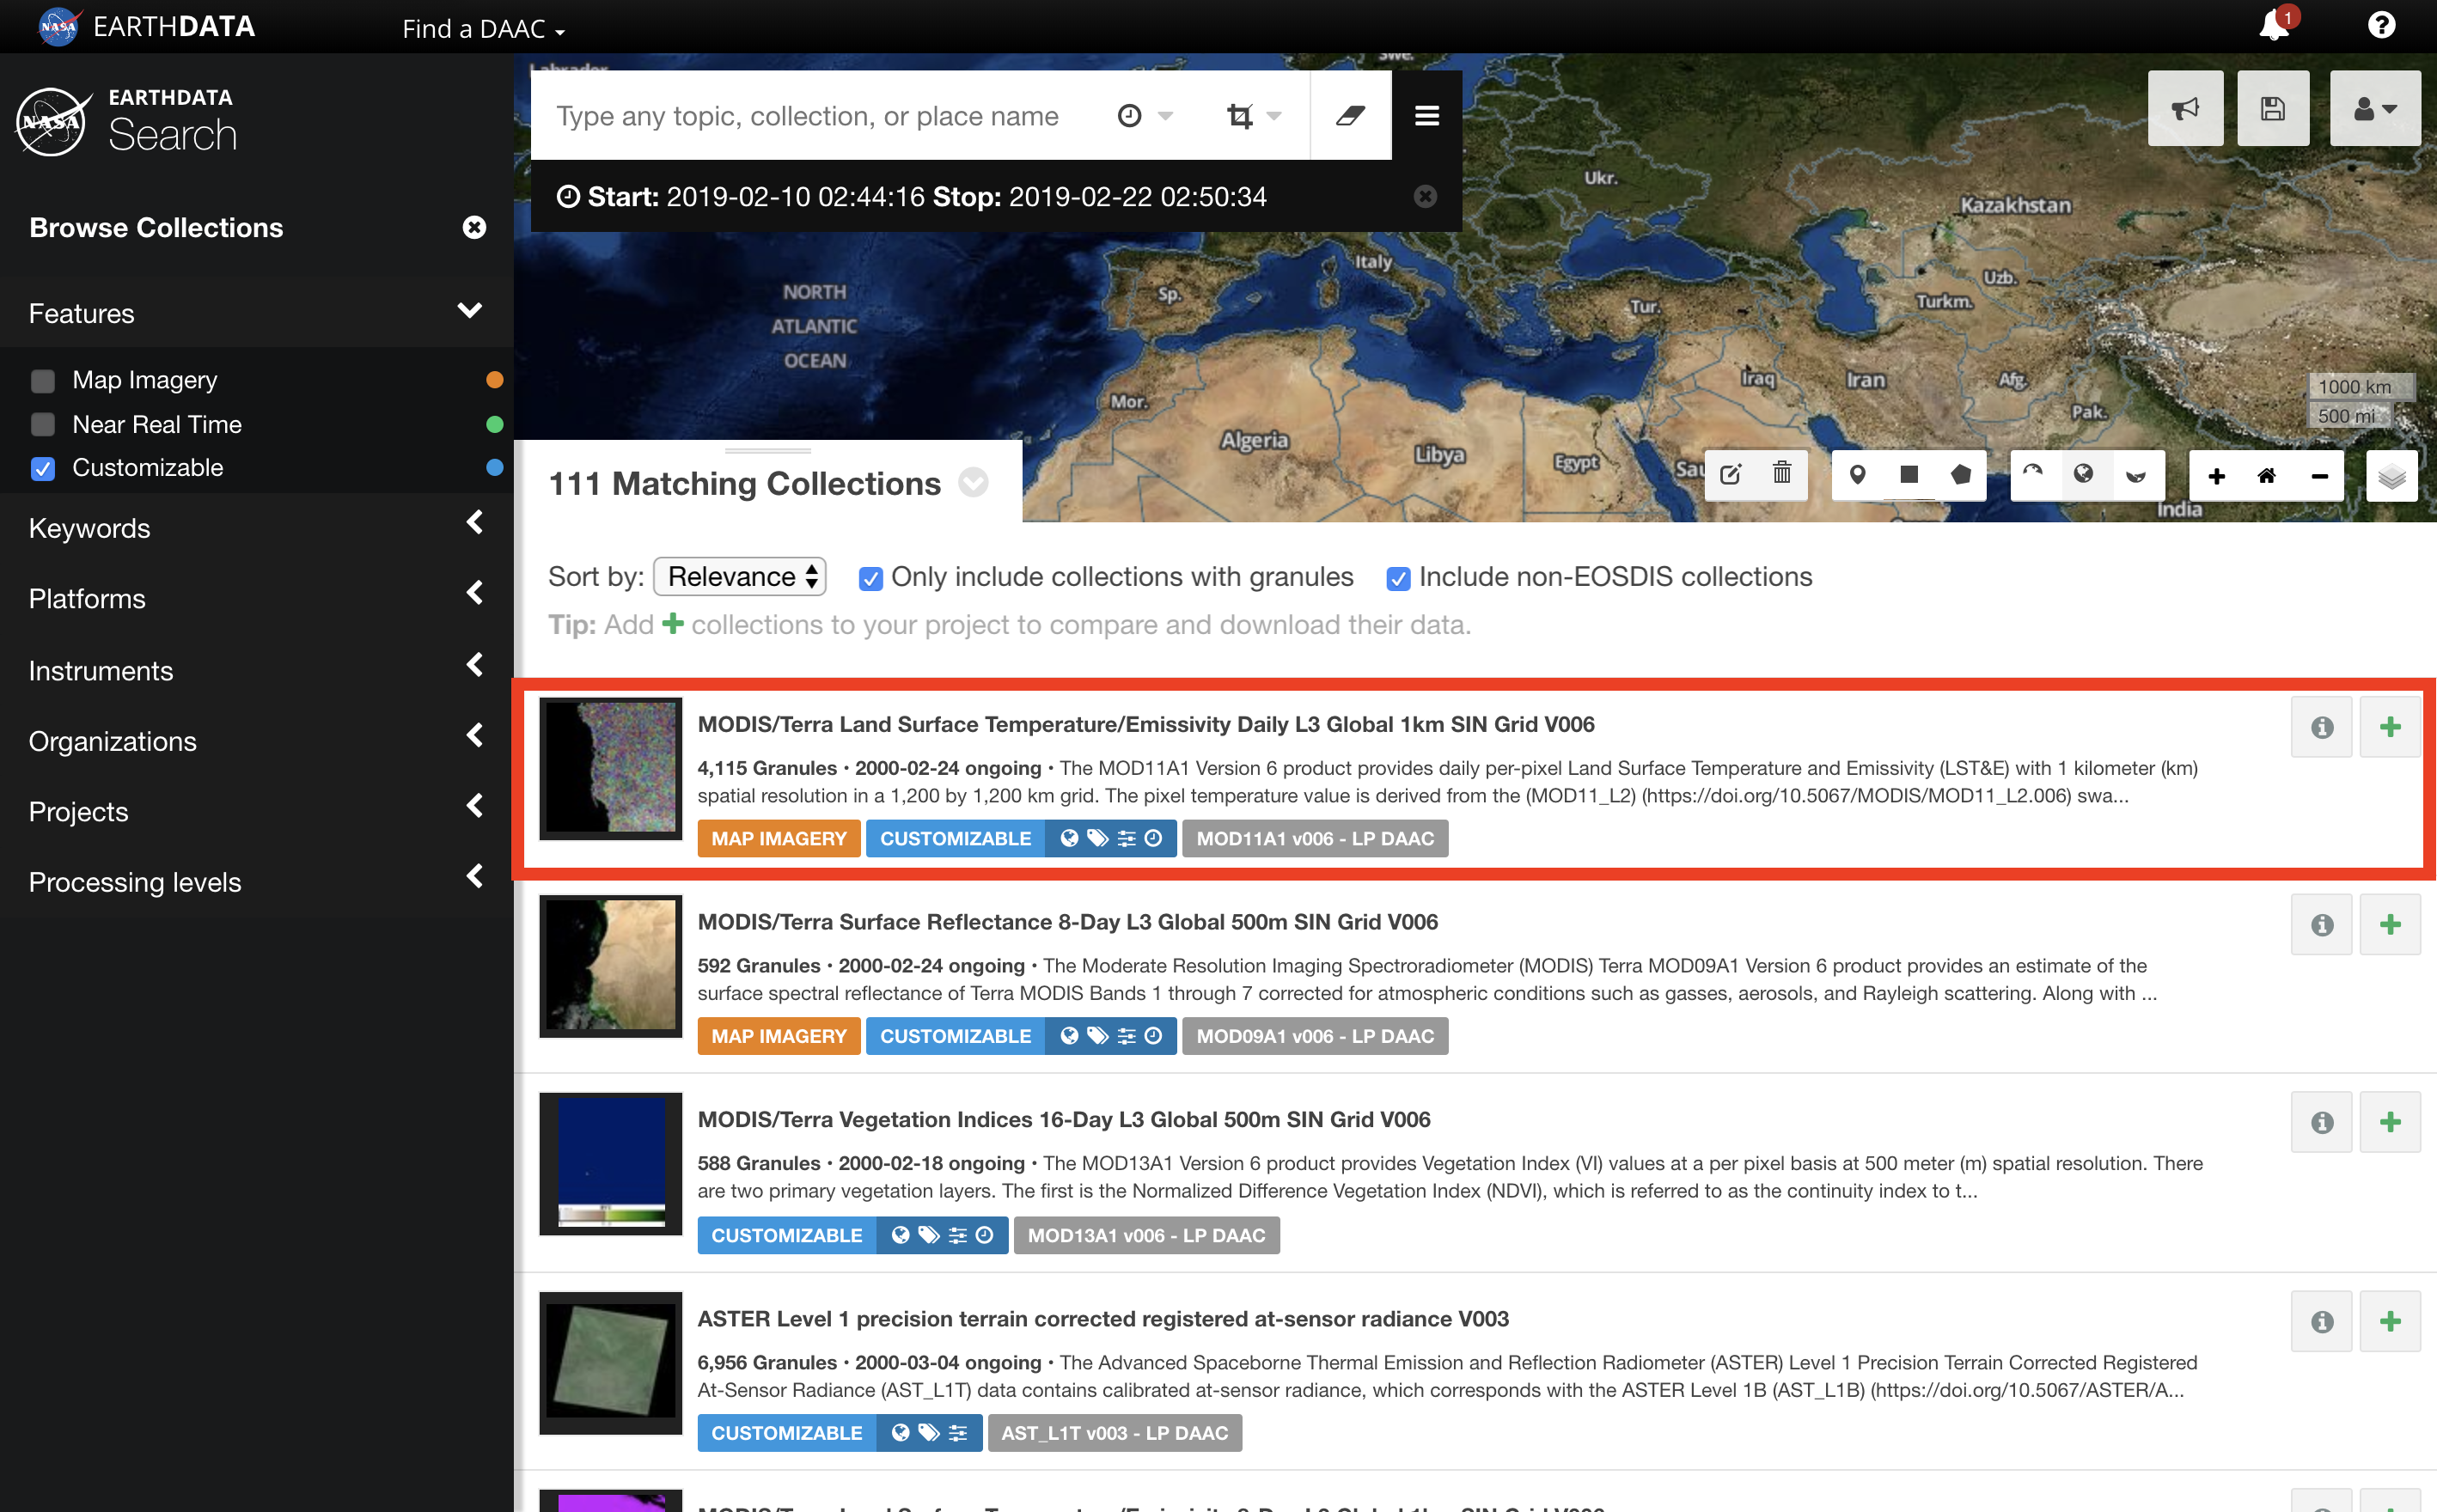
Click a collection to view its granules. In granule view, you'll see only the granules for the collection that fit your spacial and temporal constraints. Note that you can further refine what granules are selected using the "Granule Search" text field, the "Granule Filters" (the link with funnel icon) to the right of it, and the date slider at the bottom of the screen.
To download all selected granules, click the big green "Download All" button on the right hand side of the screen.
To download an individual granule, click the "Download single granule data" button (the down arrow icon) beside the granule
After clicking "Download All" or "Configure and download single granule data," you will see one or more of the following order options, depending on what the data provider supports:
- "Direct Download" - Allows you to download data as-is now from your browser, either by accessing a list of download links, by downloading a file of data links for offline processing, or by downloading a script that can be used with curl or wget. (Note: tips for using the download script can be found here.)
- "Stage for Delivery" - Allows you to submit a request for a staged delivery. You will receive an email with download instructions when the data is ready.
- "Customize Product" - Allows you to select custom service options to be performed (e.g. subsetting, reprojection, etc.) You will receive an email with download instructions when the data is ready.
TO DOWNLOAD MULTIPLE COLLECTIONS
- Use the "Add to project" button to add collections to your "project" (similar to a shopping cart), and then click the "My Project" button in the upper right hand side of the screen.
- For each collection in your project, click the collection and select the granules you want to download.
- Go back to the project, and select the big green "Download Project Data" button on the right.
Searching: Filtering granules
In granule view, you can filter the granules selected using any combination of the following:
- temporal criteria (clock button upper left) - enter / modify the date criteria
- spacial criteria (compass button upper left) - enter / modify the location criteria
- the date slider at the bottom of the page
- the "Granule Search" field – enter one or more granule names or patterns
- the "Granules Filters" link (the funnel link to right of the Granule Search field) - specify Day / Night, Cloud Cover and other collection-specific attributes
Searching for granules by filename
To search for a specific granule file in Earthdata Search, you will first need to know the name, shortname or id of the collection to which it belongs.
When you have that, search for the collection, then click the collection in the search results, and in granule view use the "Granule Search" field to filter the collection's granules using the significant part of granule filename.
For example, to search for file N42W072.zip in in the collection having the shortname ASTGTM:
- Search for collection ASTGTM
- Click on the collection, and in granule view in the "Granule Search" field type *N42W072*
Searching by recurring date: How to search for all Novembers from 2000 to 2018:
- In the upper left corner of the screen, click the temporal icon (the clock).
- In the dialog, check "Recurring"
- In the dialog, click in "Start," then click "Nov," then click "1"
- In the dialog, click in "End," then click "Nov," then click "30"
- In the dialog, adjust "Year Range" to be 2000 - 2018
- In the dialog, click "Apply Filter"
Customizations: Data subsetting, reformatting, reprojection, etc
"Customizations" refer to optional data processing/subsetting services that may be available from data providers. These may include data reformatting (e.g. to NetCDF, GeoTIFF, KLM and other file formats), data reprojection, data subsetting, and other options.
For a specific collection, the availability of customizations depends on whether the collection's provider supports customization services for it. Collections for which customizations are available are indicated with the label "CUSTOMIZABLE" following the collection name.
To see only customizable products, check the "Features | Customizable" checkbox on the left in collection view.
To specify a customization option, place an order for one or more granules of a customizable collection, and then choose the "Customize Order" option.
NOTE: customization services are not offered for all products, and not all customizable products support every option.
Entering grid coordinates: coordinate system options
CALIPSO
- Dimensions - Orbit/Path
- Enter orbit and path coordinates separated by spaces, e.g. "2,3 5,7 8,8"
- Note - Orbit and Path values are not continuous and cannot be used in a range.
- More info:
MISR
- Dimensions - Path/Block
- Enter path and block coordinates separated by spaces, e.g. "2,3 5,7 8,8"
- Note - Path values are not continuous and cannot be used in a range.
- More info:
MODIS EASE
- Dimensions - Horizontal/Vertical
- Enter h and v coordinates separated by spaces, e.g. "2,3 5,7 8,8"
- More info:
- "For MODIS Sea Ice EASE-Grid products. Tiles are 951 pixels x 951 pixels and 10 degrees by 10 degrees, with half of the tiles (313) located in the north polar grid and half in the south polar grid. In addition:
- The north polar grid tile coordinate system starts at (0,0) (horizontal tile number, vertical tile number) in the upper left corner and proceeds right (horizontal) and downward (vertical). The tile in the bottom left corner is (18,18).
- The south polar grid tile coordinate system starts at (0,20) and the tile in the bottom left corner is (18,38).
- The polar grids are based on the Lambert Azimuthal Equal Area map projection centered on each pole. The grids are compatible with the NSIDC EASE-Grid."
- https://nsidc.org/data/modis/ease-grid-tile-locations-sea-ice
- http://nsidc.org/data/ease
- "For MODIS Sea Ice EASE-Grid products. Tiles are 951 pixels x 951 pixels and 10 degrees by 10 degrees, with half of the tiles (313) located in the north polar grid and half in the south polar grid. In addition:
MODIS Sinusoidal
- Dimensions - Horizontal/Vertical
- Enter h and v coordinates separated by spaces, e.g. "2,3 5,7 8,8"
- More info:
- "MODIS Land products use the Sinusoidal grid tiling system. Tiles are 10 degrees by 10 degrees at the equator. The tile coordinate system starts at (0,0) (horizontal tile number, vertical tile number) in the upper left corner and proceeds right (horizontal) and downward (vertical). The tile in the bottom right corner is (35,17)."
- http://spatialreference.org/ref/sr-org/modis-sinusoidal/
- https://modis-land.gsfc.nasa.gov/MODLAND_grid.html
- https://lpdaac.usgs.gov/dataset_discovery/modis
WELD ALASKA Tile
Upper Left Tile (ul corner) Lower Right Tile (lr corner) (h) (v) ulX (m) ulY (m) (h) (v) lrX (m) lrY (m) Alaska 0 0 -851715 2474325 16 13 1698285 374325 - Dimensions - Horizontal/Vertical
- Enter h and v coordinates separated by spaces, e.g. "2,3 5,7 8,8"
- More info:
- A U.S. Landsat ARD 30m tile system based on the Web-Enabled Landsat Data (WELD) project, with coordinates anchored in ALASKA.
WELD CONUS Tile
Upper Left Tile (ul corner) Lower Right Tile (lr corner) (h) (v) ulX (m) ulY (m) (h) (v) lrX (m) lrY (m) CONUS 0 0 -2565585 3314805 32 21 2384415 14805 - Dimensions - Horizontal/Vertical
- Enter h and v coordinates separated by spaces, e.g. "2,3 5,7 8,8"
- More info:
- A U.S. Landsat ARD 30m tile system based on the Web-Enabled Landsat Data (WELD) project, with coordinates anchored in the Continental United States (CONUS)
WRS-1 (Landsat 1-3)
- Dimensions - Path/Row
- Enter path and row coordinates separated by spaces, e.g. "2,3 5,7 8,8"
- More info:
- "The Worldwide Reference System (WRS) is a global notation used in cataloging Landsat data. Landsat 8 and Landsat 7 follow the WRS-2, as did Landsat 5 and Landsat 4. Landsat 1, Landsat 2, and Landsat 3 followed WRS-1.""
- https://landsat.usgs.gov/what-worldwide-reference-system-wrs
WRS-2 (Landsat 4+)
- Dimensions - Path/Row
- Enter path and row coordinates separated by spaces, e.g. "2,3 5,7 8,8"
- More info:
- "The Worldwide Reference System (WRS) is a global notation used in cataloging Landsat data. Landsat 8 and Landsat 7 follow the WRS-2, as did Landsat 5 and Landsat 4. Landsat 1, Landsat 2, and Landsat 3 followed WRS-1.""
- https://landsat.usgs.gov/what-worldwide-reference-system-wrs
Using NASA Earthdata datasets in other works
NASA data are freely accessible; however, when you publish these data or works based on the data, we request that you cite the datasets within the text of your work, and include references to the datasets in your reference list.
References to datasets should have enough detail to allow your audience to obtain the datasets themselves and conduct their own studies based on your work. (For complete provenance and understanding of specifically which parts of data were used and how, it also may be necessary to describe in detail, within the body of your work, exactly how the data is used.)
Because each discipline within Earth science has its own unique approach to data, each dataset provider has posted examples on how to cite and reference its discipline-specific data and services.
These can be found at:
- How to Use the Download Access Script for Earthdata Search
-
Instructions for how to use the download access script provided by Earthdata Search, which allows users to easily download large numbers of files.
IMPORTANT: The download access script works on Mac, Linux and Windows systems. Windows users will need to a program that emulates a Linux command line, such as Cygwin. Cygwin is free, and can be download here: https://www.cygwin.com/install.html
Step-by-step guide
In your Earthdata Login profile, make sure you have authorized the application from which you are downloading data (see How To Pre-authorize an application). There are many similarly named apps. If you aren't sure which one, authorize all apps you think could be relevant to your data. For example, if you are trying to get data from goldsmr5.gesdisc.eosdis.nasa.gov and it's not working, make sure you approve all the apps containing the word "GESDISC," just to be sure. After downloading the script, open Terminal (Mac or Linux) or Cygwin (Windows) and navigate to the folder that contains your script
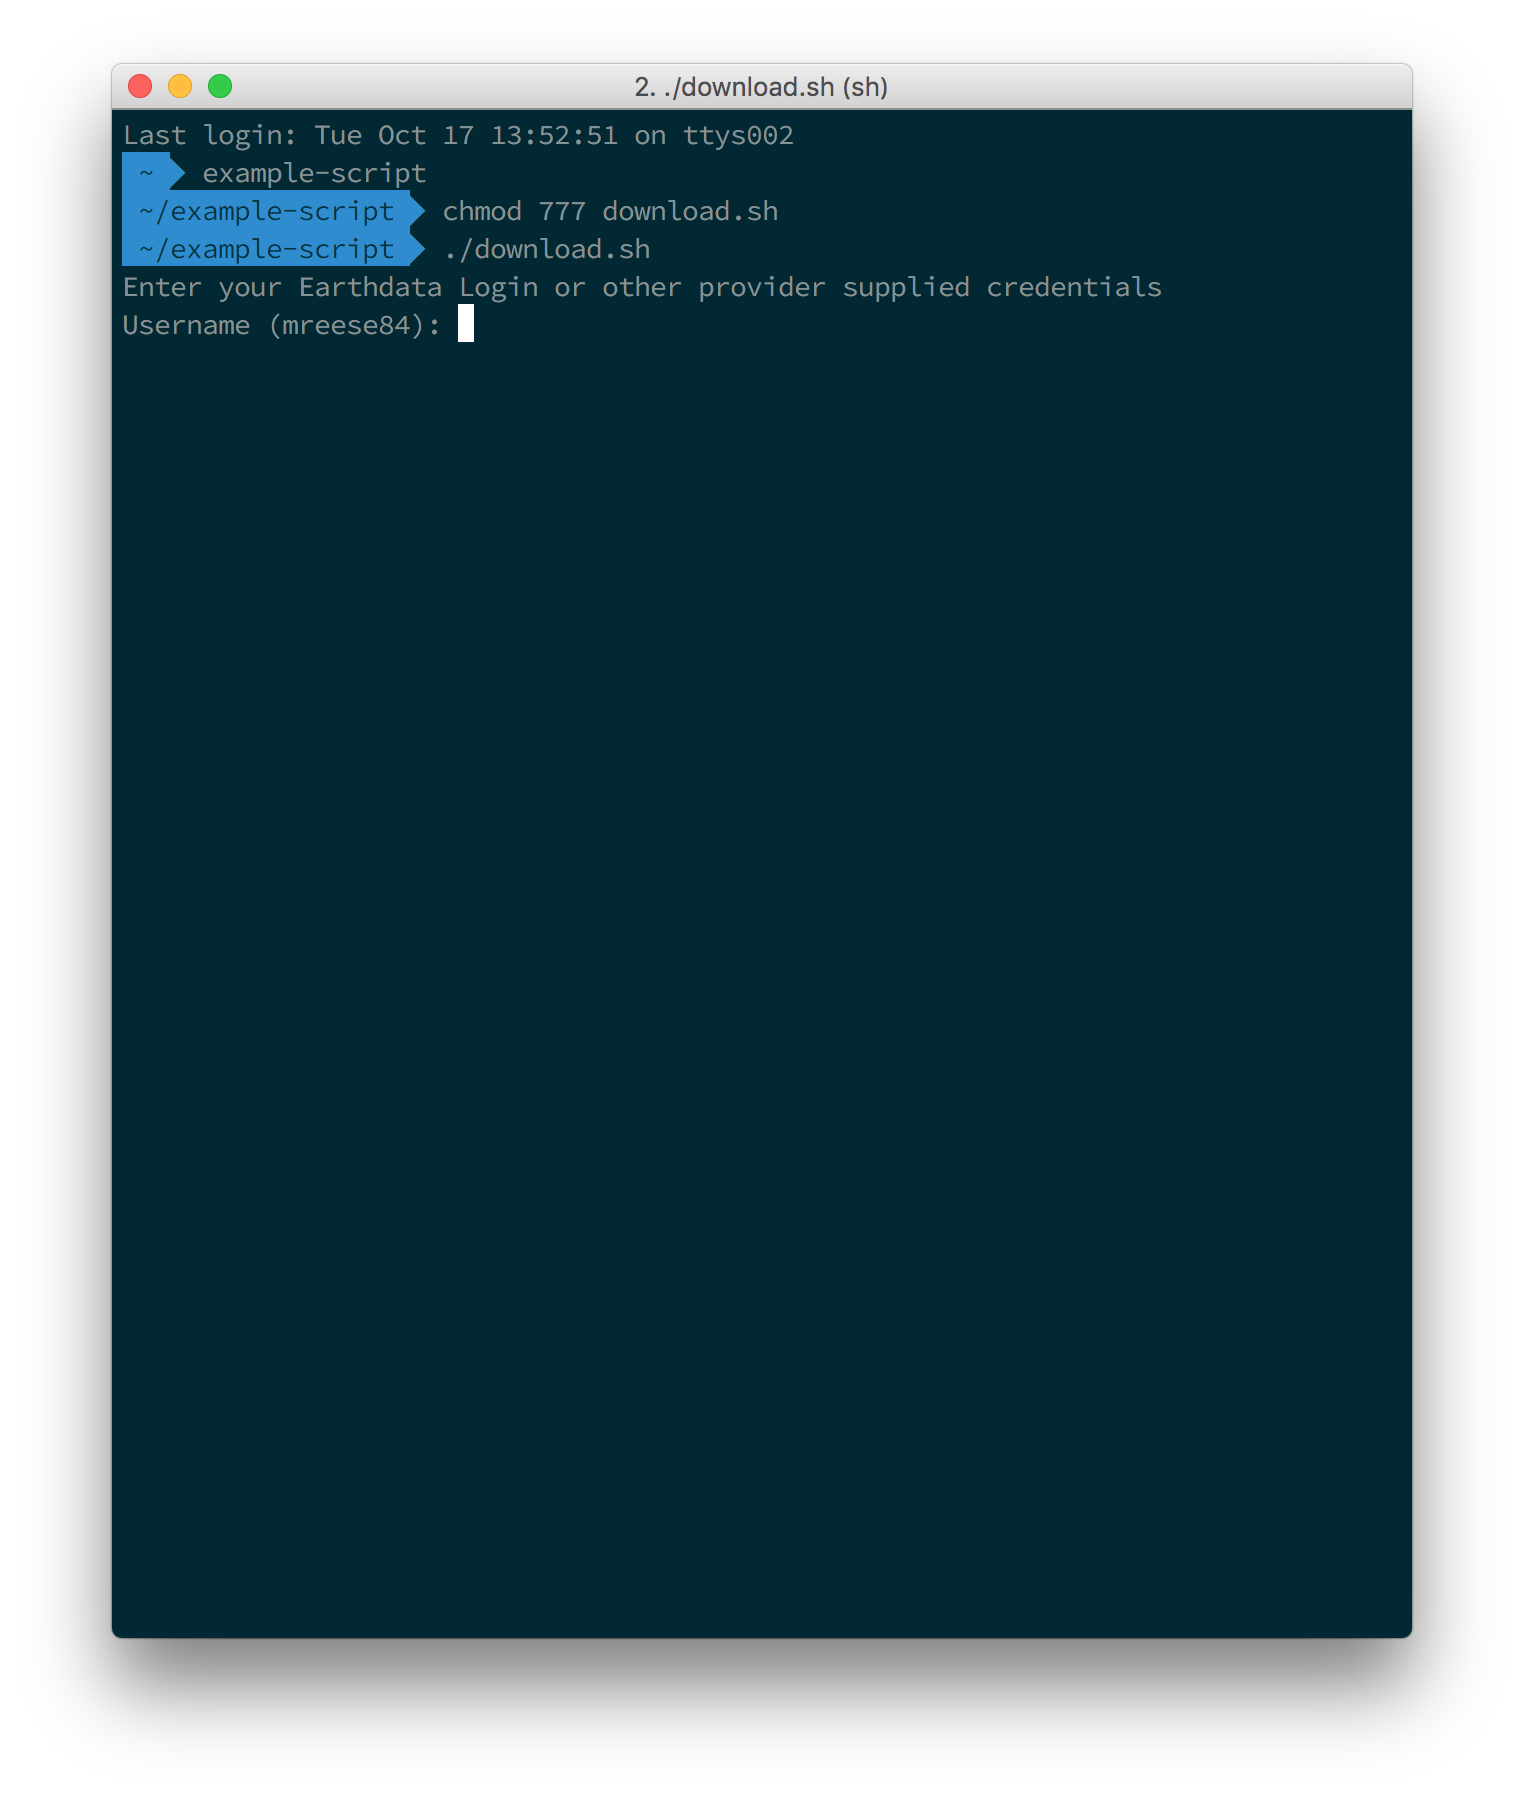
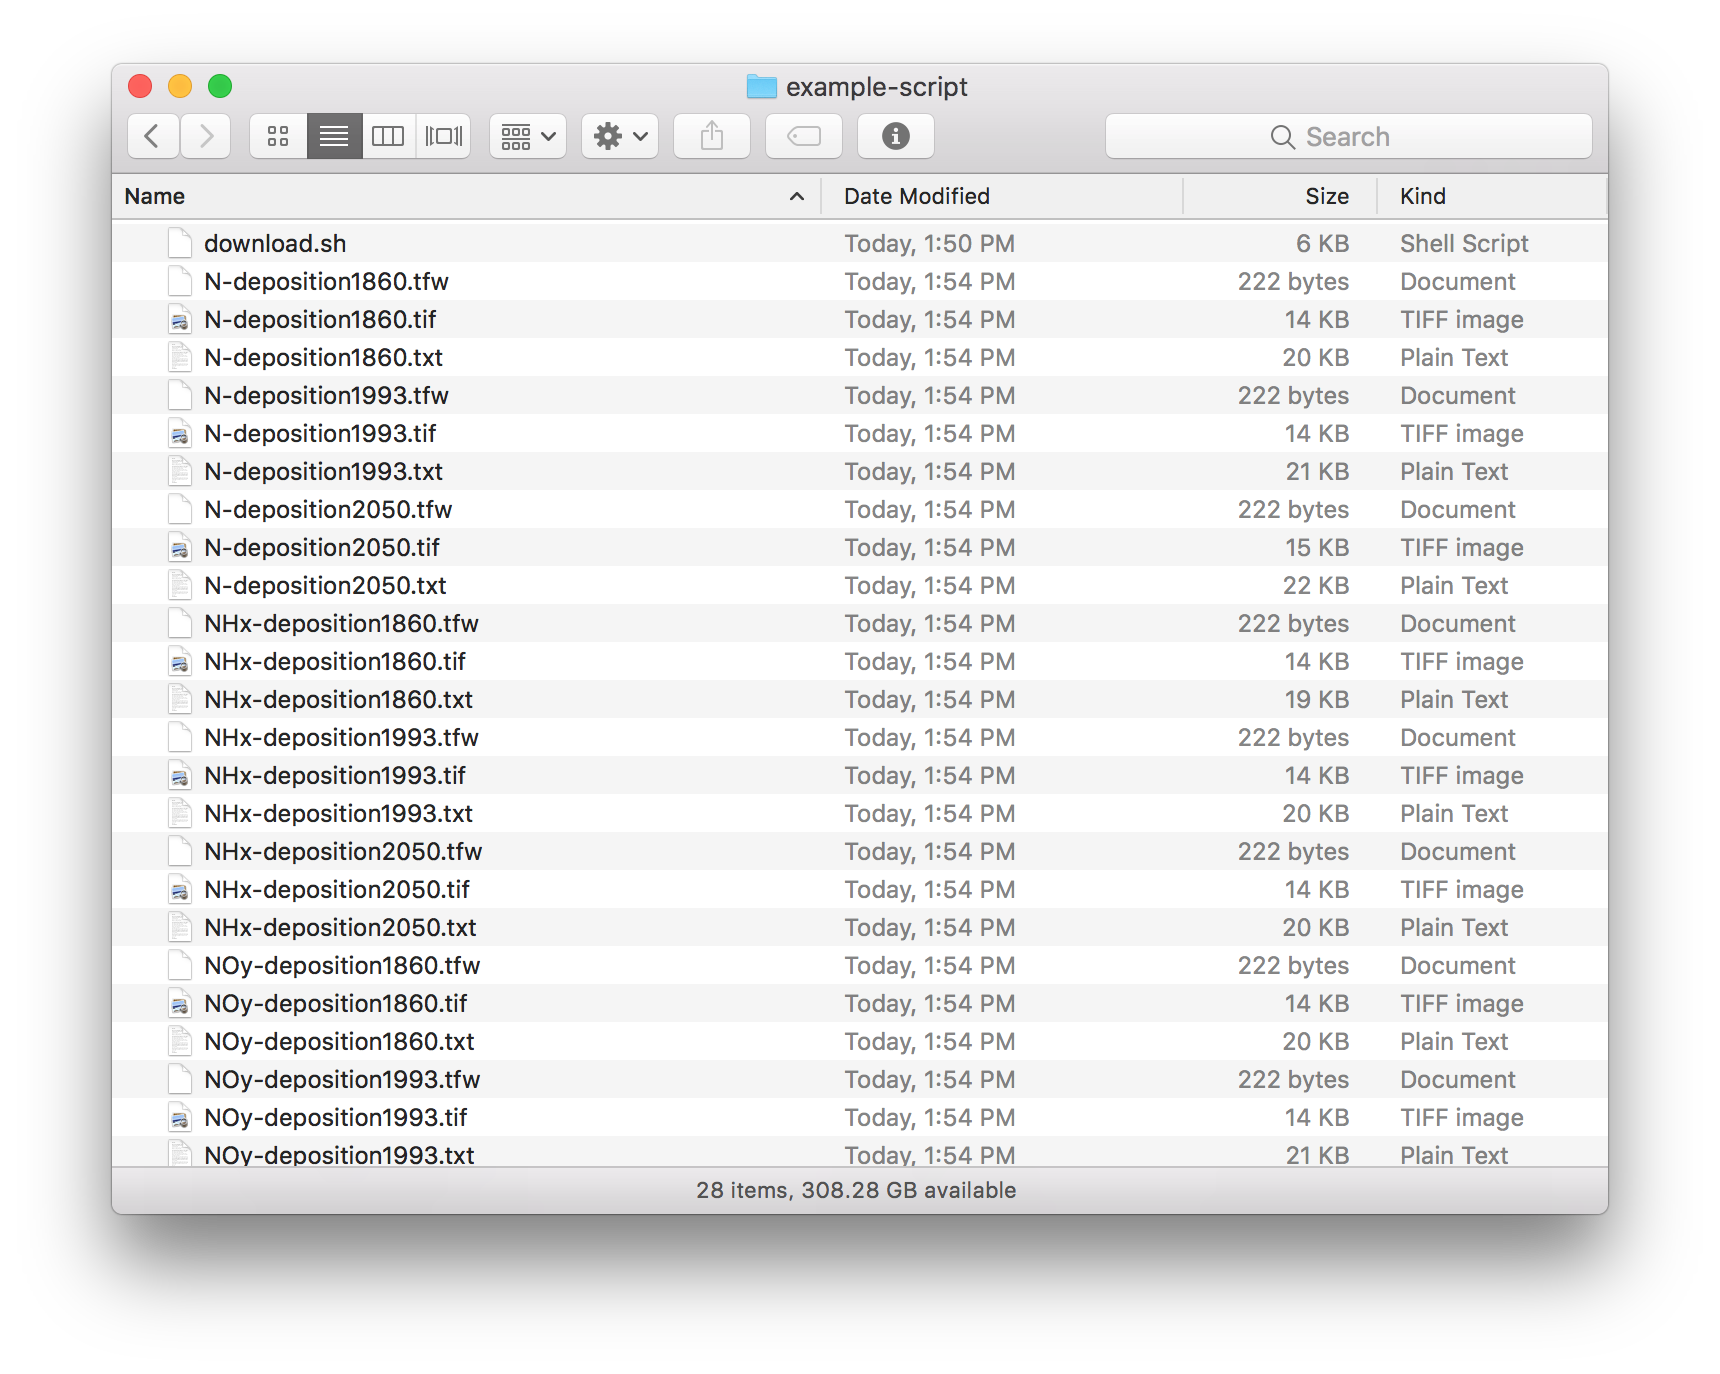
Next, run the following command to make the script executable:The files downloaded by this script will be downloaded to the folder that your script is in. If you want your files downloaded to a specific folder, please make sure to move the script to that folder before executing the script.
Now that your script is executable, run the script using the following command. (Note: the leading period and forward slash is required.)chmod777download.sh
The script will ask for your Earthdata Login credentials../download.shNote: your Earthdata Login username and password are case-sensitive, so be sure CAPSLOCK is off.
When asked for your Username, please enter your Earthdata Login username.
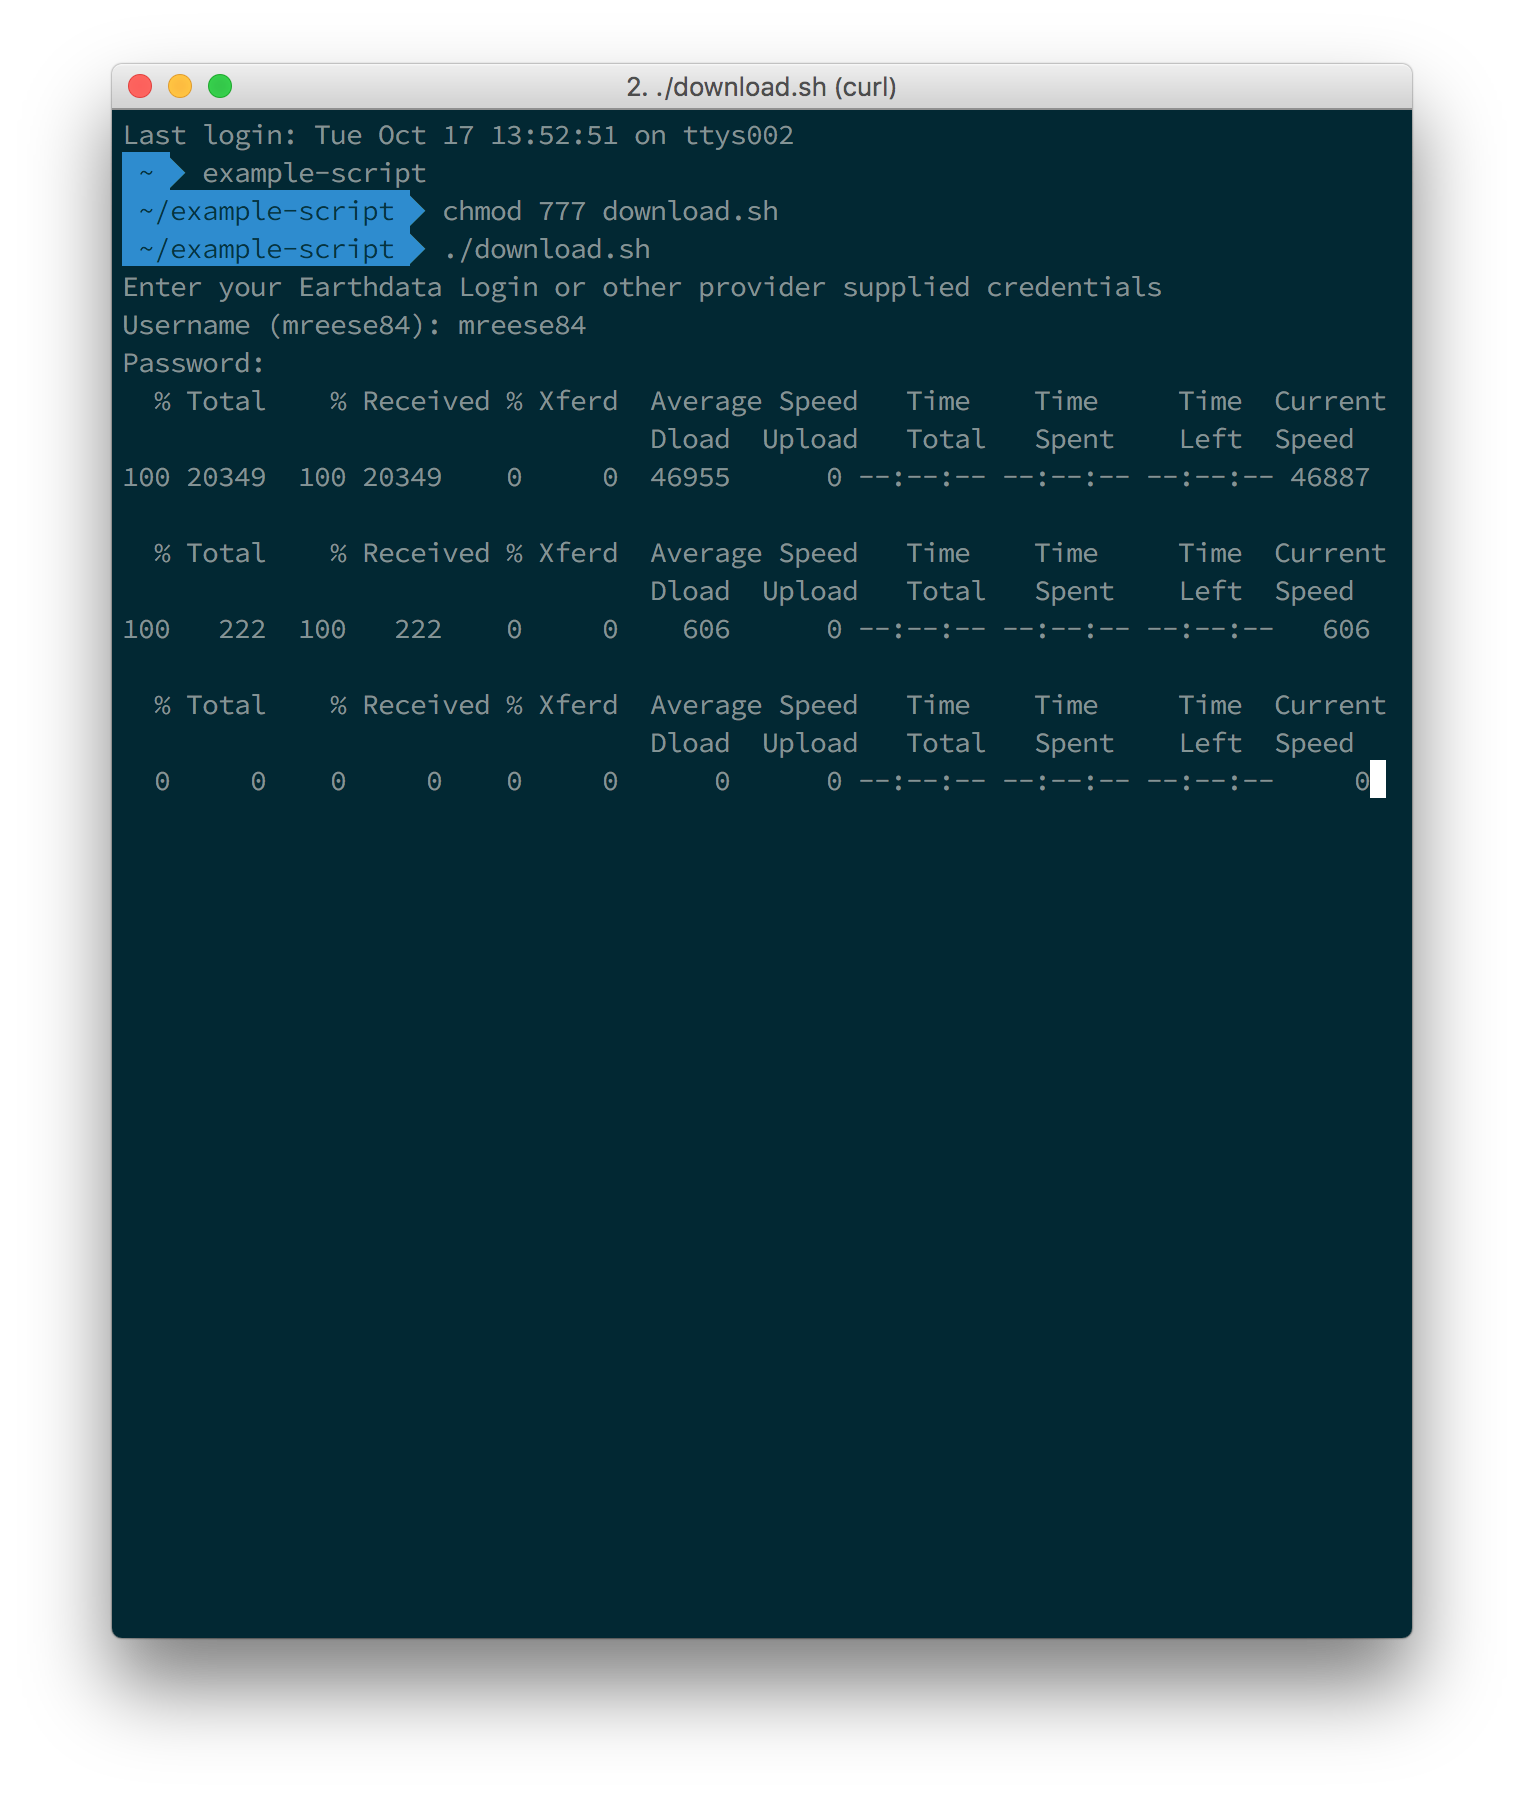
When asked for your Password, please enter your Earthdata Login password. When entering your password, you cannot see your password as you type. This is a Unix convention for security, but it can be confusing.
After entering your password, be sure to hit the RETURN key. After entering your password and hitting the RETURN key, the downloads will begin. You should start to see download statuses appear for each link present in the download script. At this point, you should start seeing files downloaded to your computer. The script will terminate once it has attempted to download the files specified in the script.IF YOU HAVE PROBLEMS WITH THE SCRIPT To download multiple files, a simple alternative to the script is to use wget as follows:
wget --user=myusername --password=mypassword -i url_list.txtwhere myusername is your Earthdata Login username, mypassword is your Earthdata Login password, and url_list.txt is a text file with one granule download link per line.
For convenience, wget can pull urls directly out of Earthdata Search's download access script, so the following will also work:wget --user=myusername --password=mypassword -i download.shTo download a single file, you can use wget as follows:
wget --user=myusername --password=mypassword urlwhere url is link for the file you want to download.
Another alternative is to use DownloadThemAll!, an add-in for the Firefox browser. (TIP: By adding .txt to the end of the download script, you can use DownloadThemAll!'s "import from file" feature to download the links it contains.). DownloadThemAll! is not compatible with Firefox Quantum, so be sure to check your version of Firefox to verify compatibility.
An alternative to DownloadThemAll! is "Chrono Download Manager," an extension for the Google Chrome browser that has many of the features of DownThemAll! for Firefox.
IF YOU HAVE CONNECTION FAILURES Connection failures like "Operation timed out" or "No route to host" are an indication that the data provider's server may be temporarily unavailable.
To see a list of known data provider outages, click the alerts button (the little bell icon) in the upper right-hand corner of Earthdata Search.
IF YOU SEE THE ERROR "curl:option --netrc-file: is unknown" When running the script, if you get the error
curl: option --netrc-file: is unknownthis means the curl command is not recognizing the option --netrc-file.
The --netrc-file option was added in curl version 7.21.5. You can check your version of curl by running the following command:
curl -VIf your version of curl is less than 7.21.5, you need to update curl.
If you have .netrc already set up with your login credentials, you may be able to get the script to work without updating curl by editing the script and removing the following from the curl command line: --netrc-file "$netrc"IF YOU DO NOT HAVE WGET - Windows users can download it at https://eternallybored.org/misc/wget/
- Mac OS X users can install it using Homebrew (https://brew.sh) using the command `brew install wget`
- Additional information on wget is available at https://www.gnu.org/software/wget/faq.html
IF YOU ARE A WINDOWS USER - Windows users can download it at https://eternallybored.org/misc/wget/
- Mac OS X users can install it using Homebrew (https://brew.sh) using the command `brew install wget`
- Additional information on wget is available at https://www.gnu.org/software/wget/faq.html
IF YOU SEE ERROR "is not recognized as an internal or external command" ON WINDOWS The download access script works on Windows systems with a program that emulates a Linux command line, such as Cygwin.
If you are a Windows user and you do not have Cygwin, you can download it here: https://www.cygwin.com/install.html
- How to Configure and Confirm Download Methods in Earthdata Search
-
Earthdata Search enables users to download data through various methods. These methods include:
Direct Download - Direct download of all data associated with the selected granules. The desired data will be available for download immediately. Files will be accessed from a list of links displayed in the browser or by using a download script. Stage for Delivery - Submit a request for data to be staged for delivery. Data files will be compressed in zip format and stored for retrieval via HTTP. The user will receive an email from the data provider when the files are ready to download. Customized - Select options like variables, transformations, and output formats to customize the data. The desired data files will be made available for access after the data provider has finished processing the request. The user will receive an email from the data provider when the files are ready to download.STEP-BY-STEP INSTRUCTIONS
Configure Download Methods for Collections
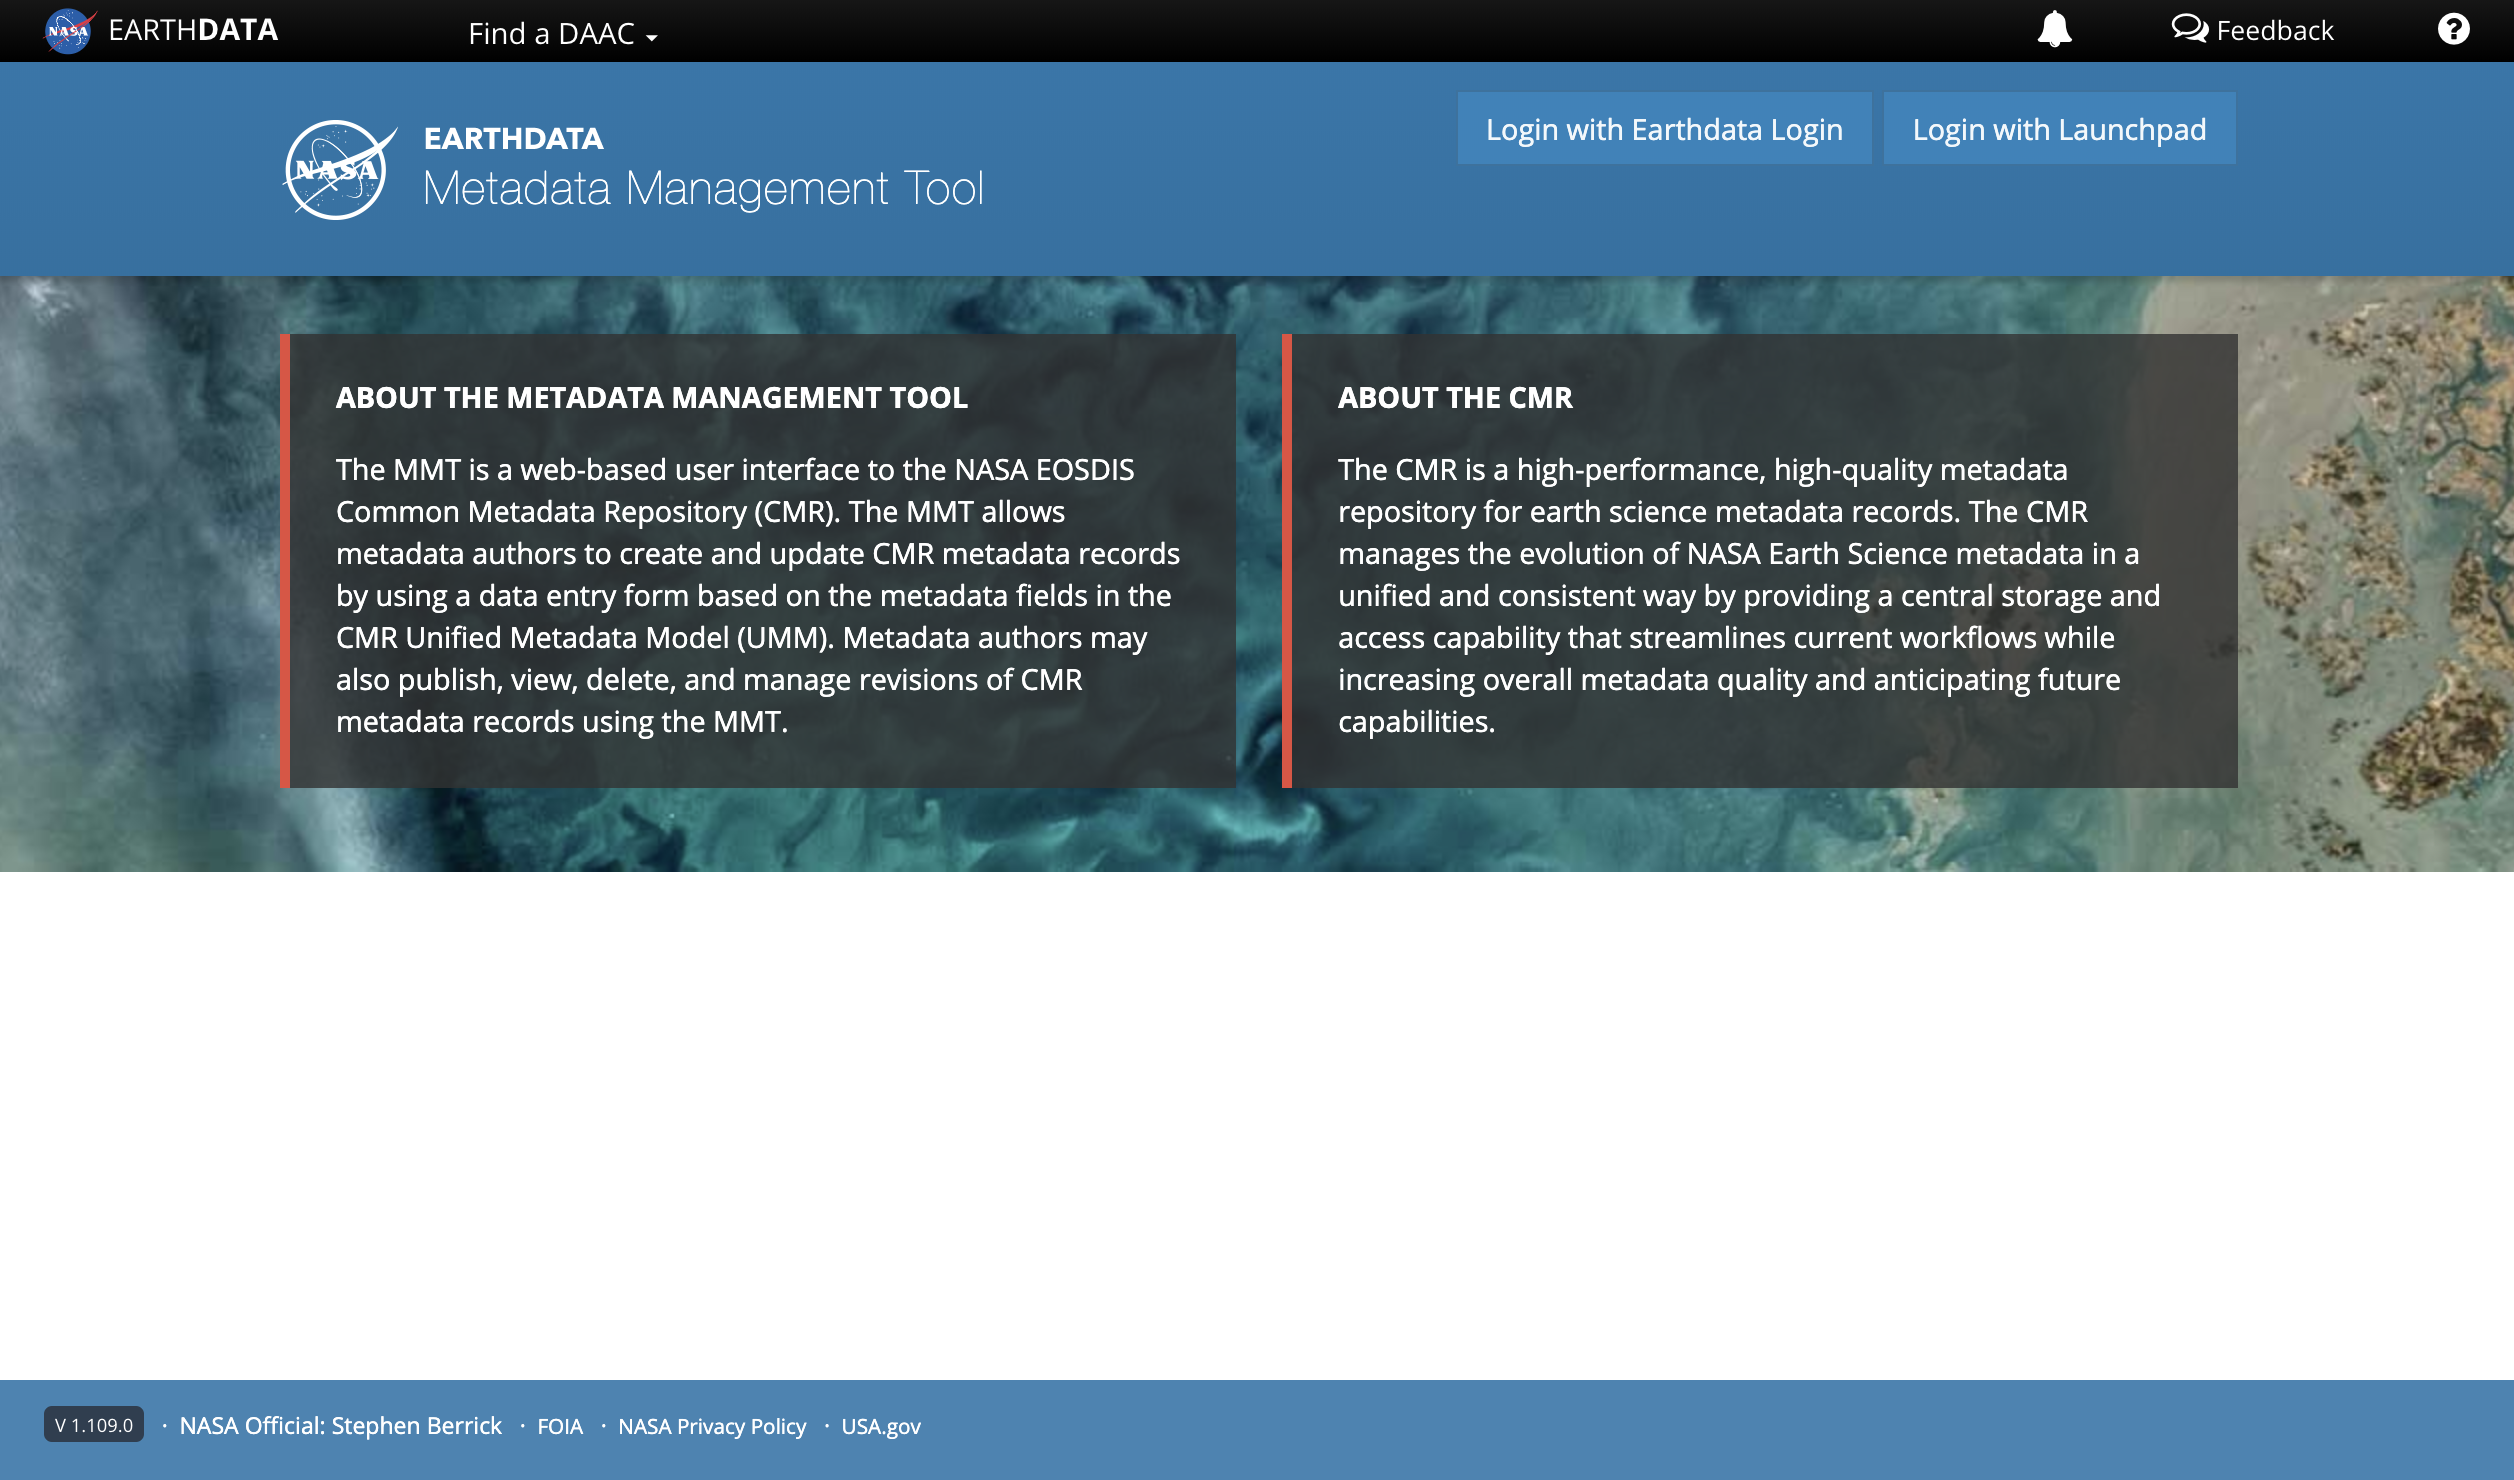
Configure Download Methods for CollectionsThese steps can be used to enable Stage for Delivery or Customized download options. - LOGIN to the Metadata Management Tool at https://mmt.earthdata.nasa.gov.
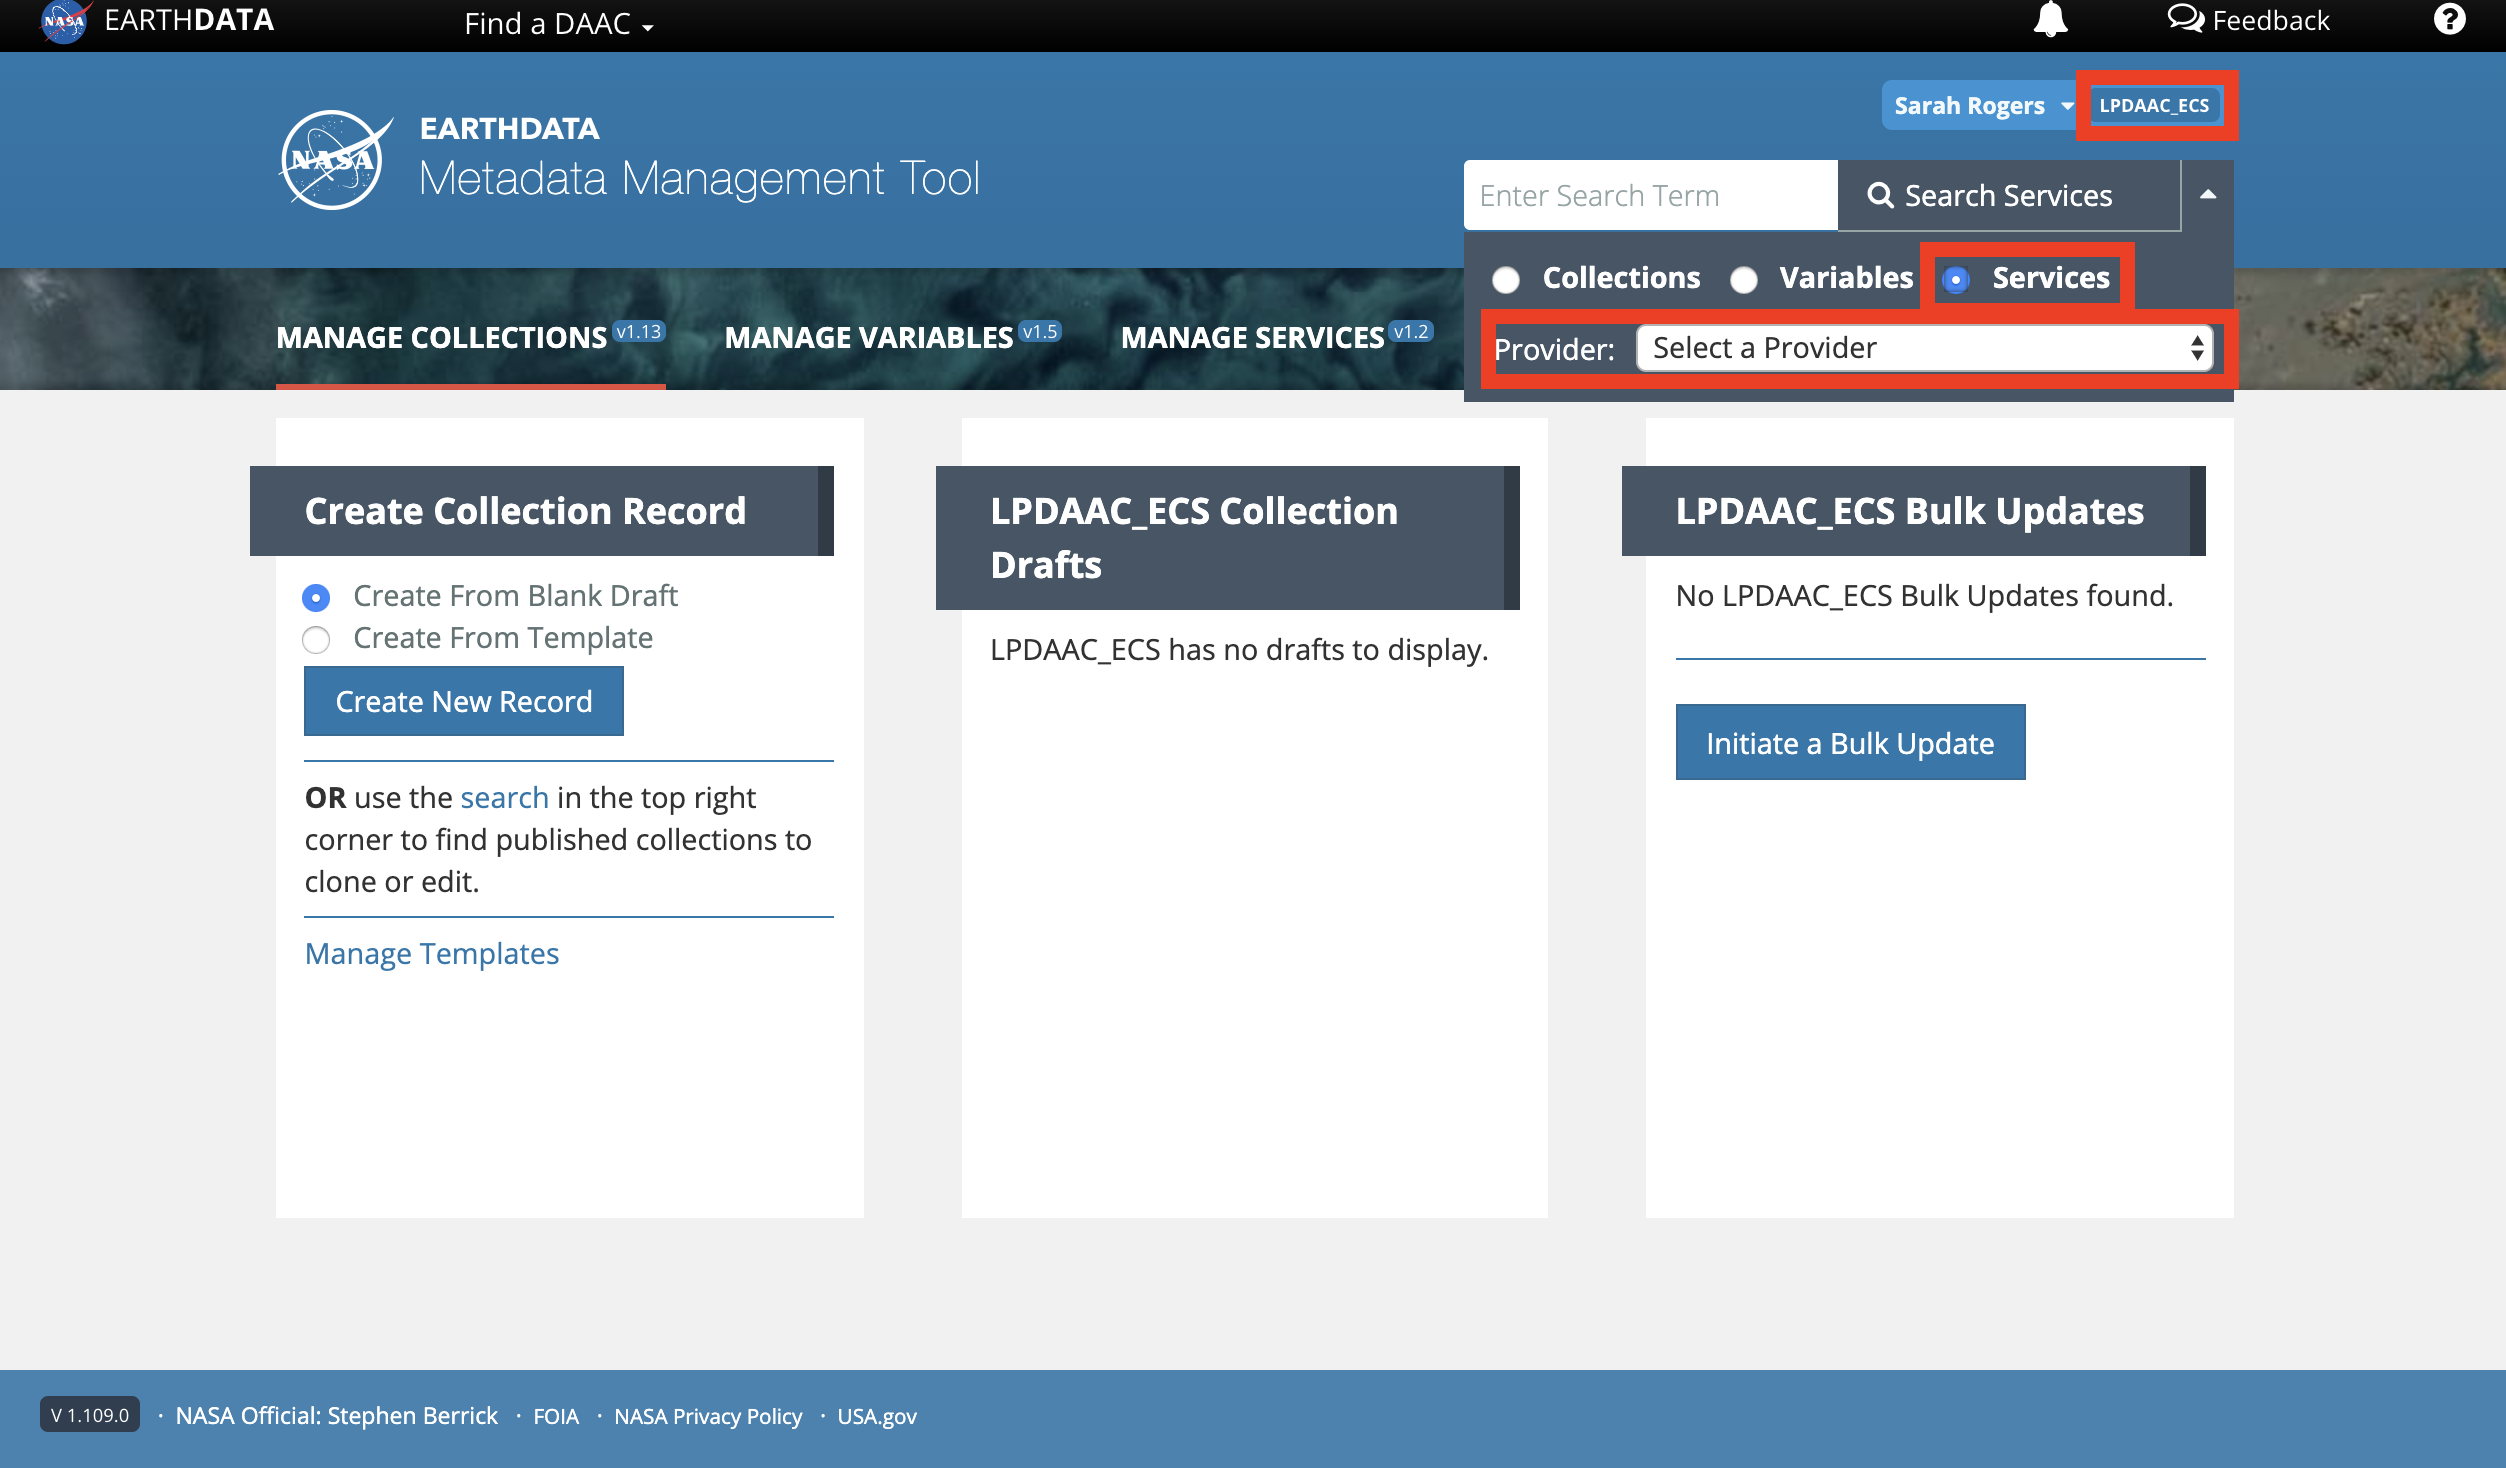
This method will enable download options in the PROD environment only. For changes to UAT use https://mmt.uat.earthdata.nasa.gov/. For changes to SIT use https://mmt.sit.earthdata.nasa.gov/. - SELECT the appropriate provider in both the context drop-down and under "Provider." SELECT the Services radio button, then CLICK Search Services.
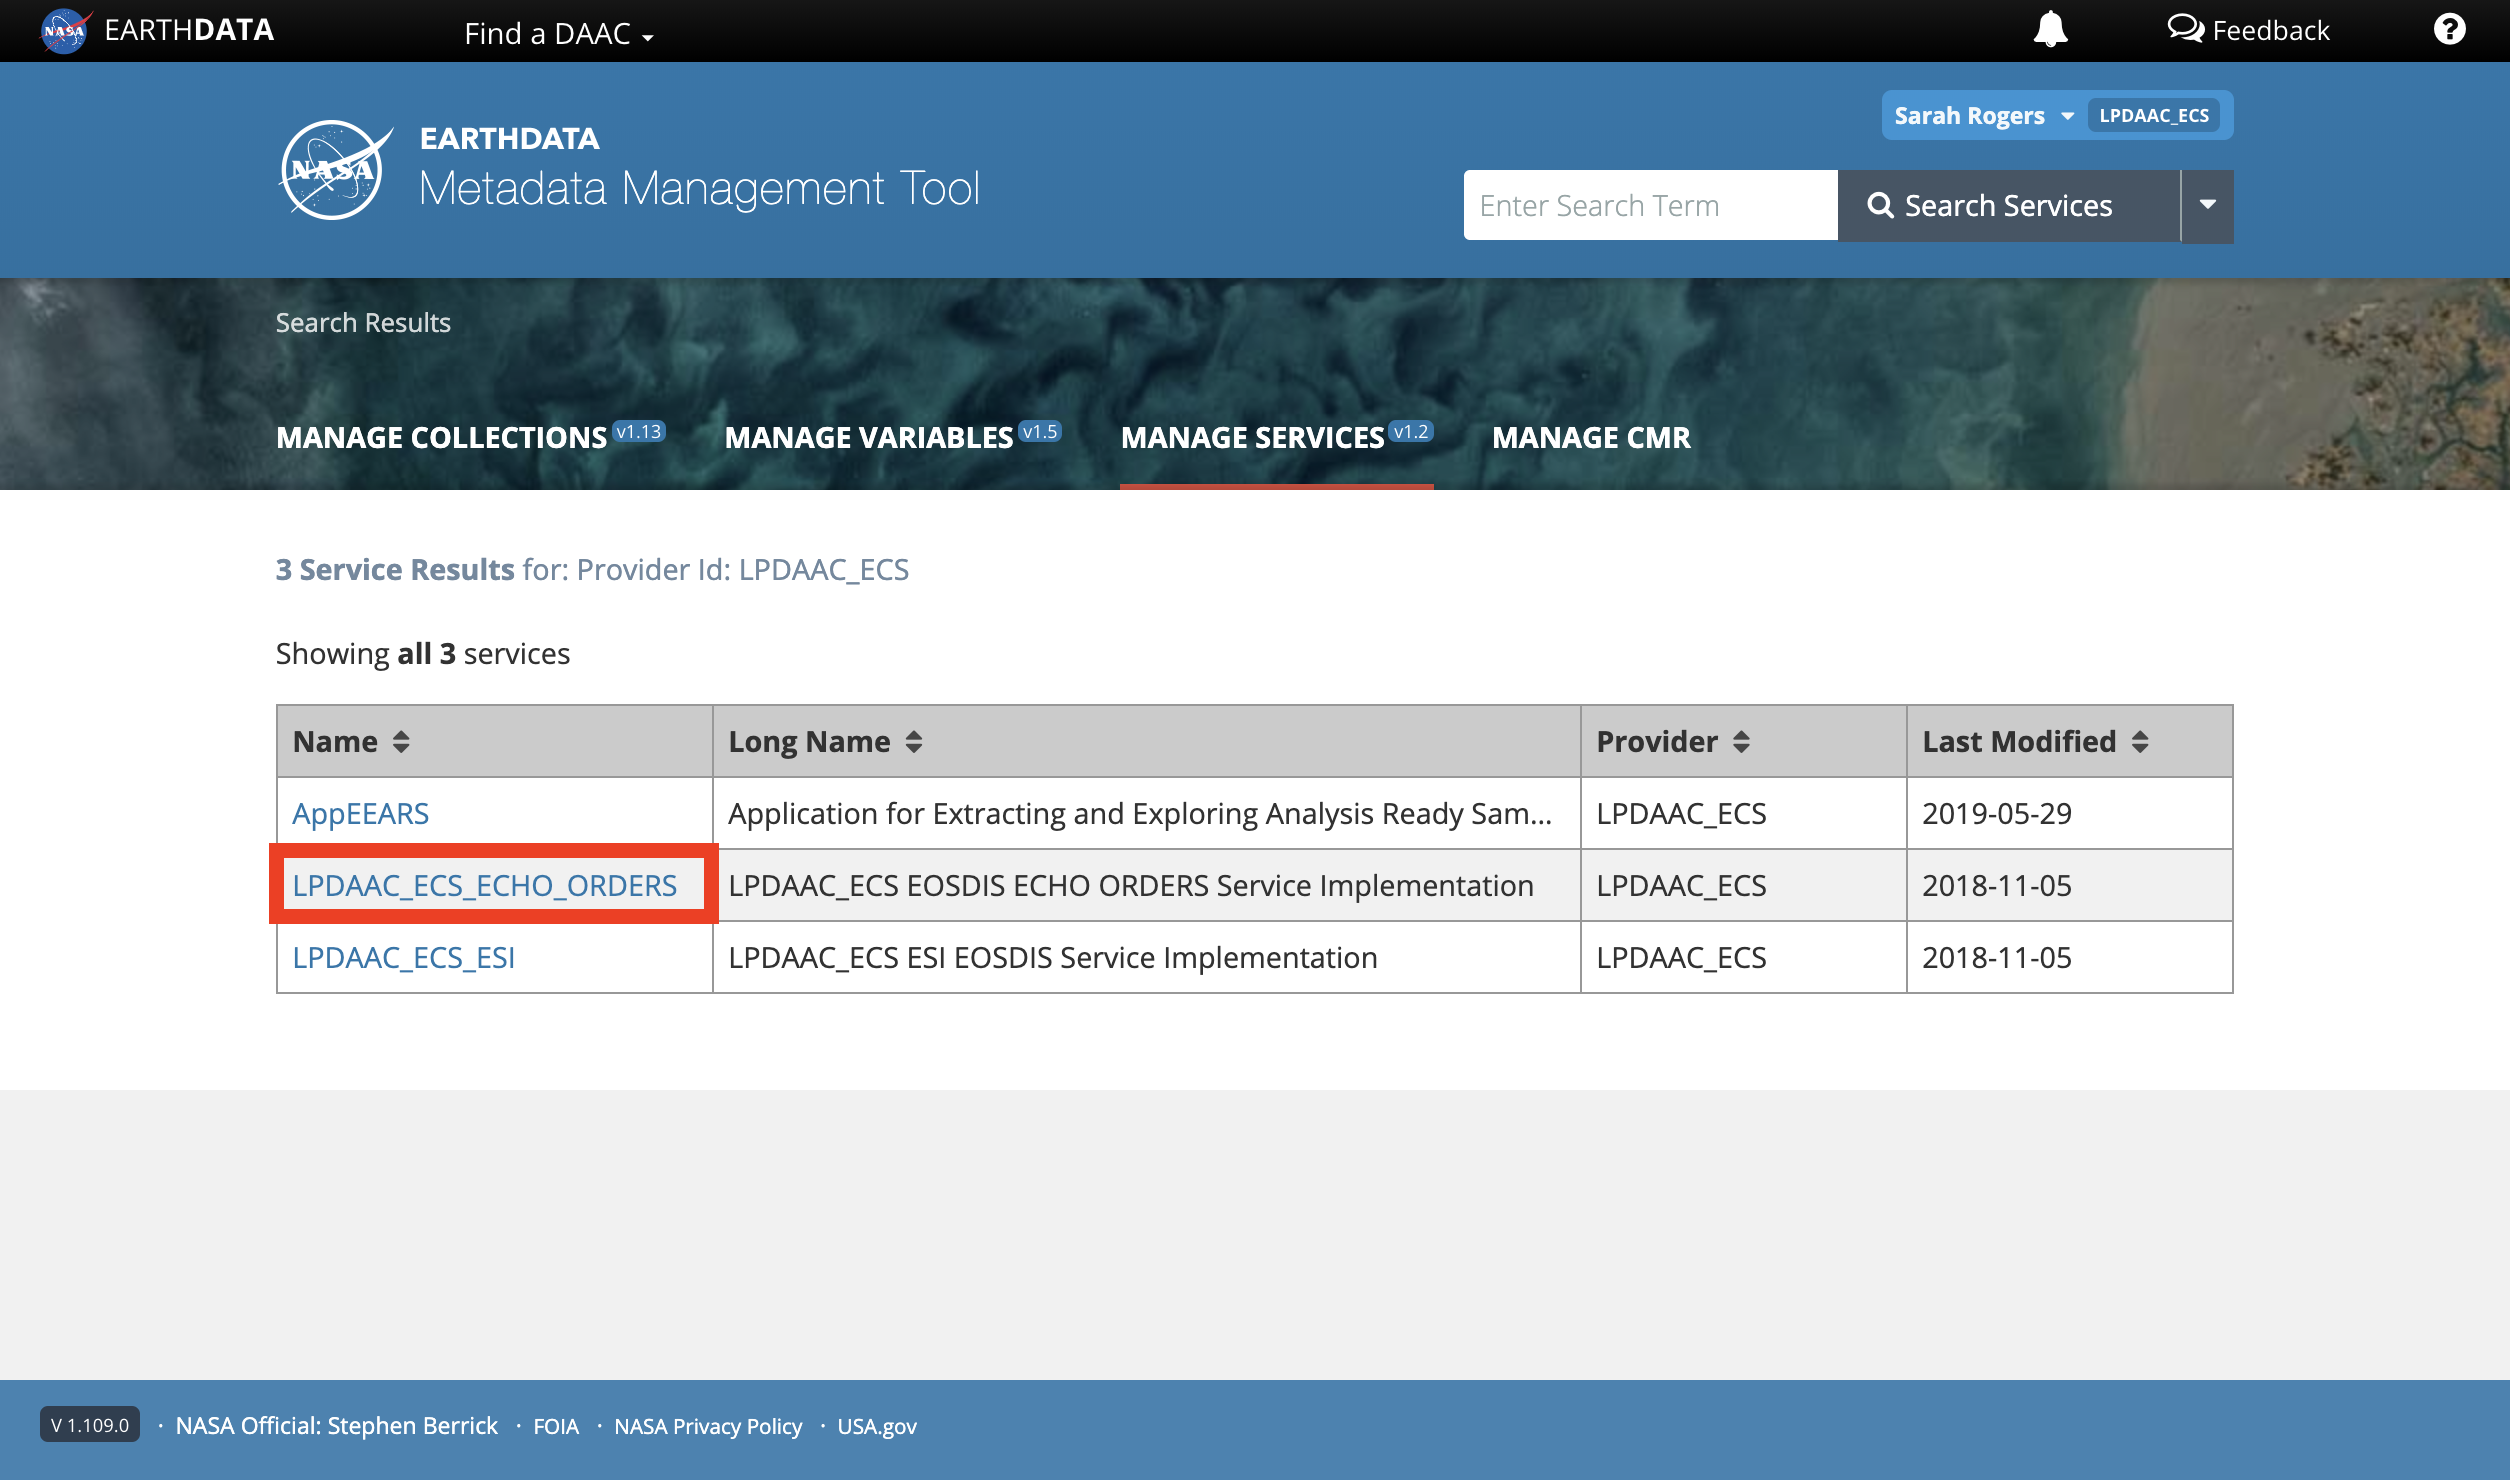
- CLICK the appropriate service implementation record.
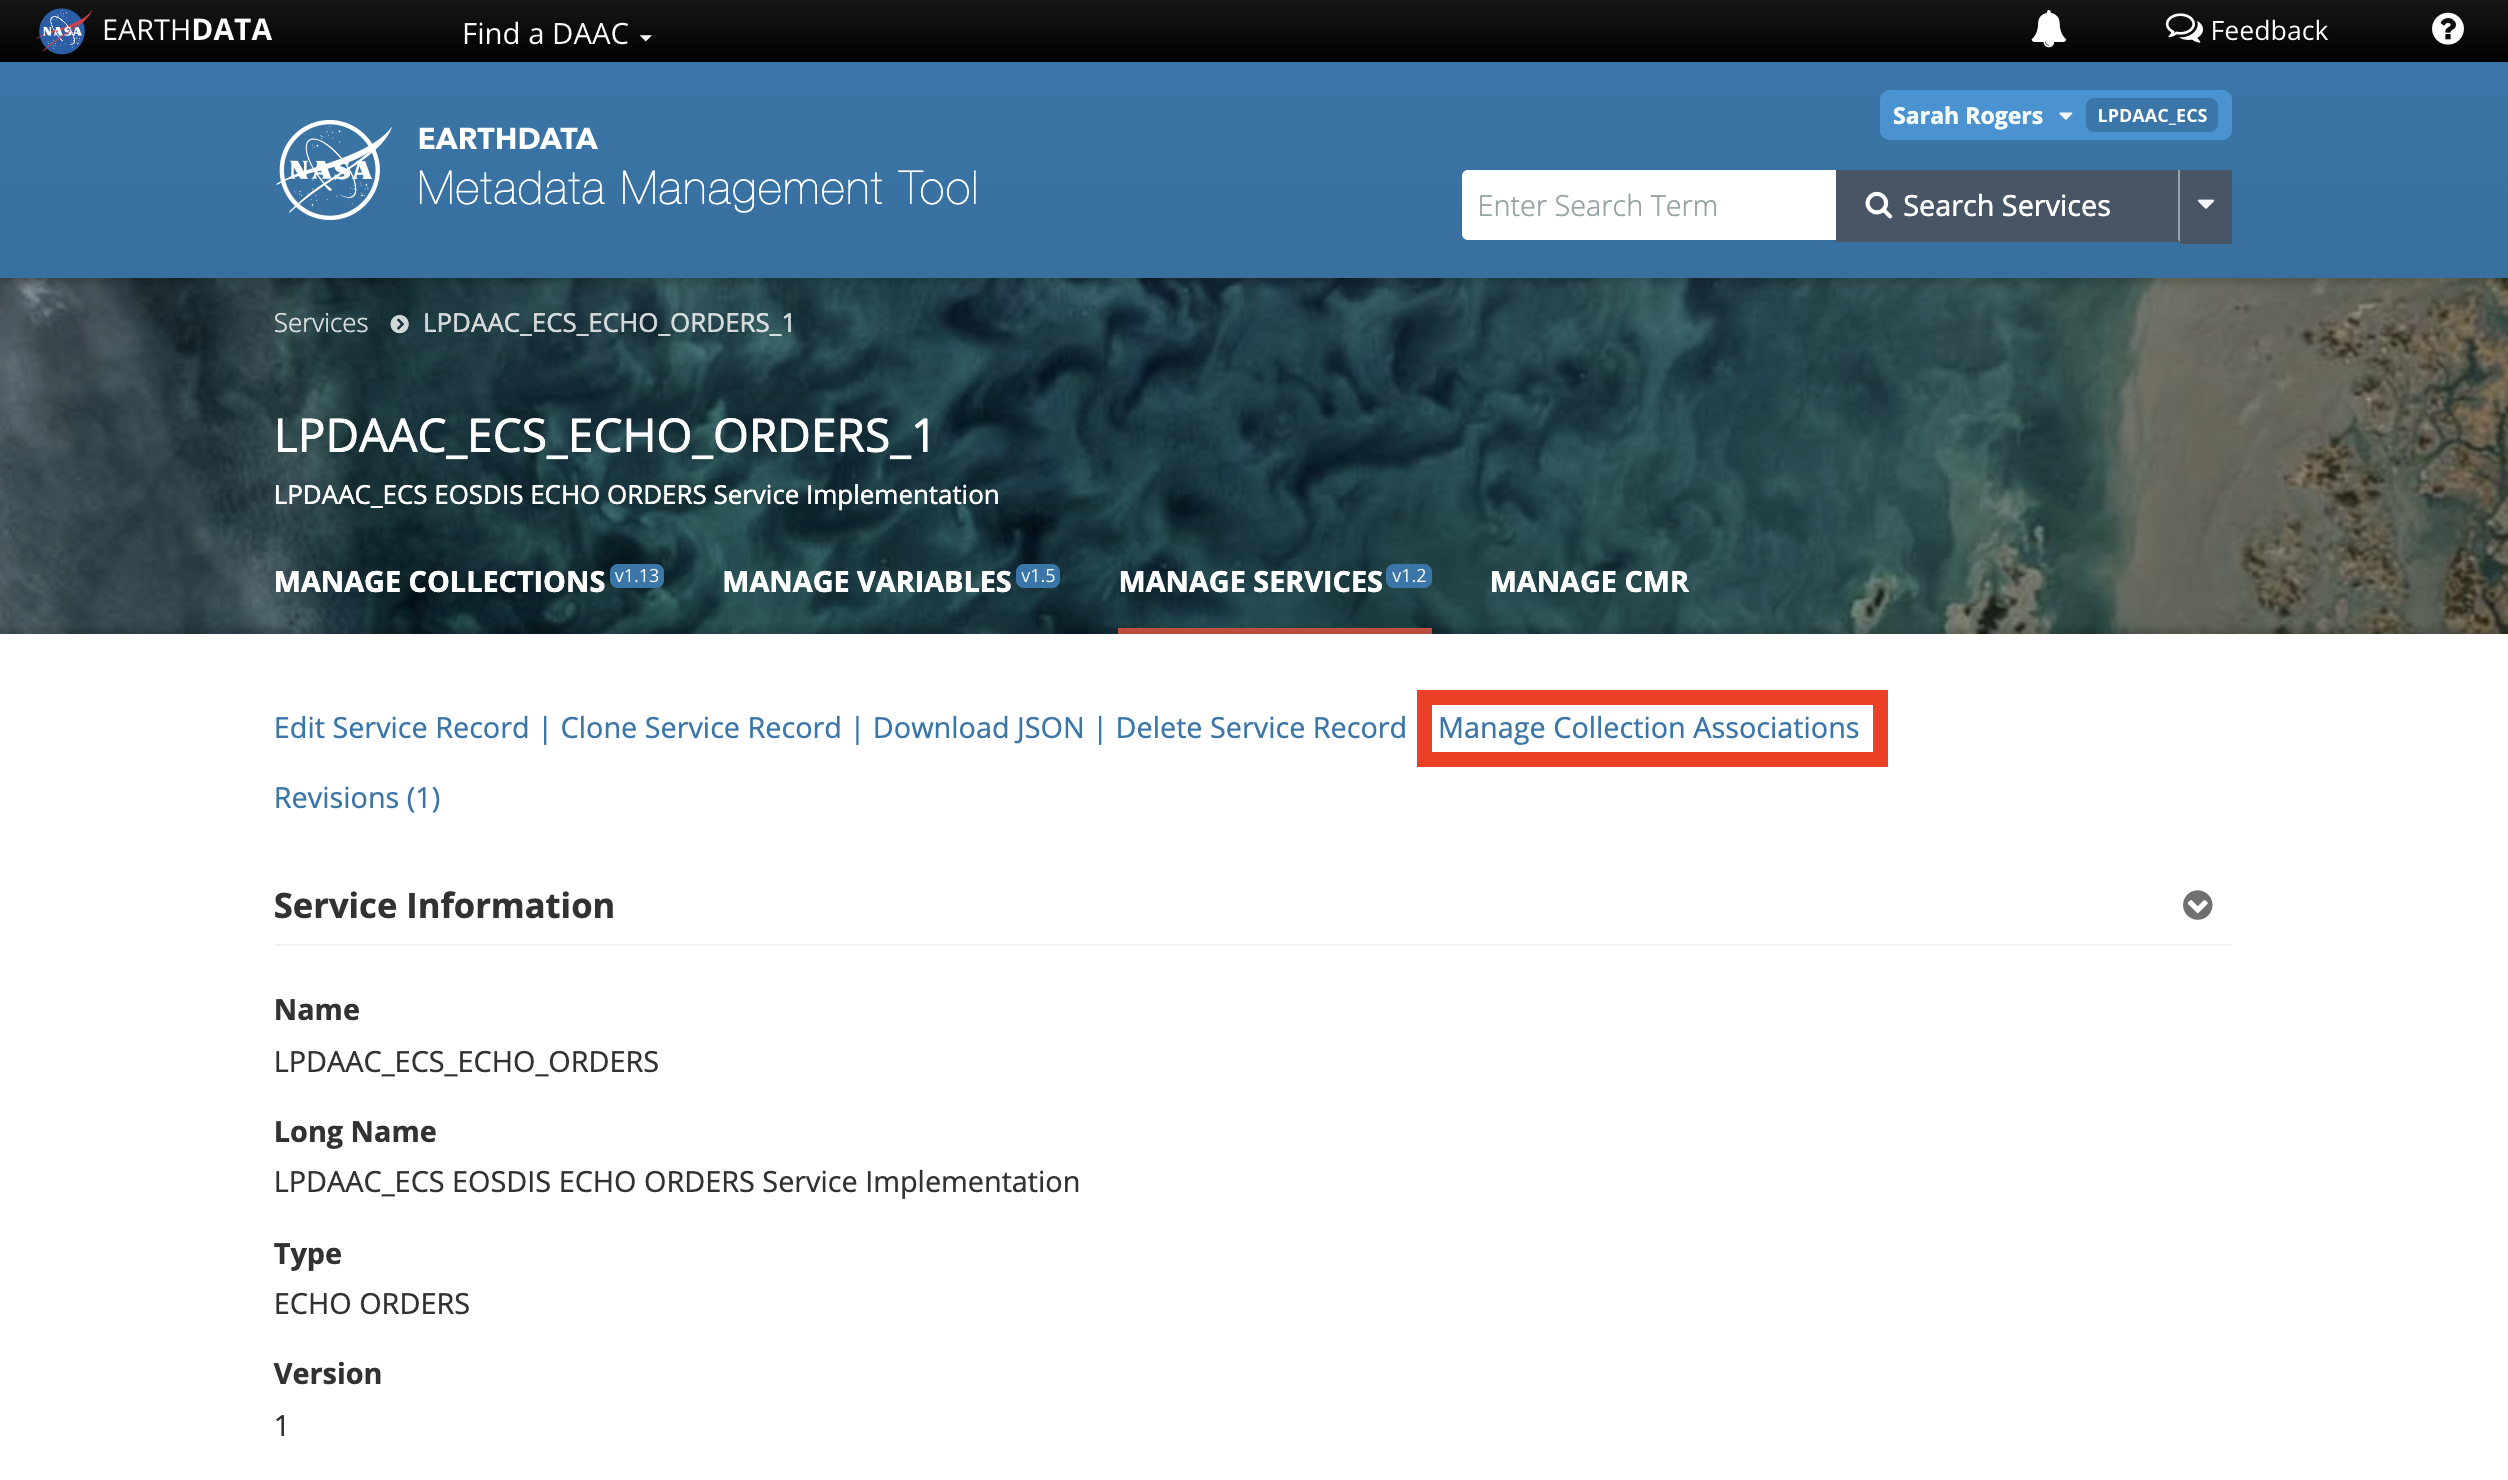
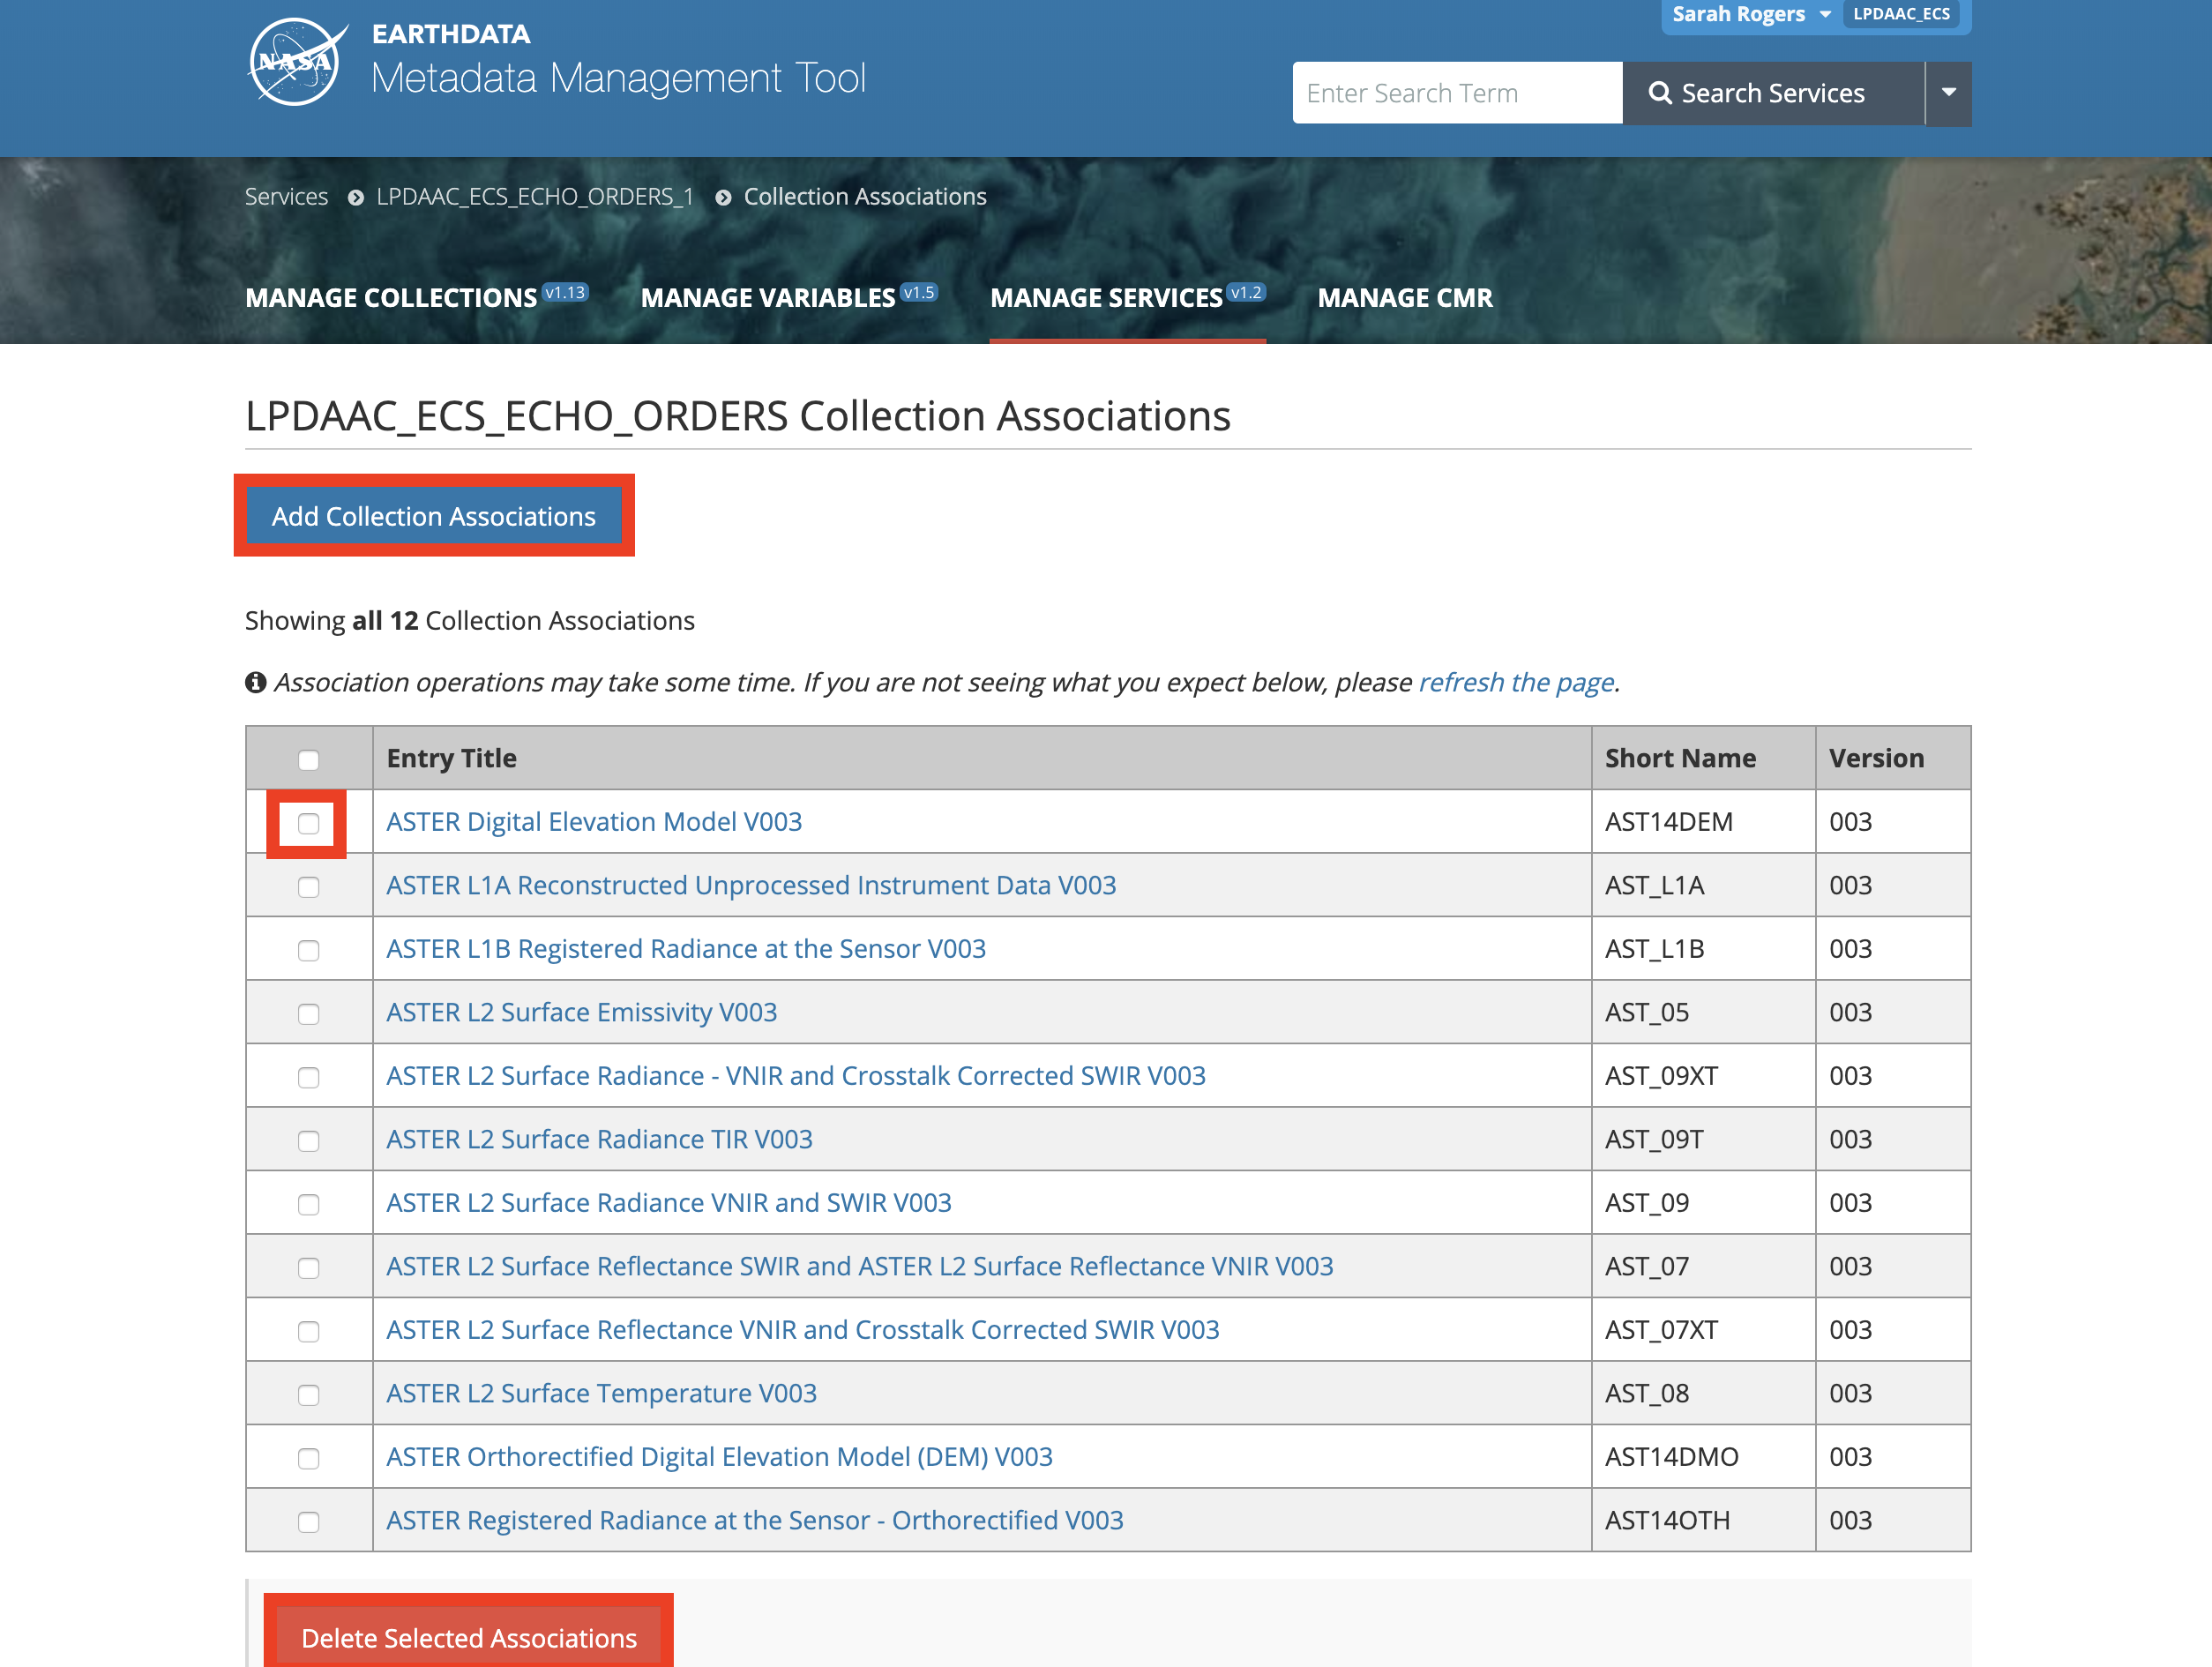
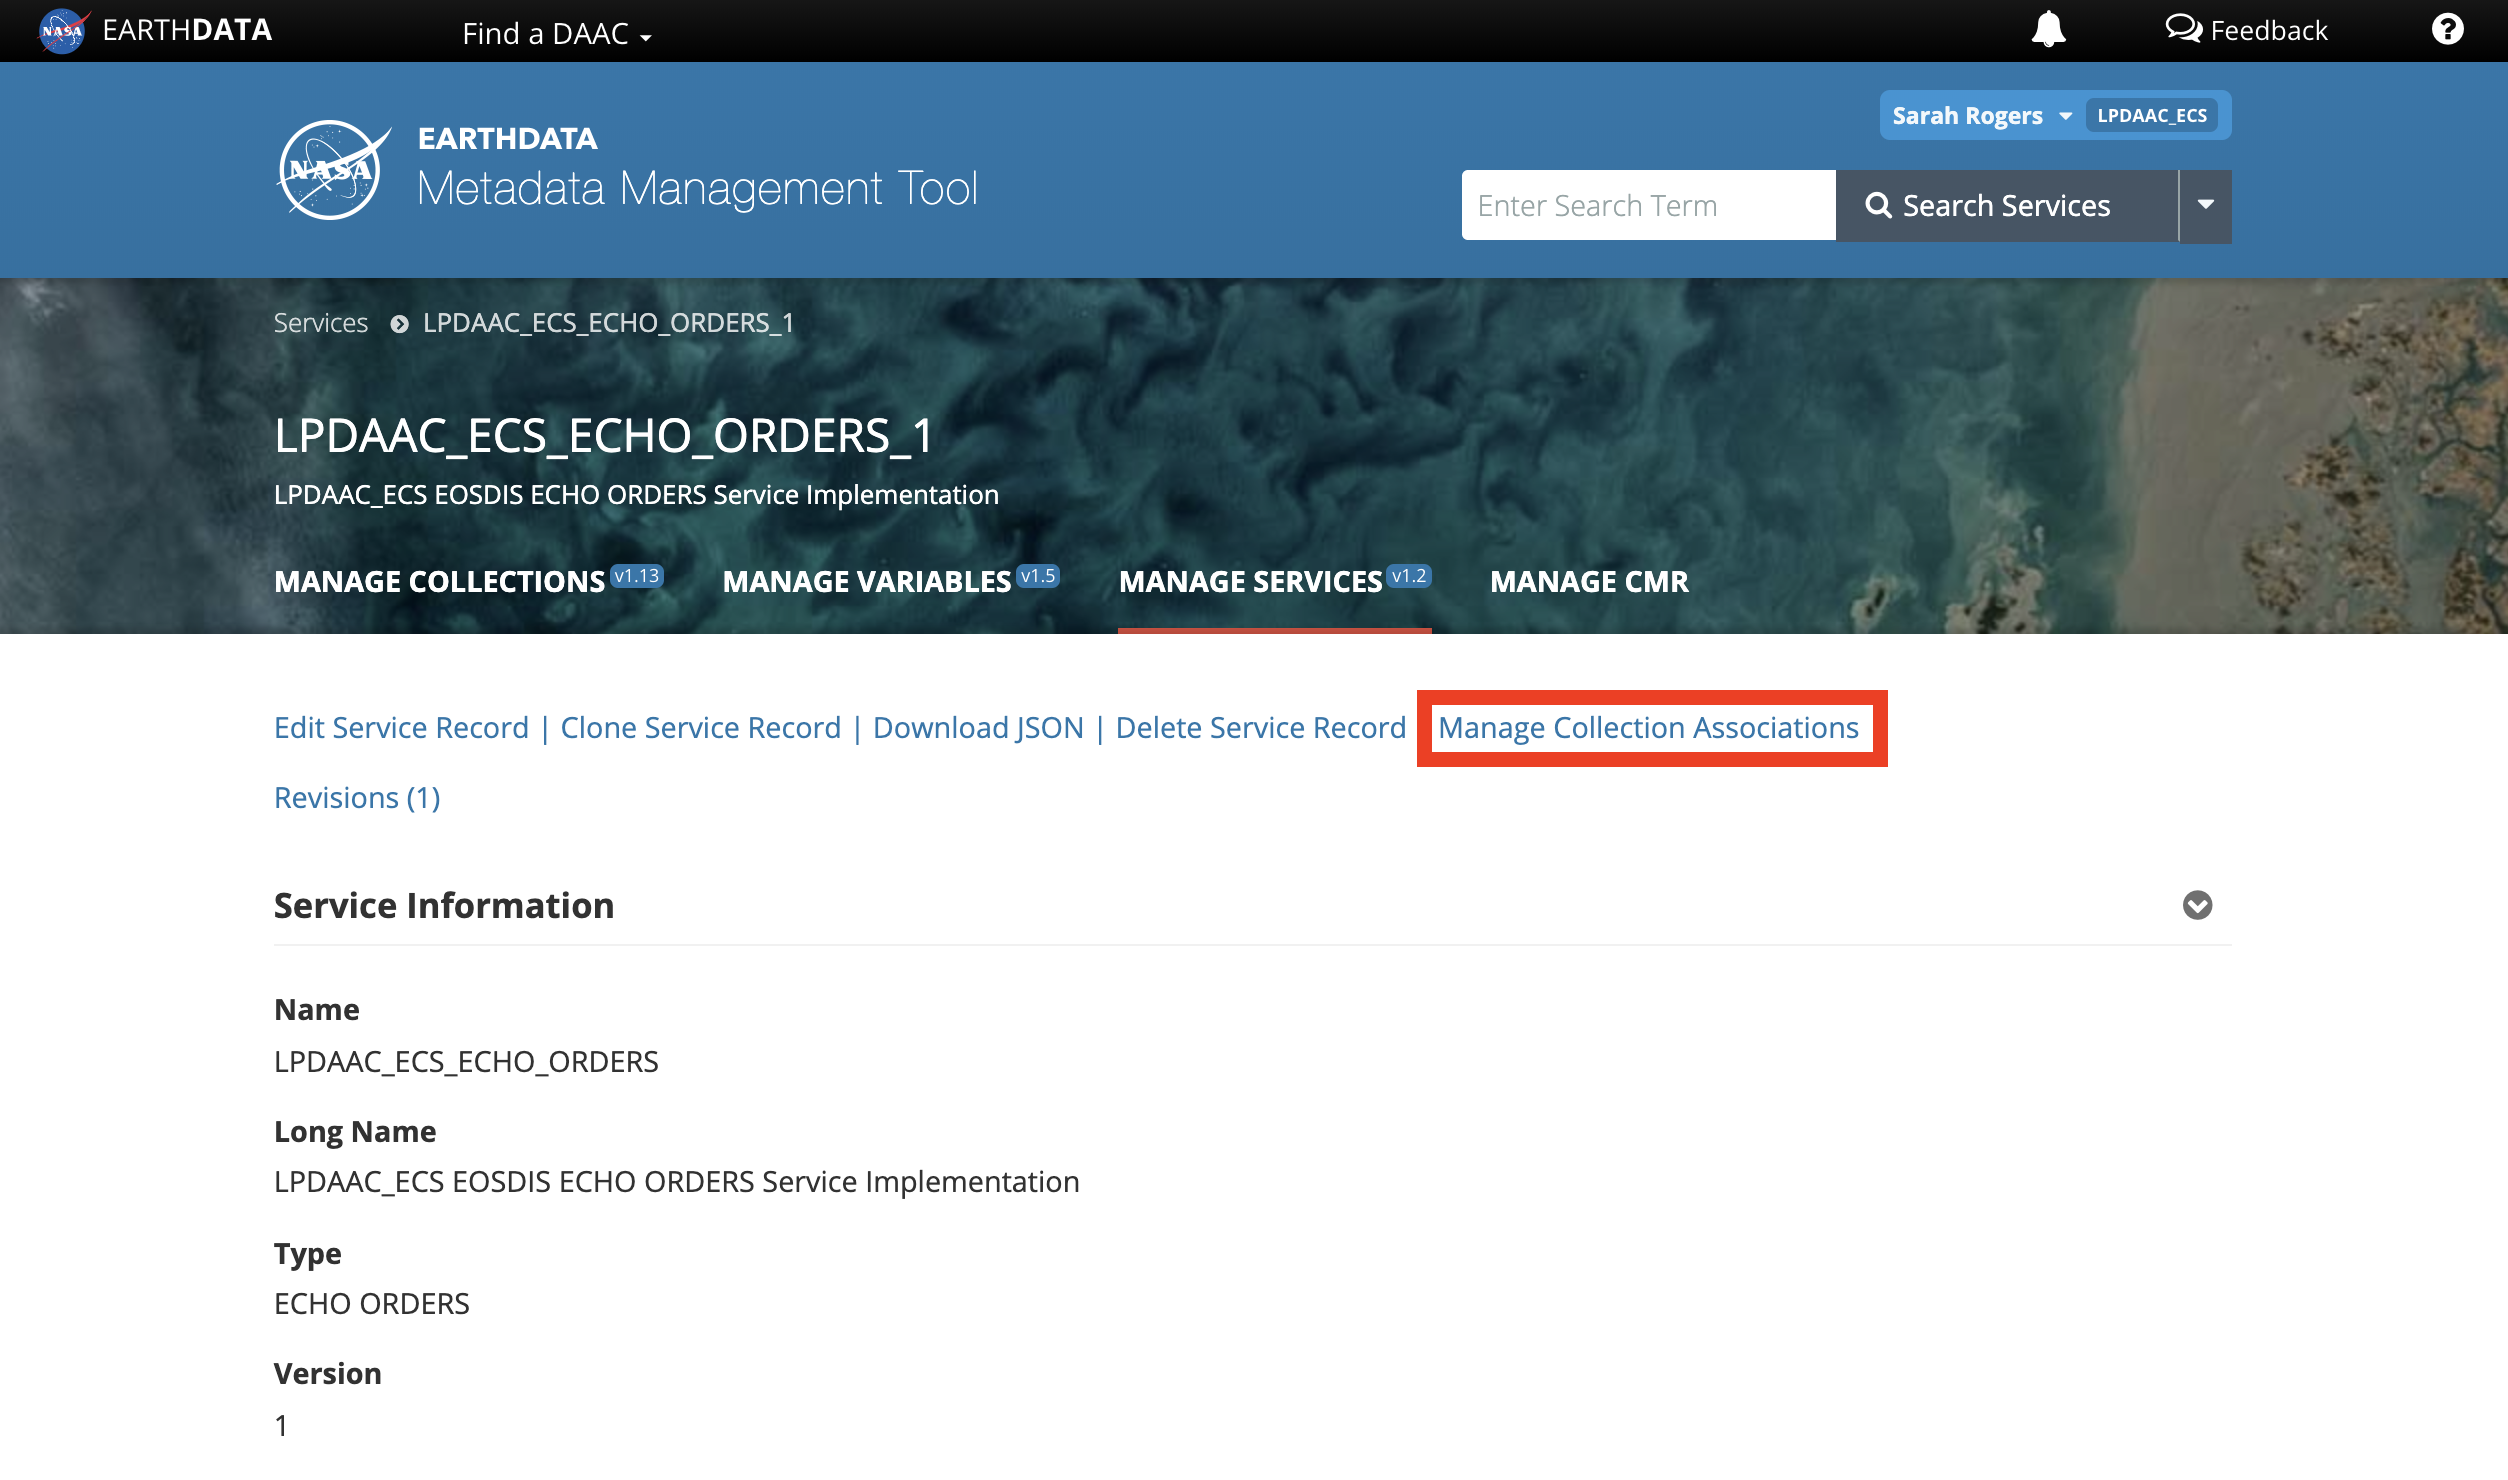
The service implementation options will vary by data provider. - CLICK on Manage Collection Associations.
- To add a collection for this service implementation record, CLICK on Add Collection Associations.
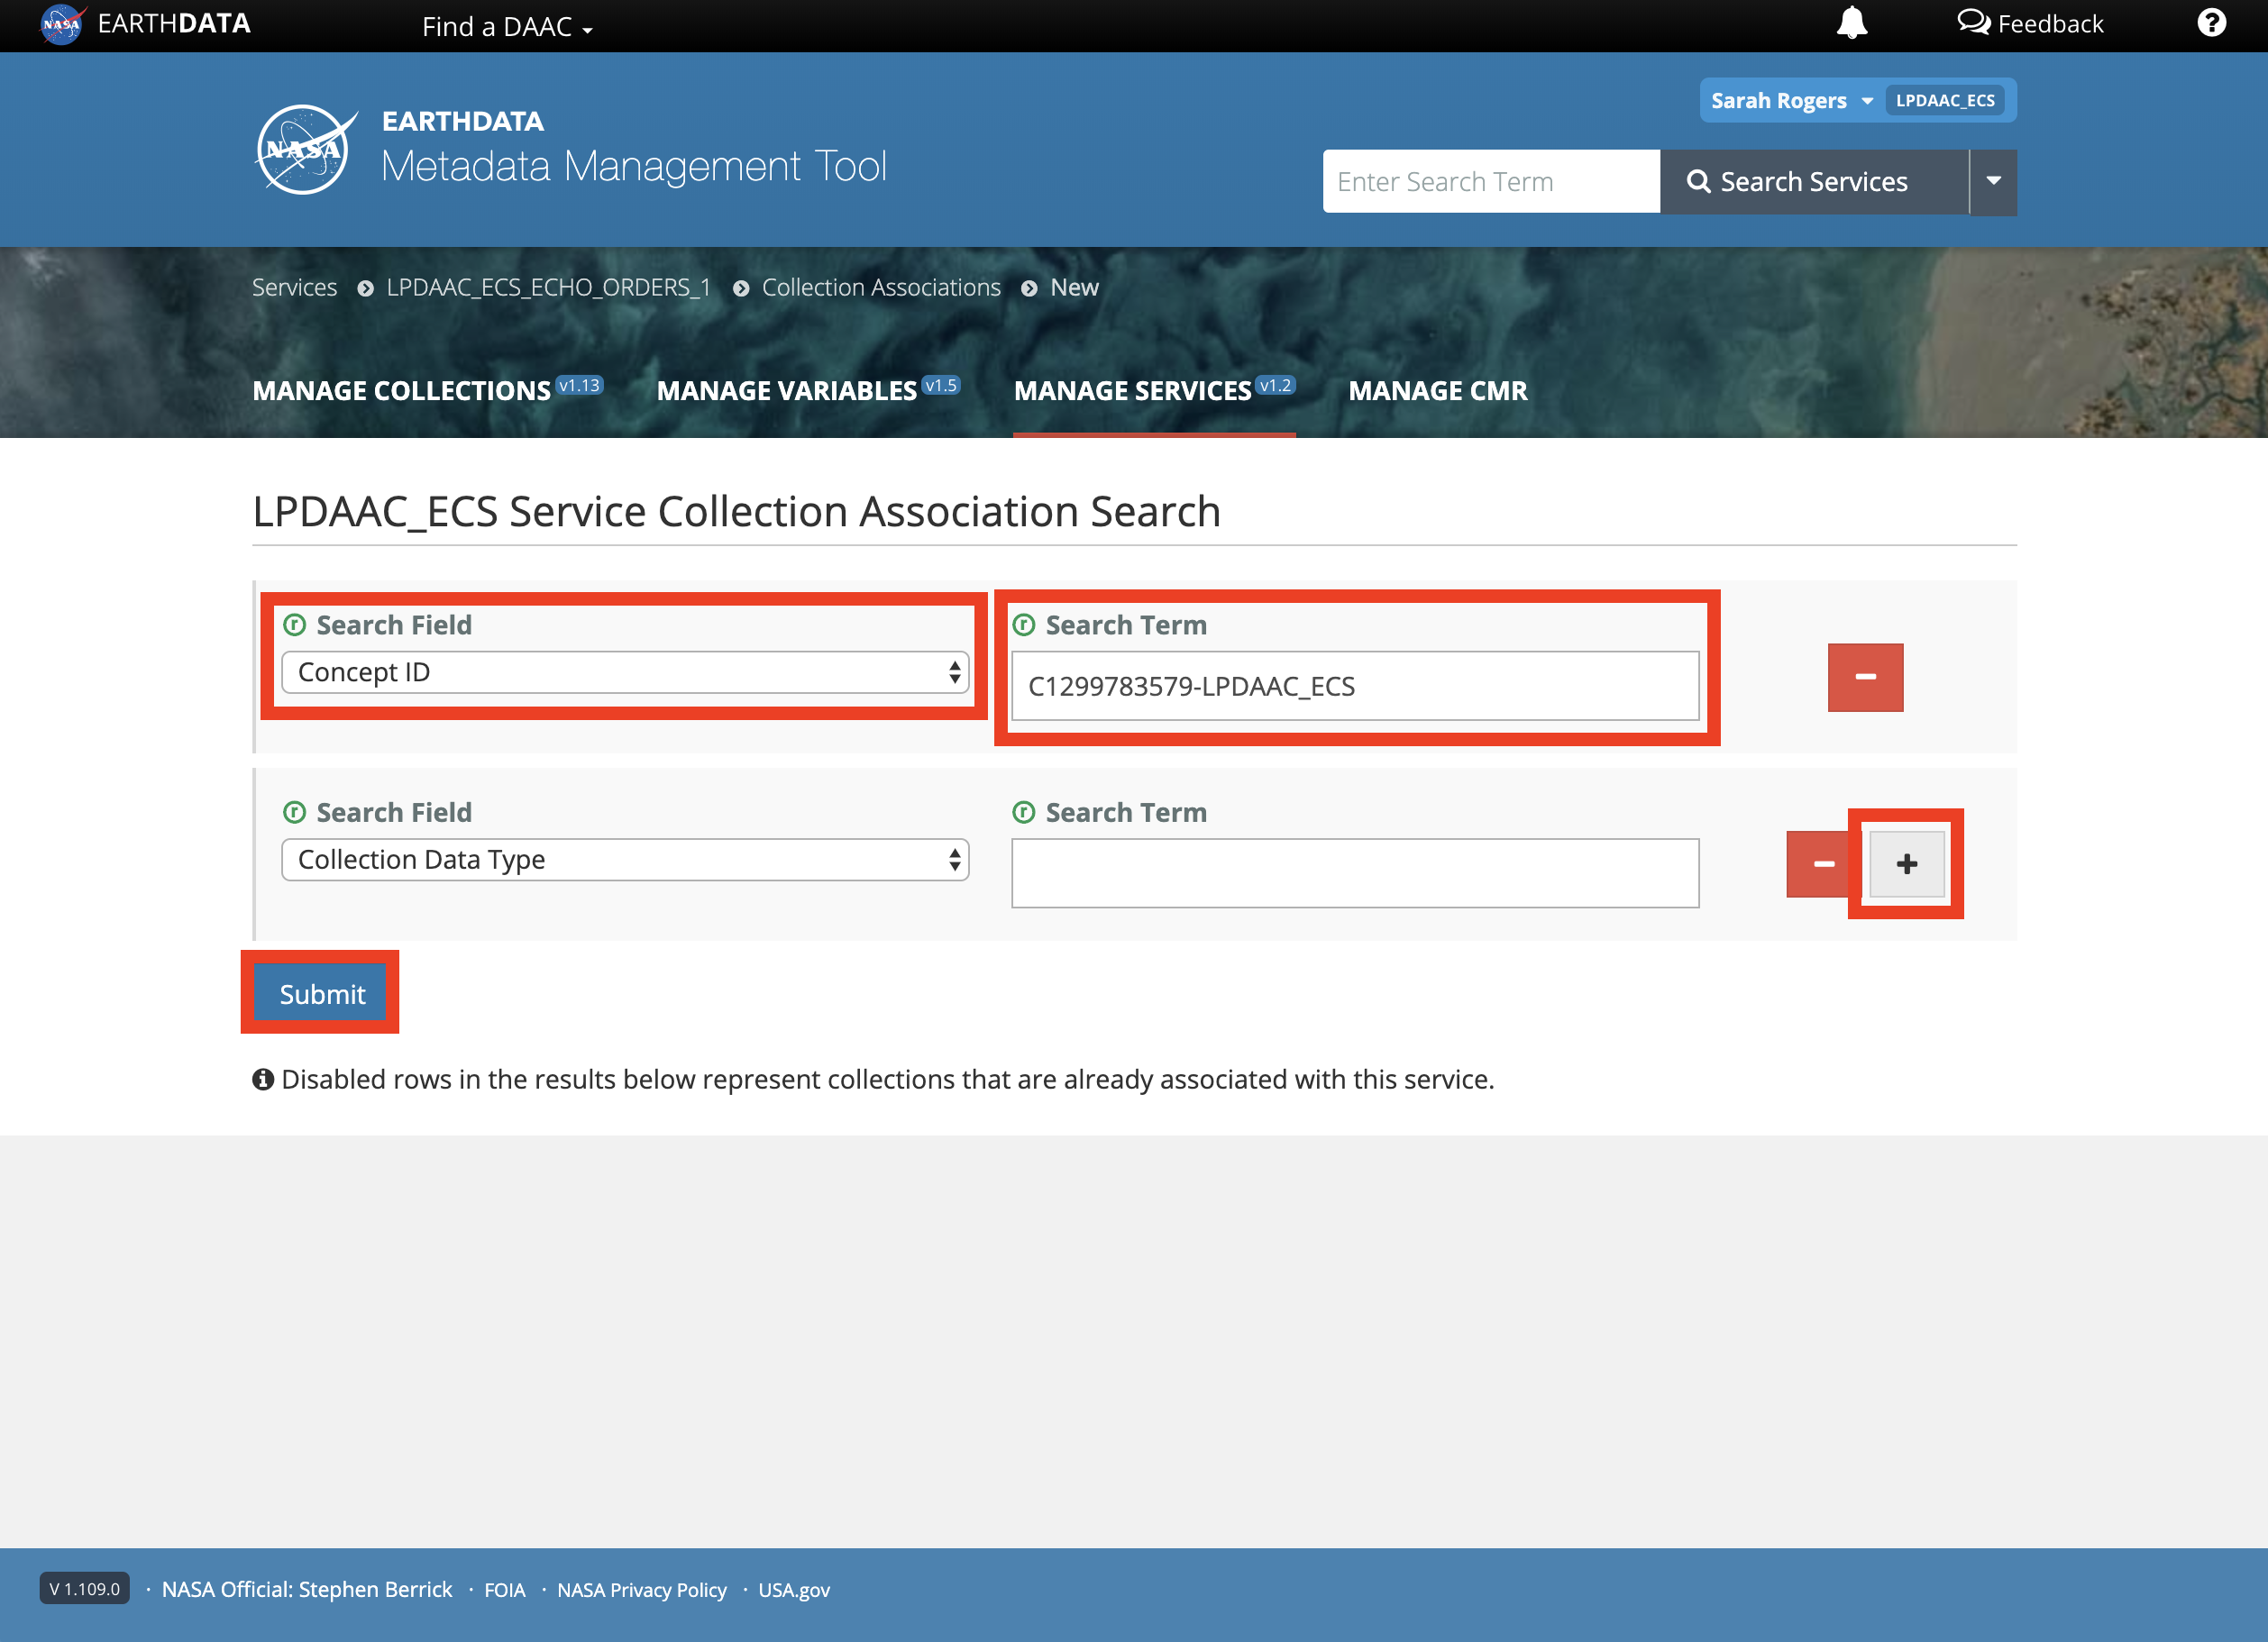
Alternatively, to delete a collection for this service implementation record, SELECT the appropriate collection by marking the checkbox next to the entry title, then CLICK Delete Selected Associations.Check for existing collection associations by SEARCHING the records for the collection entry title or short name. This is most easily done by using the Command+F function on Mac, or Control+F function on Windows. Please note, there may be several pages of collections sorted in alphabetical order. - SELECT a Search Field and ENTER the appropriate Search Term to find the collection of interest. CLICK the + button to add each collection of interest. Once all collections have been added, CLICK Submit
The Earthdata Search background job that searches for new or updated collection associations runs every 4 hours, and takes approximately 45 minutes to complete. It may take some time before you see any changes on the Earthdata Search website.
Confirm Existing Download Methods for Collections
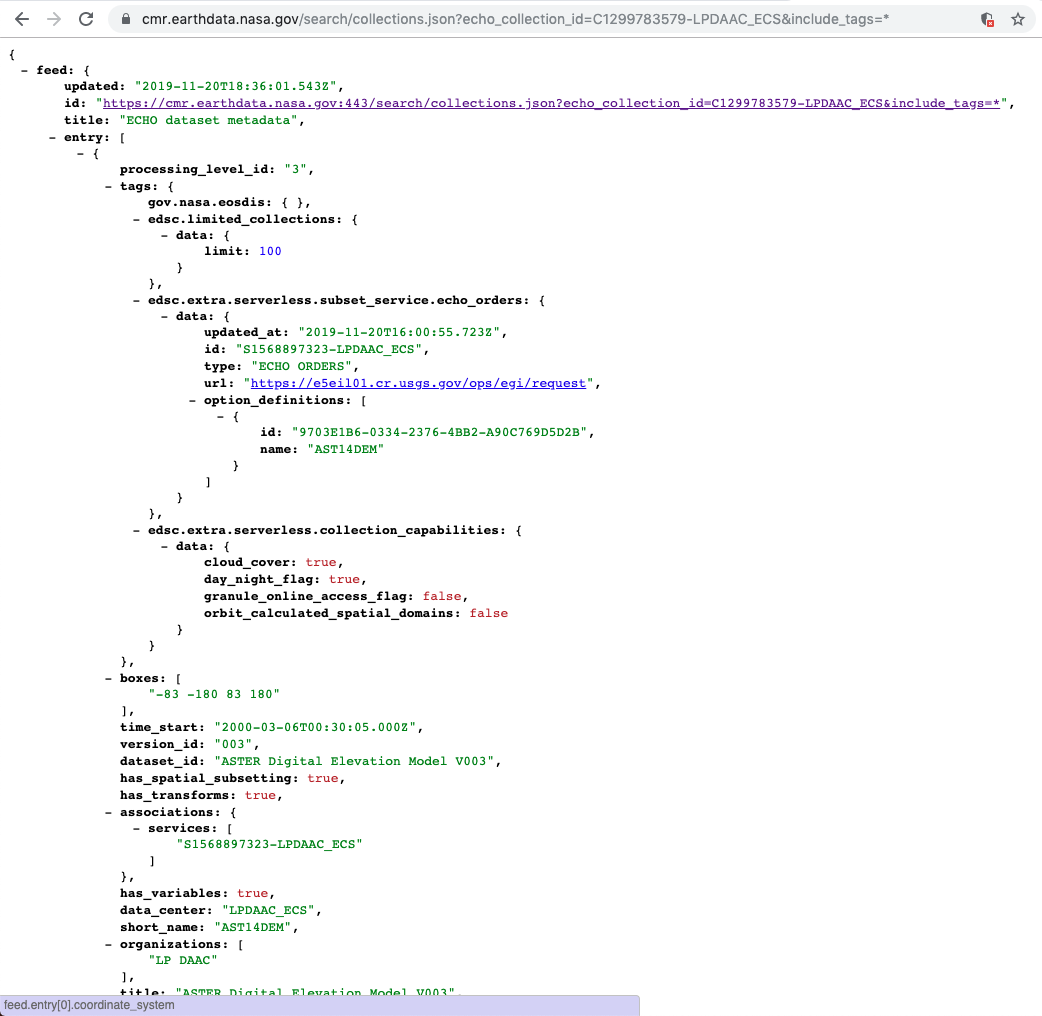
Confirm Existing Download Methods for CollectionsThese steps can be done in a web browser, using the terminal or command line, or by using a dedicated application for API environments (i.e. Postman). These instructions will be shown using a web browser. - Using the following URL format, NAVIGATE to the page below in a web browser. https://cmr.earthdata.nasa.gov/search/collections.json?ECHO_collection_id=<ECHO_collection_id>&include_tags=* Example for concept ID C1299783579-LPDAAC_ECS: https://cmr.earthdata.nasa.gov/search/collections.json?ECHO_collection_id=C1299783579-LPDAAC_ECS&include_tags=*
This example uses the echo_collection_id parameter to find the appropriate collection. The list of available parameters to search for in the CMR API can be found at https://cmr.earthdata.nasa.gov/search/site/docs/search/api.html. - RETRIEVE a token (if necessary). Some collections and/or data providers require a token to access the CMR API information. In this case, the response returned from CMR would be blank. An example would be concept ID C1236303843-NSIDC_ECS.
In this case the URL format should be as follows, to include a token:
https://cmr.earthdata.nasa.gov/search/collections.json?ECHO_collection_id=<ECHO_collection_id>&include_tags=*&token=<token>
A token can be retrieved using the Postman POST Request file below. In the Body of the request, replace the username and password with your Earthdata Login credentials. - Various tags for the collection can be found in the metadata, depending on the download method of interest.
Direct Download
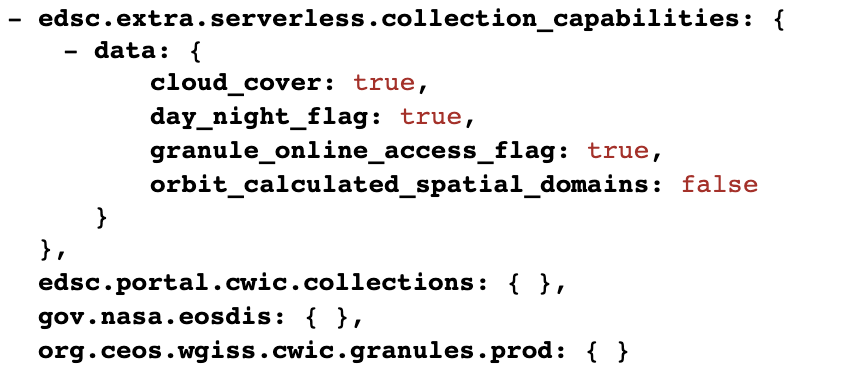
Direct DownloadAn example collection for Direct Download would be concept ID C194001241-LPDAAC_ECS. The tag associations for direct download can be found under:
edsc.extra.serverless.collection_capabilities
granule_online_access_flag
https://cmr.earthdata.nasa.gov/search/collections.json?ECHO_collection_id=C194001241-LPDAAC_ECS&include_tags=* The granule_online_access_flag is set by granule metadata within the collection. The granule(s) must have an OnlineAccessURL tag in its metadata. Earthdata Search inspects the first granule for this OnlineAccessURL tag that is then used to enable Direct Download for the collection.
An example for this same collection would be granule concept ID G1658148046-LPDAAC_ECS.
https://cmr.earthdata.nasa.gov:443/search/concepts/G1658148046-LPDAAC_ECS/1Stage for Delivery
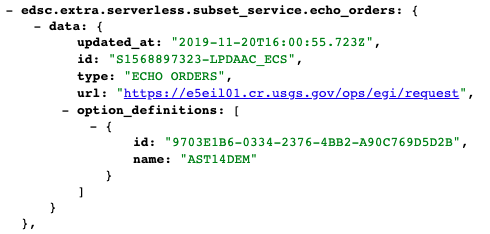
Stage for DeliveryAn example collection for Stage for Delivery would be concept ID C1299783579-LPDAAC_ECS. The tag associations for the ECHO orders service implementation can be found under edsc.extra.serverless.subset_service.ECHO_orders.
https://cmr.earthdata.nasa.gov/search/collections.json?ECHO_collection_id=C1299783579-LPDAAC_ECS&include_tags=*
The id field under the data tag displays the service implementation ID. In this example, the service implementation ID is S1568897323-LPDAAC_ECS.
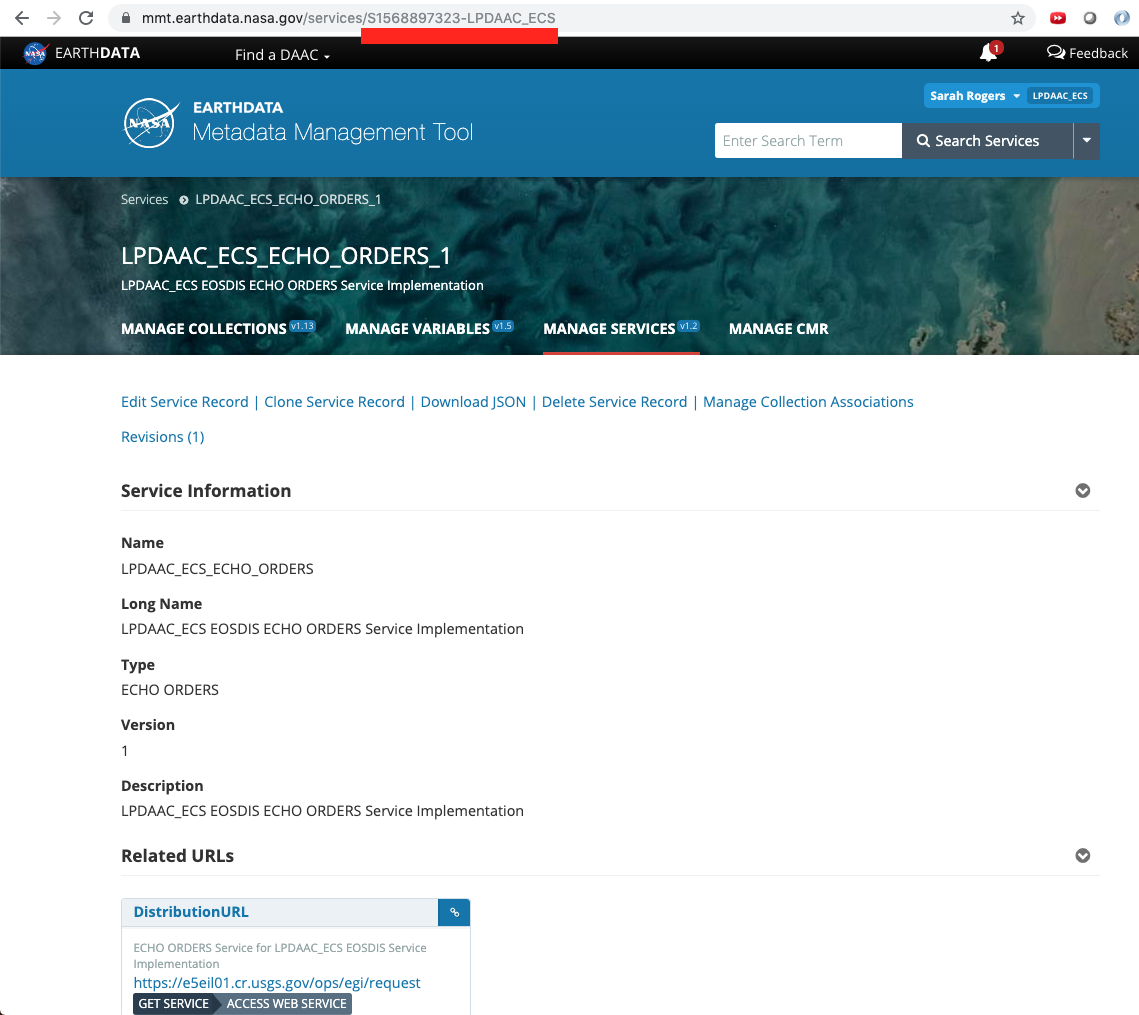
Using the steps above under 'Configure Download Methods for Collections,' this ID number will correlate with the MMT service implementation record ID. This ID can be seen in the URL of the MMT Service Implementation page.
https://mmt.earthdata.nasa.gov/services/S1568897323-LPDAAC_ECSCustomized
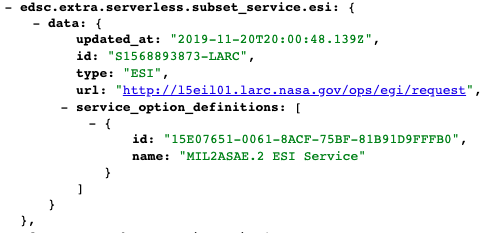
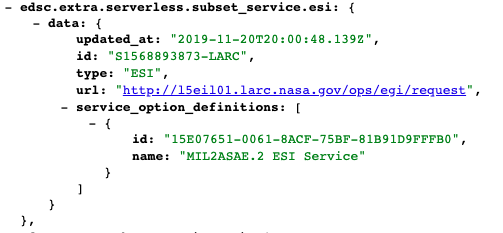
CustomizedAn example collection for Customized Download would be C43677706-LARC. The tag associations for the ESI service implementation can be found under edsc.extra.serverless.subset_service.esi. https://cmr.earthdata.nasa.gov/search/collections.json?ECHO_collection_id=C43677706-LARC&include_tags=* The following tags determine the various badges seen on the Earthdata Search collections page. The tags are generated by CMR, referencing the UMM-S record:- has_spatial_subsetting
- has_transforms
- has_variables
- has_formats
- has_temporal_subsetting
In this example the ECHO form ID is 15E07651-0061-8ACF-75BF-81B91D9FFFB0. The name of the ECHO form is MIL2ASAE.2 ESI Service. - CONFIRM the appropriate Earthdata Search tags are associated with the collection. If the appropriate tags for the associated download method are missing, the download option on Earthdata Search will not be made available.
The Earthdata Search background job that searches for new or updated collection associations runs every 4 hours, and takes approximately 45 minutes to complete. It may take some time before you see any changes on the Earthdata Search website.
- Check the UMM-S Record for Collections
Data providers can enable any and all of these download options in Earthdata Search by following the step-by-step instructions below. Stage for Delivery and Customized Downloads require more manual configuration. At a high level, in order to enable data access for one of these methods, Earthdata Search requires a collection be associated with both a UMM-S record and an echoform. Please make sure you carefully follow the steps below to ensure your collections are configured correctly. This guide will cover the following information:
Configure Download Methods for Collections Confirm Existing Download Methods for Collections - LOGIN to the Metadata Management Tool at https://mmt.earthdata.nasa.gov.
- Check the UMM-S Record for Collections
-
These steps can be used to check UMM-S records for Stage for Delivery or Customized download options. This example will show a Customized download option. - Using the following URL format, NAVIGATE to the page below in a web browser.
https://cmr.earthdata.nasa.gov/search/collections.json?ECHO_collection_id=<ECHO_collection_id>&include_tags=*
An example collection for Customized Download would be C43677706-LARC.
https://cmr.earthdata.nasa.gov/search/collections.json?ECHO_collection_id=C43677706-LARC&include_tags=*This example uses the echo_collection_id parameter to find the appropriate collection. The list of available parameters to search for in the CMR API can be found at https://cmr.earthdata.nasa.gov/search/site/docs/search/api.html. - RETRIEVE a token (if necessary). Some collections and/or data providers require a token to access the CMR API information. In this case, the response returned from CMR would be blank. An example would be concept ID C1236303843-NSIDC_ECS.
In this case the URL format should be as follows, to include a token:
https://cmr.earthdata.nasa.gov/search/collections.json?ECHO_collection_id=<ECHO_collection_id>&include_tags=*&token=<token>
A token can be retrieved using the Postman POST Request file below. In the Body of the request, replace the username and password with your Earthdata Login credentials. - FIND the ECHO form ID and name in the collection metadata. The id field under service_option_definitions is the ID for the ECHO form used to generate the customized options available on the Earthdata Search project page.
In this example the ECHO form ID is 15E07651-0061-8ACF-75BF-81B91D9FFFB0. The name of the ECHO form is MIL2ASAE.2 ESI Service. - LOGIN to the Metadata Management Tool at https://mmt.earthdata.nasa.gov/.
To view ECHO forms for UAT use https://mmt.uat.earthdata.nasa.gov/. For SIT use https://mmt.sit.earthdata.nasa.gov/. - SELECT the appropriate provider in the context drop-down menu.
- CLICK on Manage CMR.
- Under Service Management, CLICK on View Service Options.
The Service Management → View Service Options will show Customized/ESI ECHO forms.
The
Orders → View Order Options will show Stage for Delivery ECHO forms. - Using the ECHO form name found in Step 3, SEARCH then CLICK on the appropriate ECHO form to view the XML document.
Alternatively, CLICK on Edit or Delete to perform those actions.Searching for the appropriate ECHO form is most easily done by using the Command+F function on Mac, or Control+F function on Windows. Please note, there may be several pages of forms which are sorted in alphabetical order. - The ECHO form XML will load.
Please note the URL of the ECHO form XML matches the ECHO form ID found in Step 3. In this example the ECHO form ID is 15E07651-0061-8ACF-75BF-81B91D9FFFB0.
An alternative to Steps 4 - 8 is to use the ECHO form ID in the following URL format:
https://mmt.earthdata.nasa.gov/service_options/<ECHOFormID>
Using this example:
https://mmt.earthdata.nasa.gov/service_options/15E07651-0061-8ACF-75BF-81B91D9FFFB0
- Using the following URL format, NAVIGATE to the page below in a web browser.
- How to Configure Customizable Icons in Earthdata Search
-
Earthdata Search provides badging with capability icons for datasets that support customizations. Currently, Earthdata Search supports EOSDIS Service Interface (ESI) and OPeNDAP customization. If configured correctly, a UMM-S record will trigger the appropriate icon to be displayed on the associated collection in the Earthdata Search interface, allowing a user to better understand what is available to them.
The following flags are used by Earthdata Search to trigger badges to display:
Badge Type Flag Description Spatial has_spatial_subsetting Will be true if spatial subset types are associated with the collection. Temporal has_temporal_subsetting Will be true if temporal subset types are associated with the collection. Variable has_variables Will be true if there are variables associated with the collection. Format has_formats Will be true if any of the collection's associated services has more than one "SupportedFormats" value. The collection's "has_formats" flag is false when none of its associated services has more than one "SupportedFormats" value. Transform has_transforms Will be true if any of the collection's associated services has a defined “SubsetType” or “InterpolationType”, or multiple “SupportedProjections” values are defined within any of its associated services. A collection’s “has_transforms” flag will only be false if none of its associated services has a defined “SubsetType” or “InterpolationType”, and none of its associated services has more than one “SupportedProjections” value. If some of the collections that your DAAC provides do not offer the same capabilities as other collections, you will need a separate UMM-S record that describes the services offered by those collections. For example, If you have 10 collections that offer spatial subsetting, variable subsetting, and reformatting, and five collections that offer only spatial subsetting and reformatting, then you will need two UMM-S records. One record would be associated with the first 10 and the other with the second set of 5. STEP-BY-STEP INSTRUCTIONS
Using MMT, create a UMM-S record to describe the service capabilities of your collection. For detailed instructions on that process, please refer to the MMT User Guide. When creating the UMM-S record, on the "Service Information" page the type must be either ESI or OPeNDAP for a customizable badge to appear.For ESI collections, metadata contained in the tags created by background jobs may also impact the display of the badges. If your collections are showing something other than what you believe should be showing, please contact the Earthdata Search team to investigate. - When creating the UMM-S record, pay special attention to the "Options" page. On that page there are 2 fields that will trigger icons for Earthdata Search to display: "Subset Types" and "Supported Output Formats".
Spatial, Temporal, or Variable
Spatial, Temporal, or VariableFormat
Format - Once you are finished creating or updating your UMM-S record and have published those changes, the icons should be reflected appropriately in Earthdata Search.
- When creating the UMM-S record, pay special attention to the "Options" page. On that page there are 2 fields that will trigger icons for Earthdata Search to display: "Subset Types" and "Supported Output Formats".
- How to Use Smart Handoffs in Earthdata Search
-
Earthdata Search enables smart handoffs of search criteria and parameters to other web user interfaces. A smart handoff allows for the seamless transfer of a user experience from one web user interface to another while preserving the user's earth science context. The context being preserved may include:
- Spatial constraints
- Temporal constraints
- Collections
There are three ways to initiate a smart handoff from Earthdata Search:
- From the 'Granule Results' page.
- From the 'My Project' page.
- From the 'Collection Details' page.
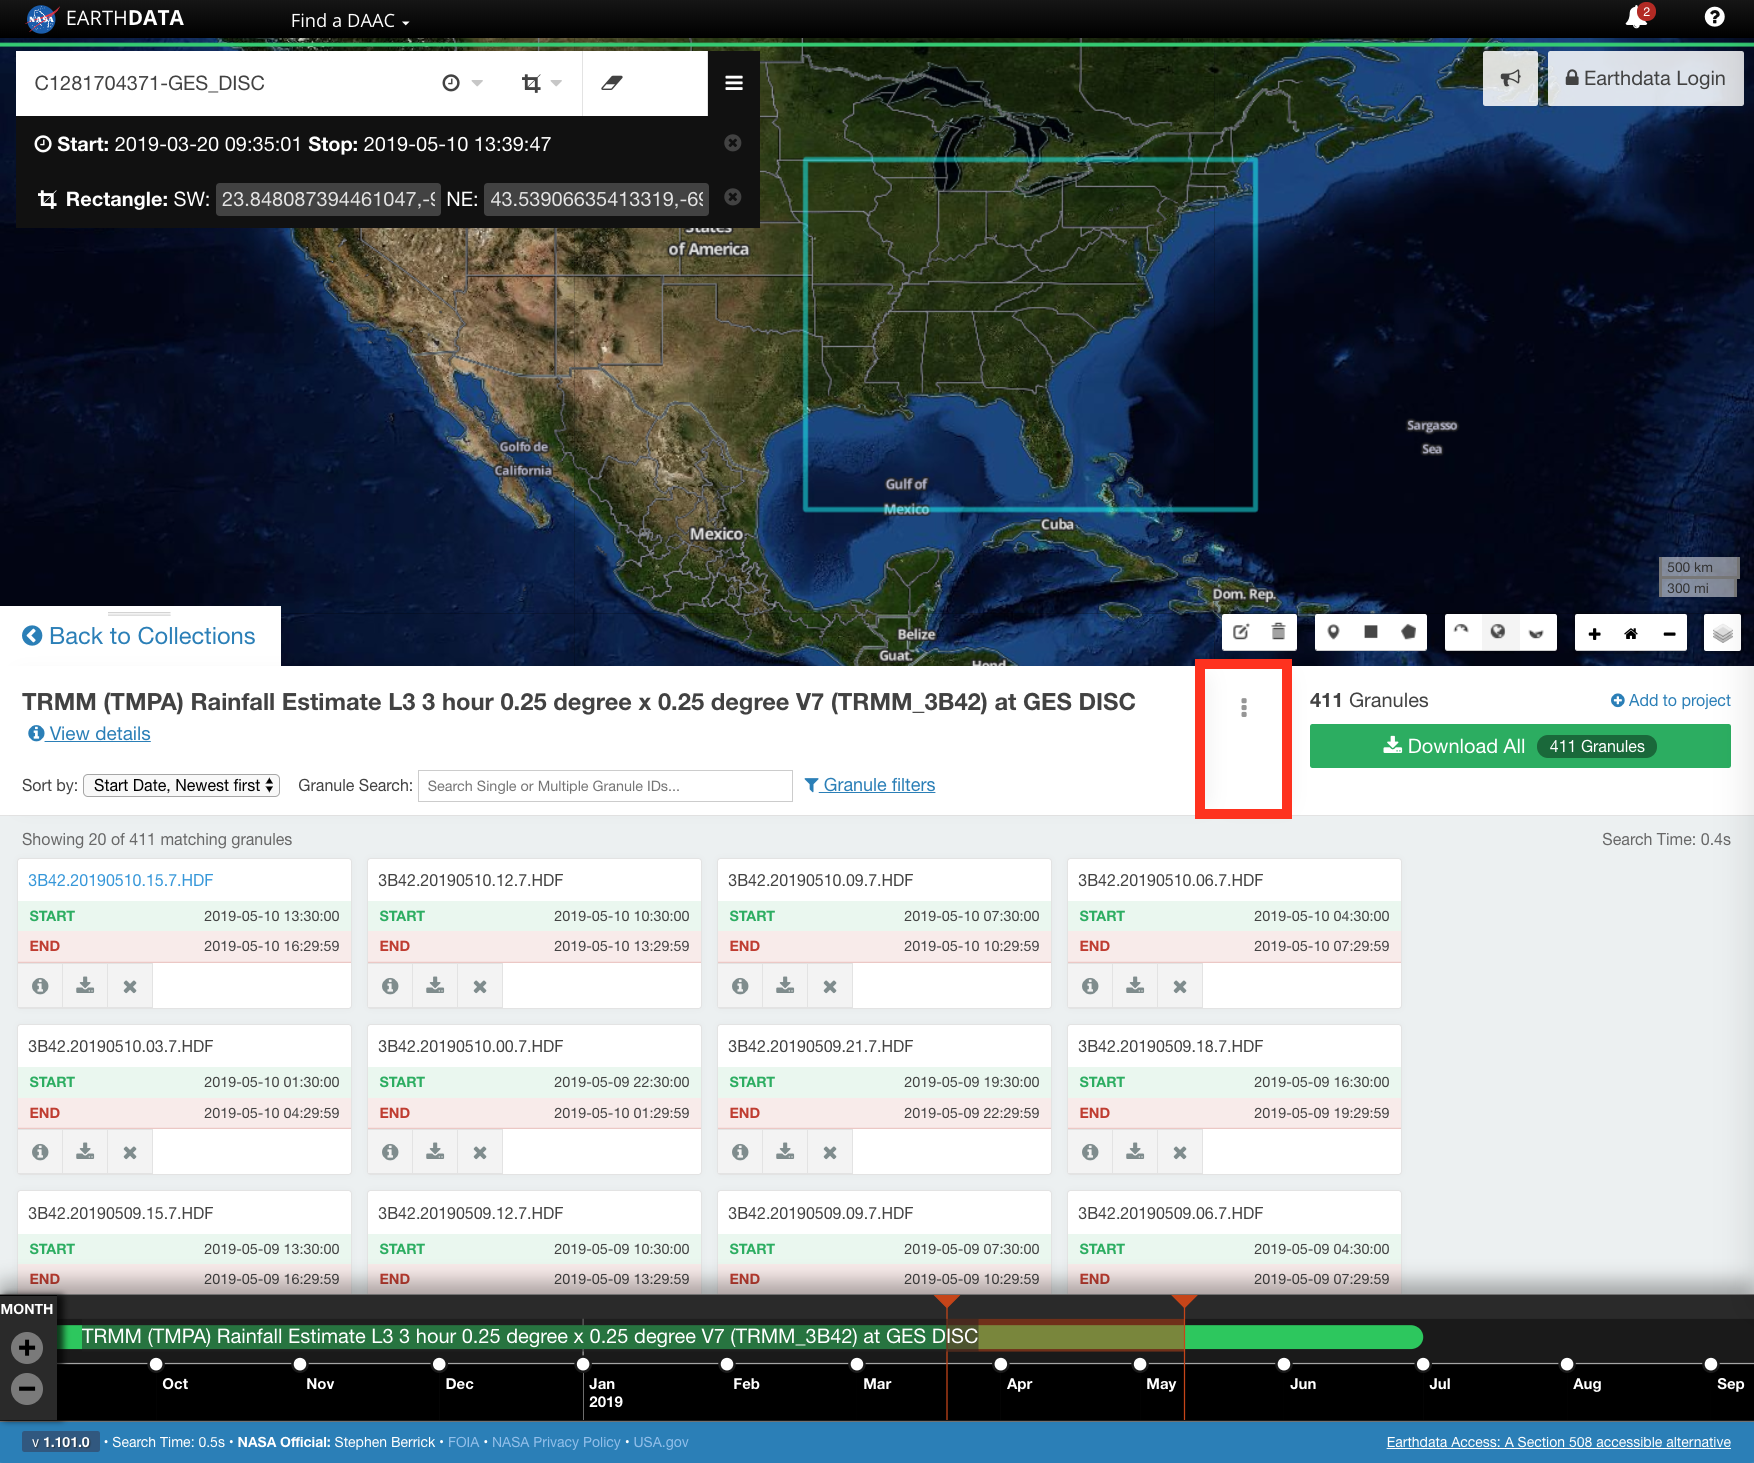
The smart handoff capability is not available for all collections. Those collections that have this capability with one or more tools will have a vertical ellipsis ⋮ within the pages listed in the step-by-step instructions below. STEP-BY-STEP INSTRUCTIONS
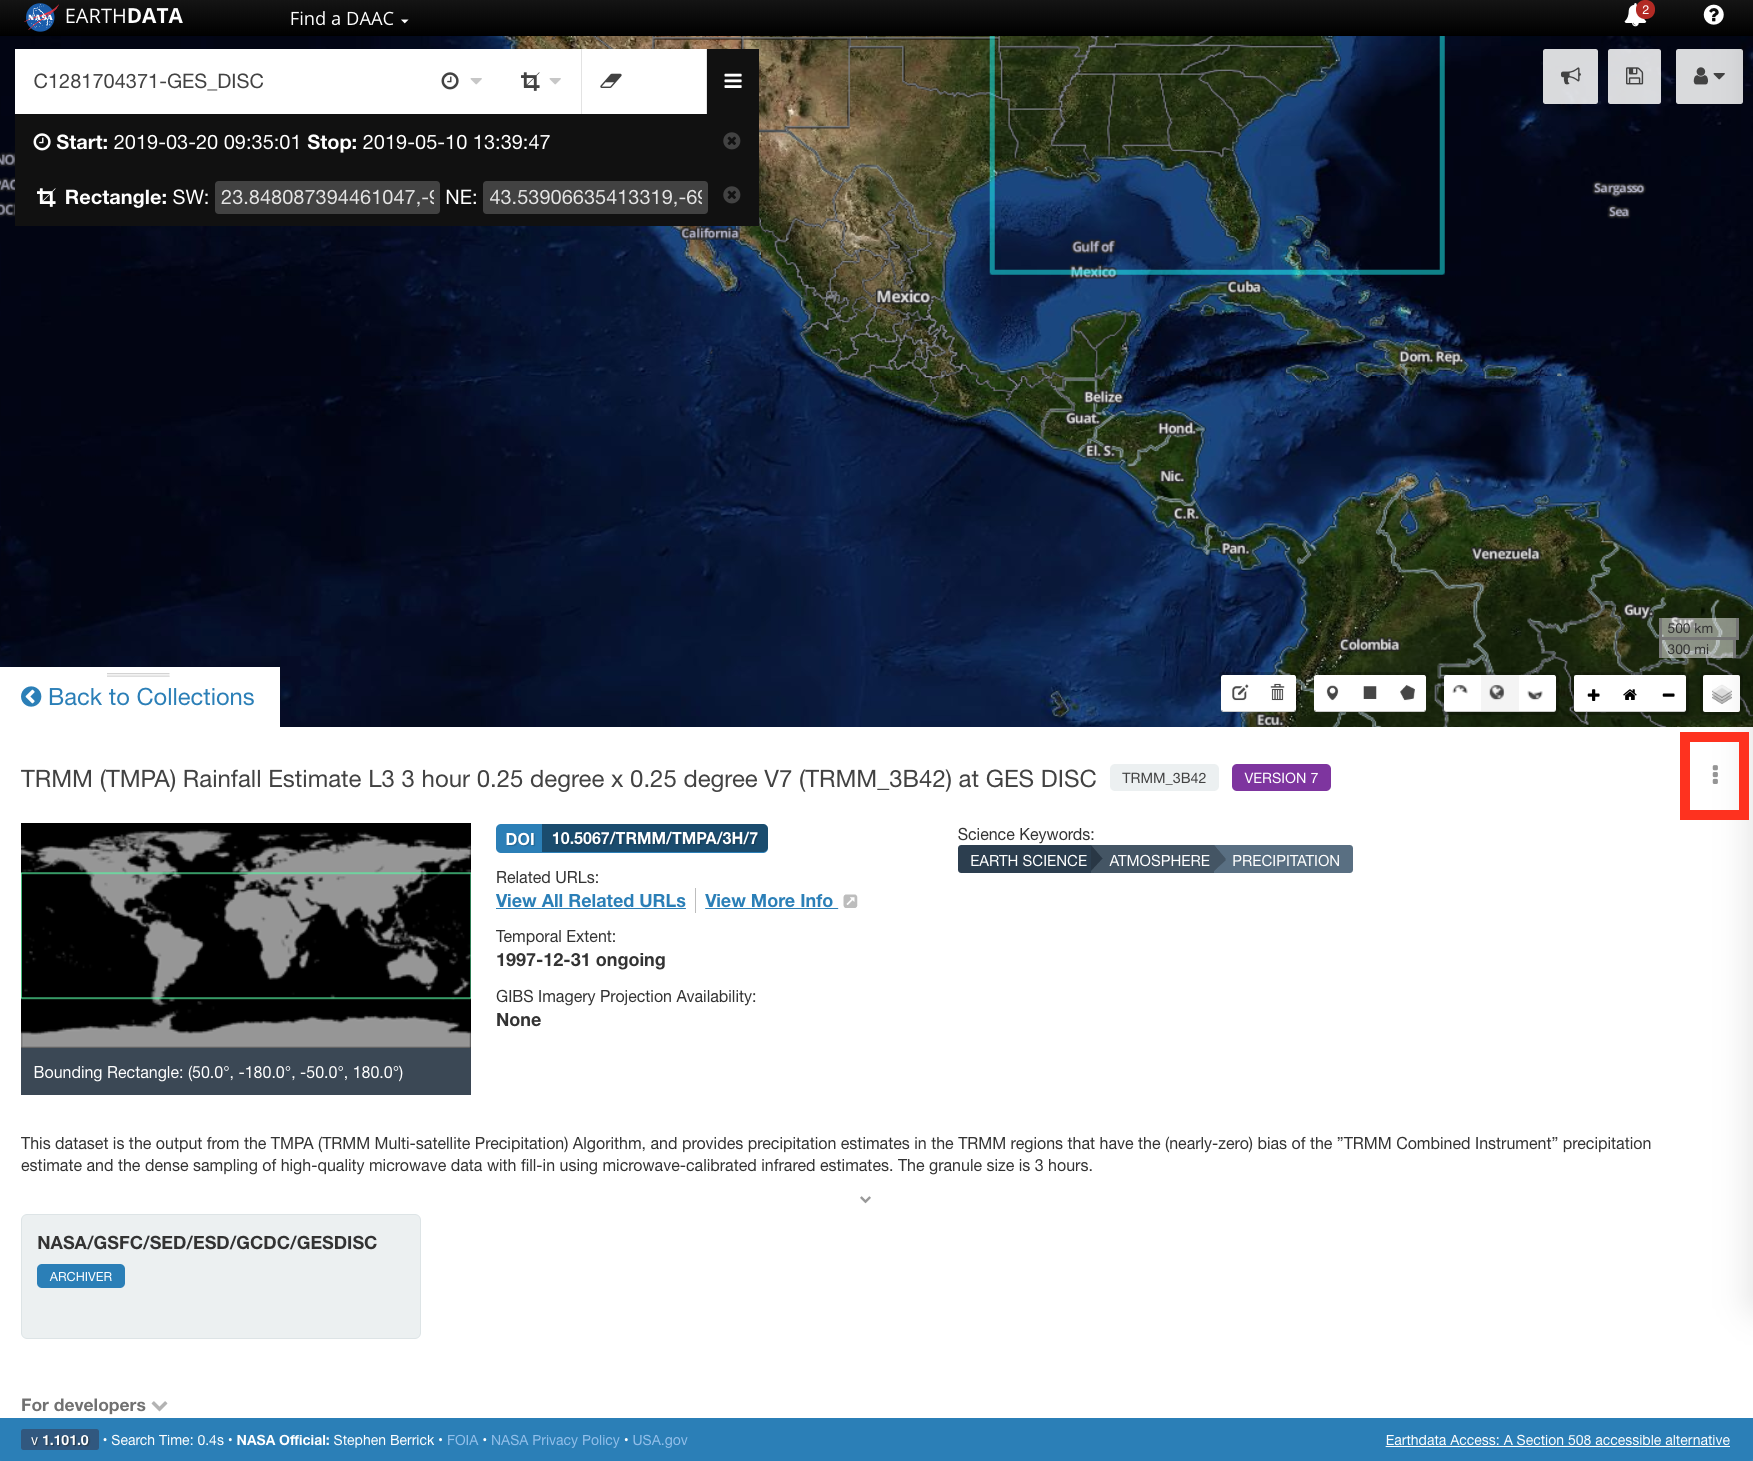
The collection being used for this guide is `C1281704371-GES_DISC` or `TRMM (TMPA) Rainfall Estimate L3 3 hour 0.25 degree x 0.25 degree V7 (TRMM_3B42) at GES DISC`. Smart handoff from the 'Granule Results' page.
Smart handoff from the 'Granule Results' page.-
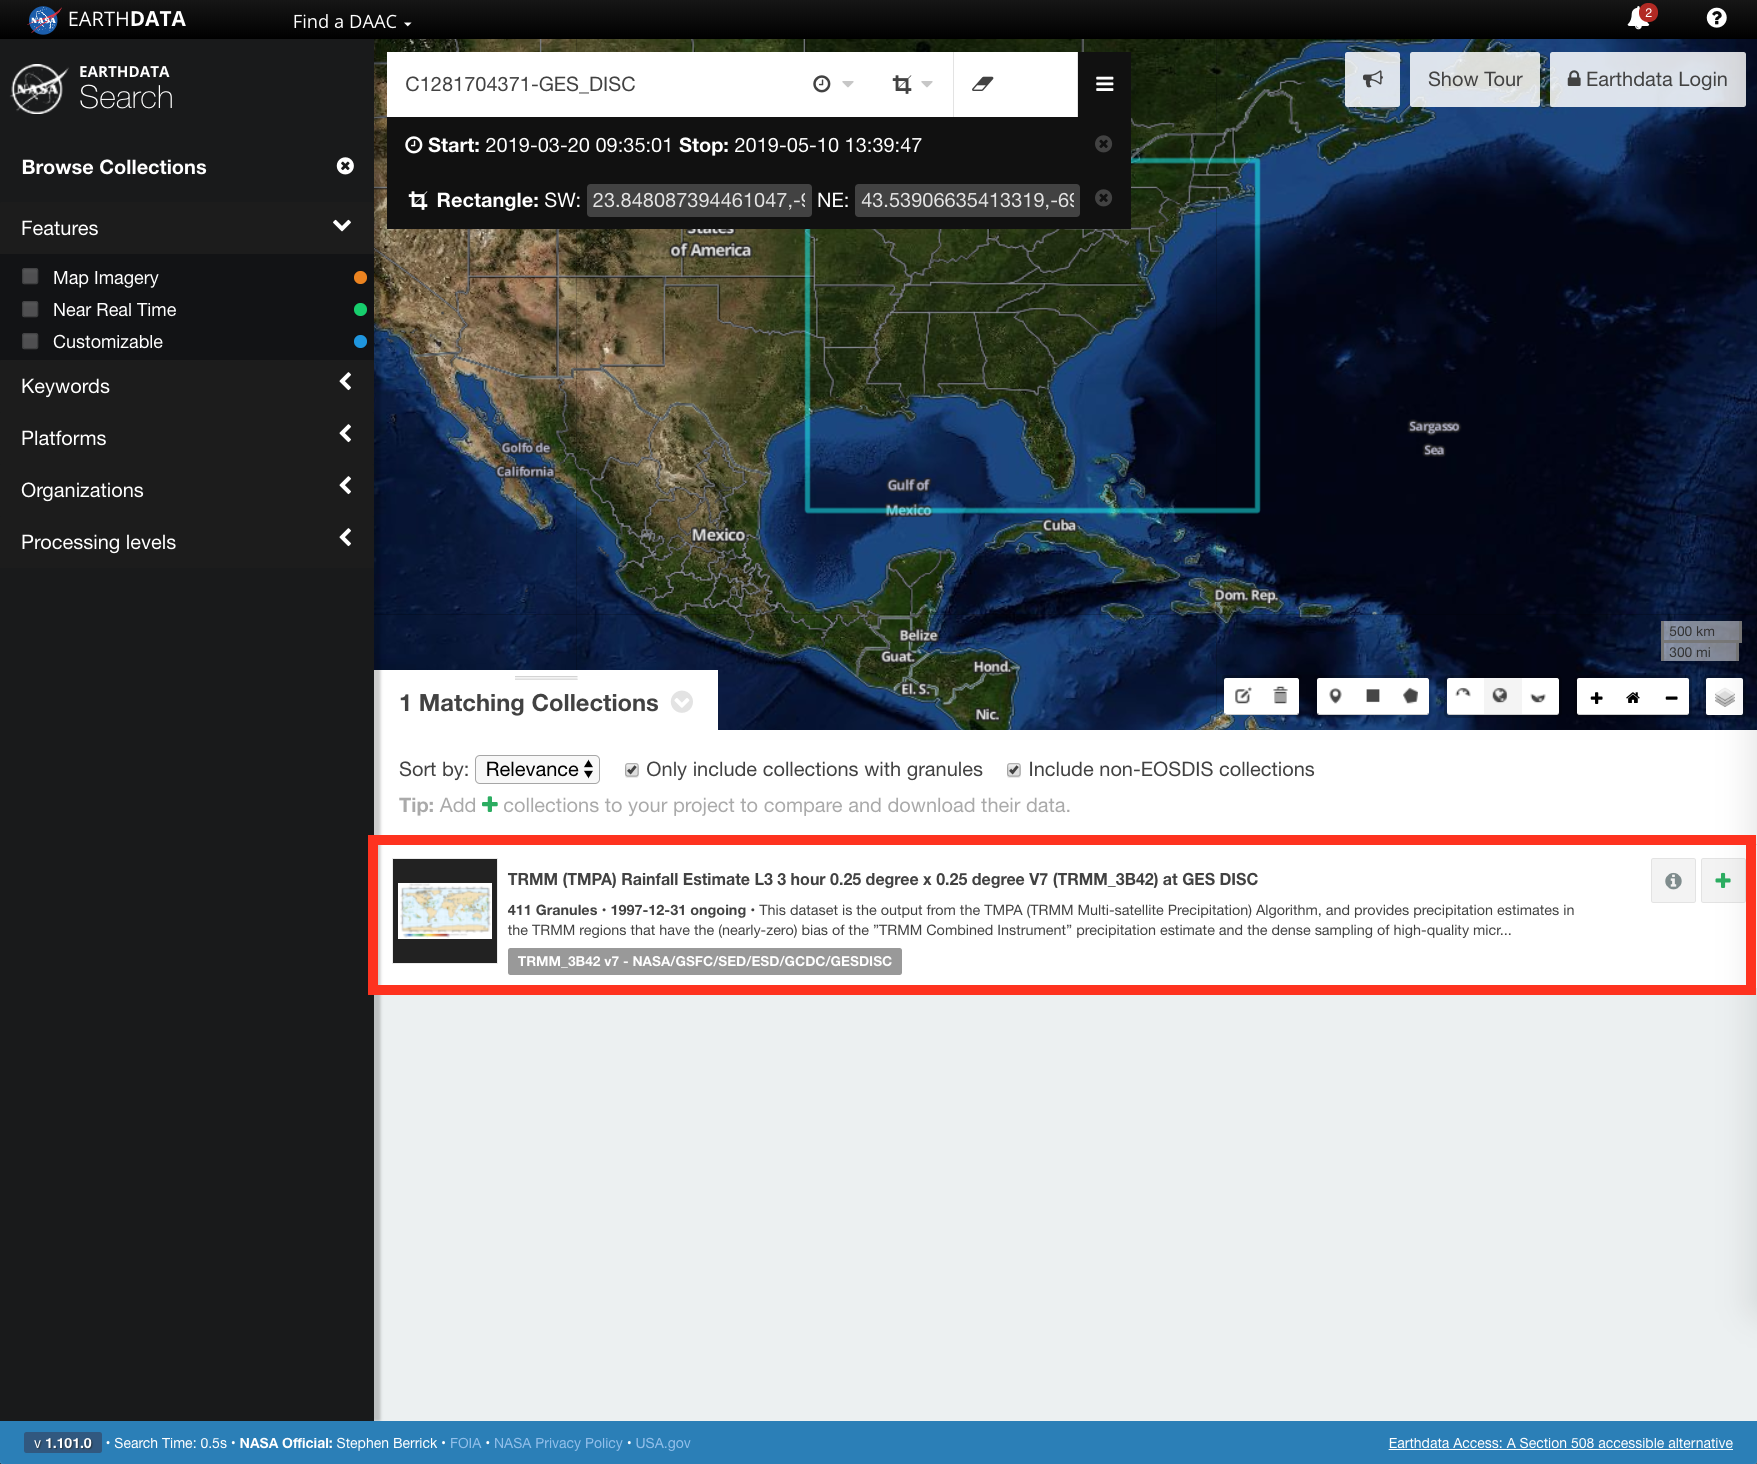
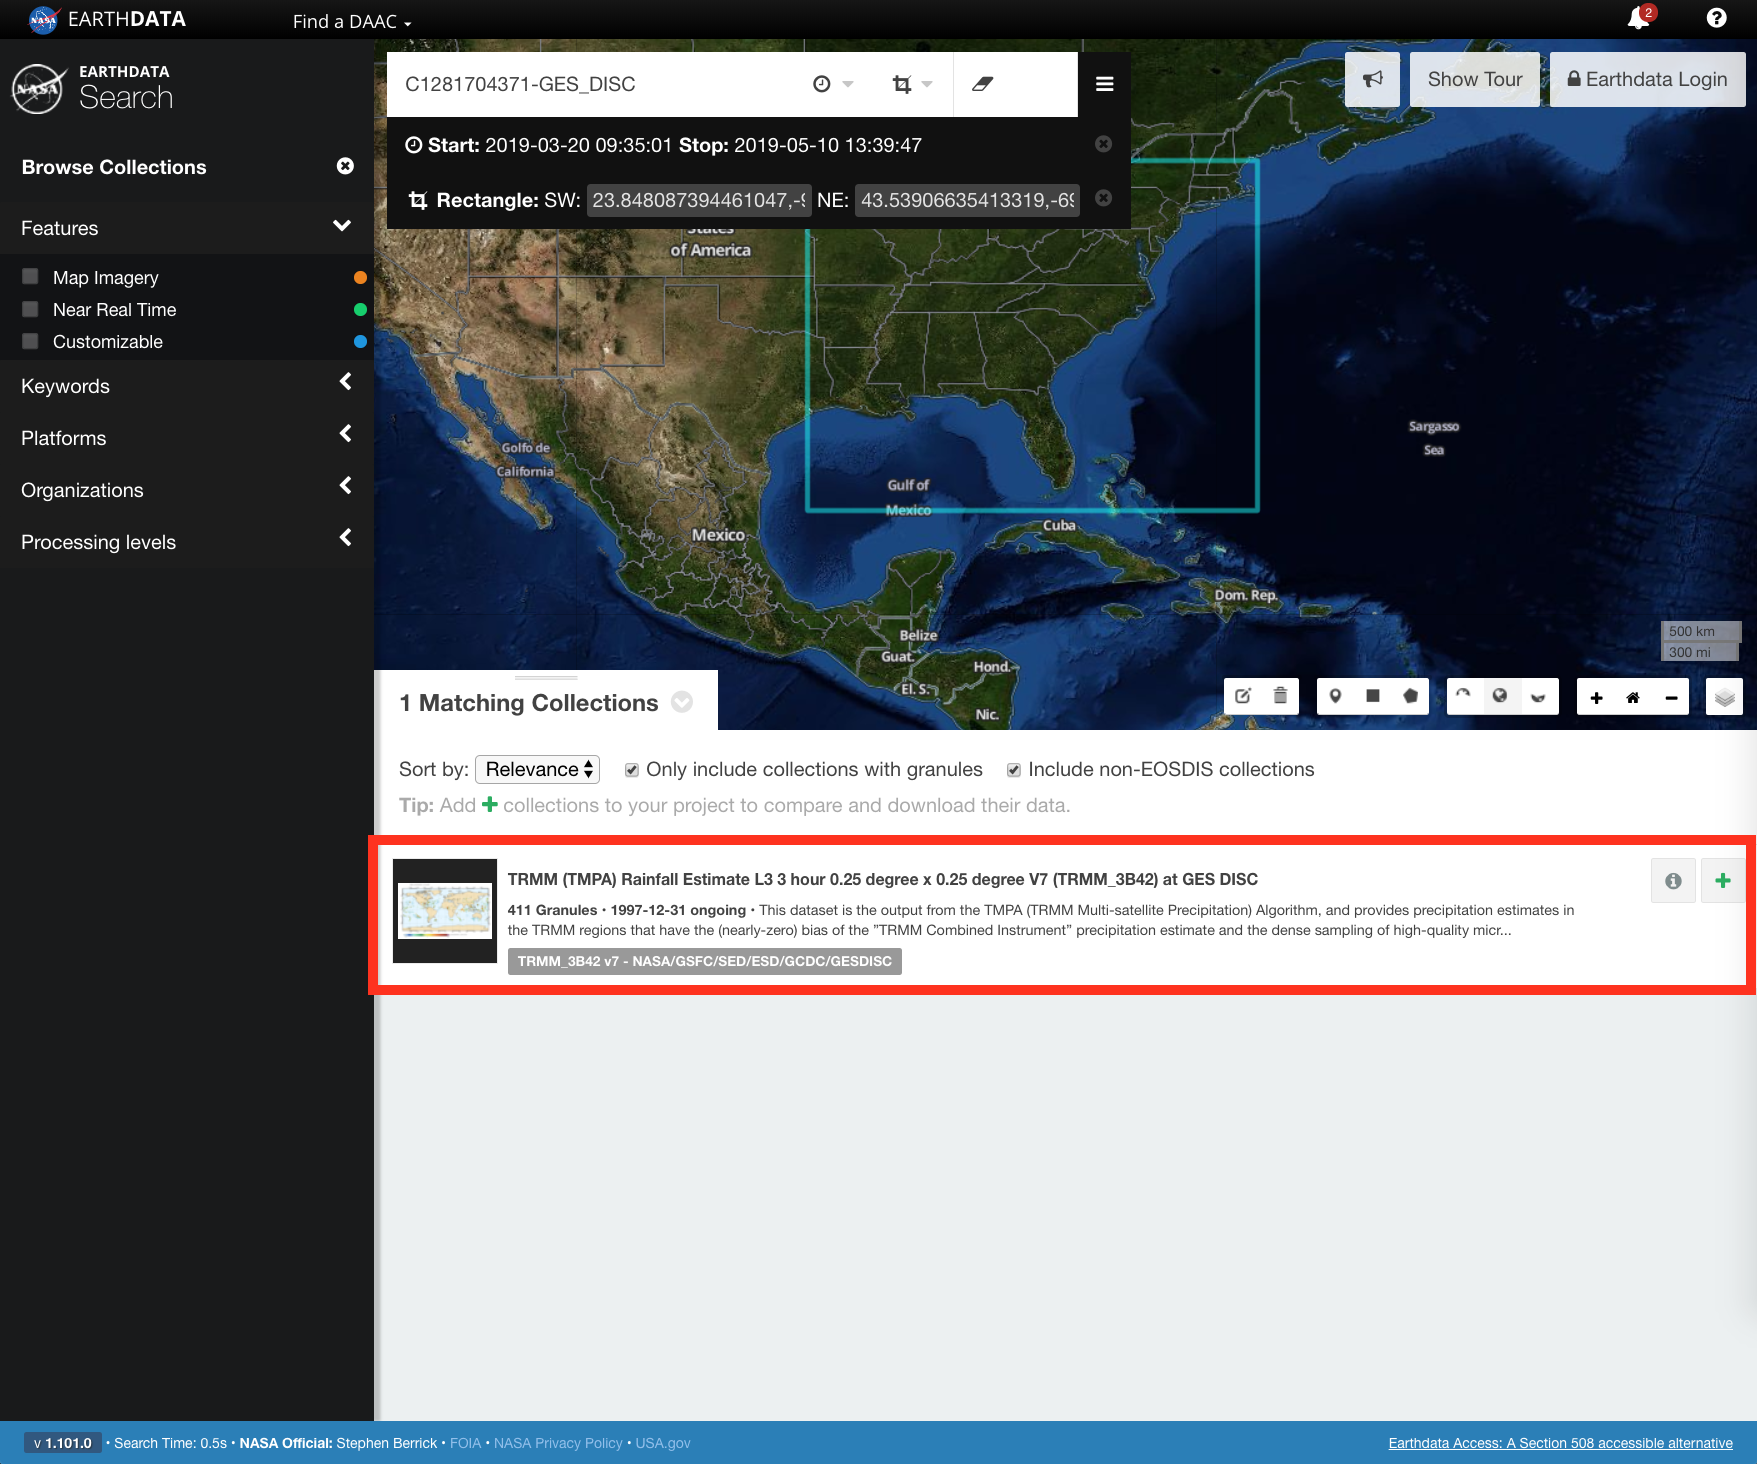
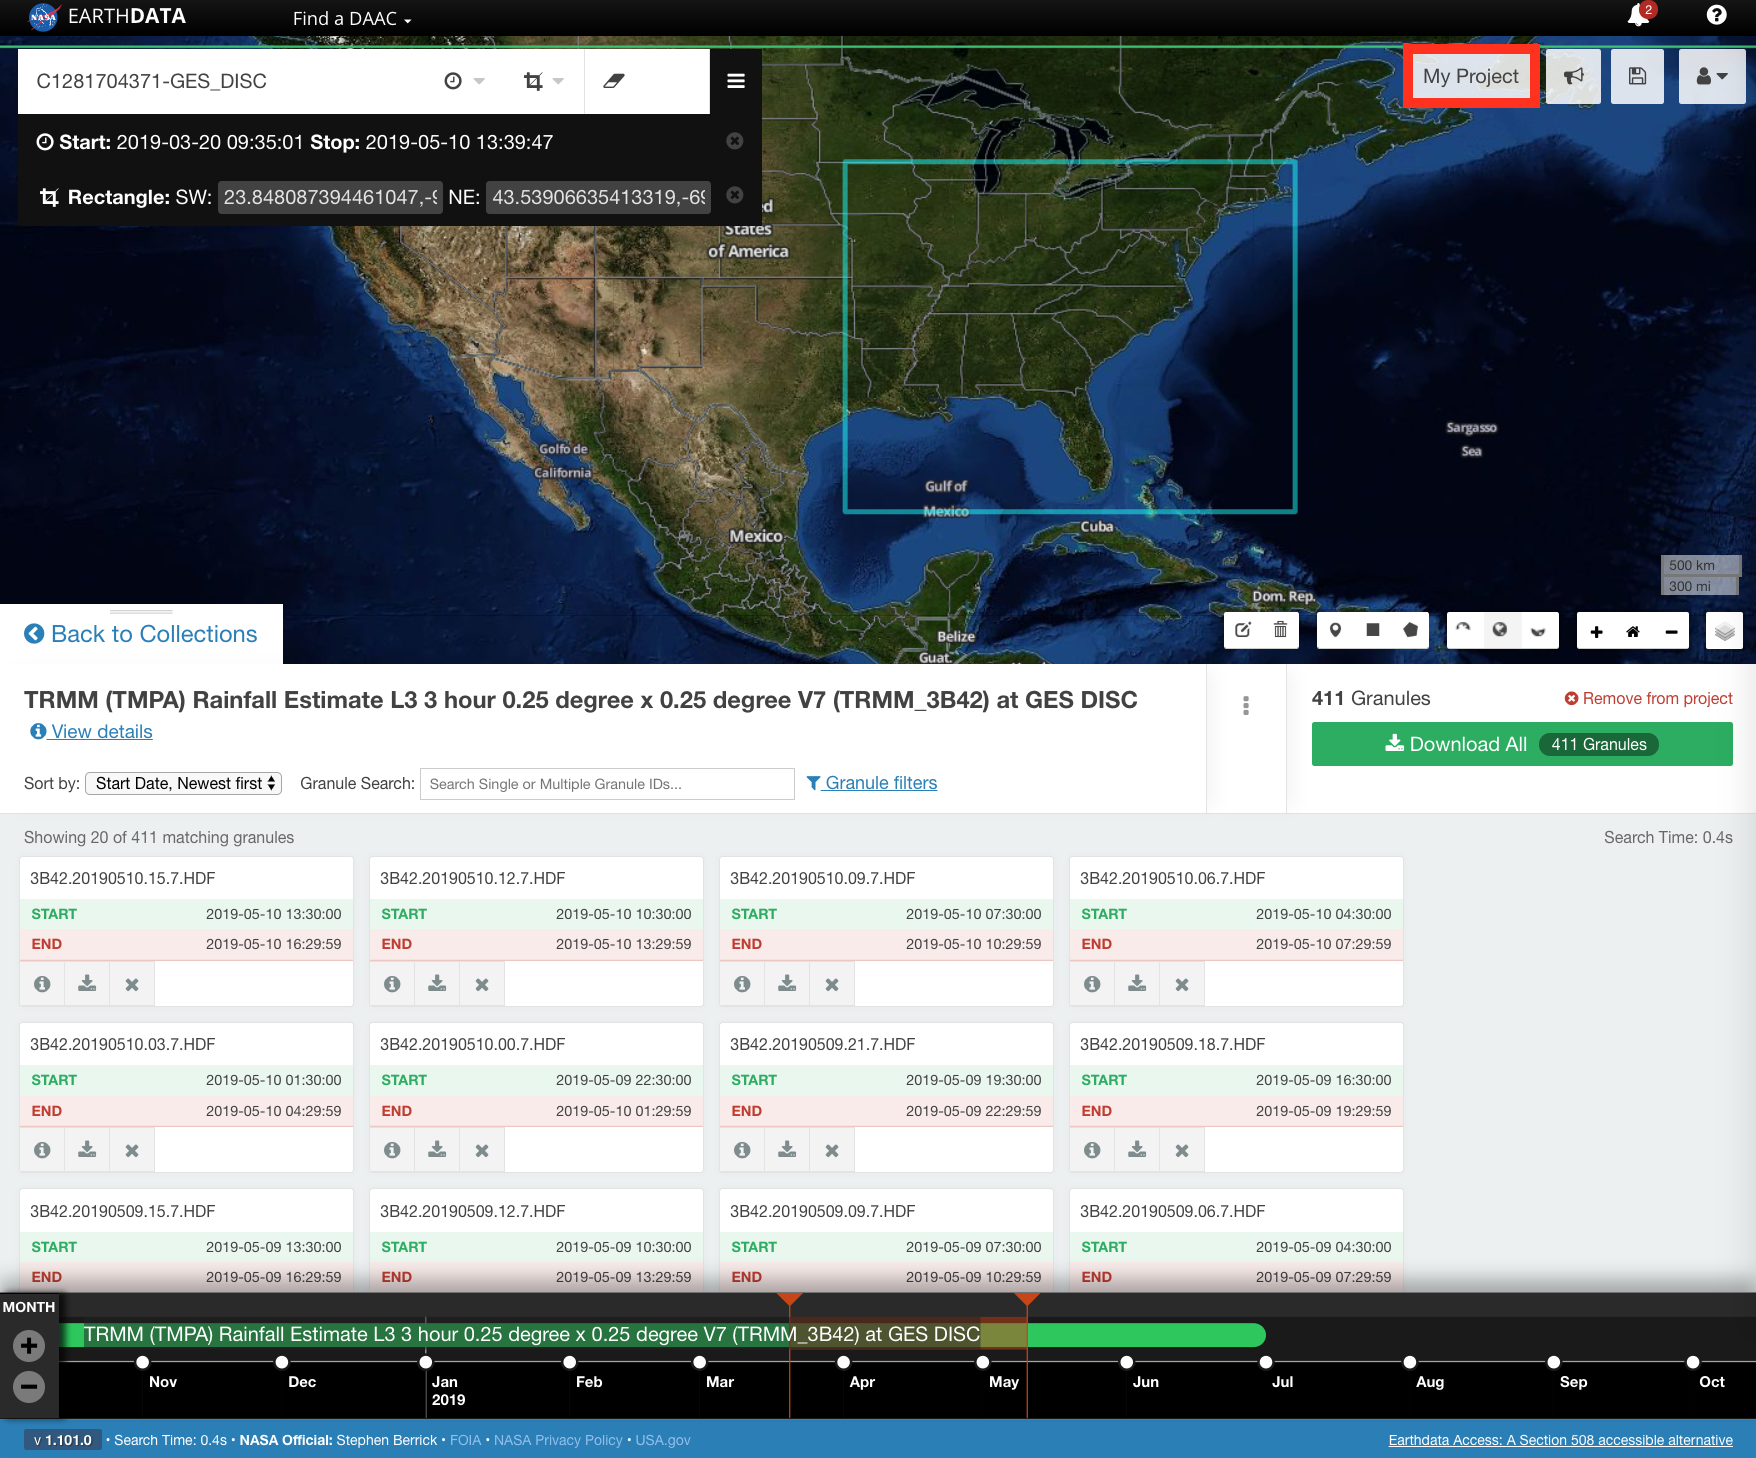
CLICK on a collection capable of the smart handoff feature to view the granule results page.Apply any spatial and/or temporal constraints to the data before following the steps below. These constraints will be preserved during a smart handoff. For instructions on how to search using Earthdata Search, please see the section on How To Search using Earthdata Search. - CLICK on the vertical ellipsis on the granule results page. This will display a list of tools supported by the smart handoff feature.
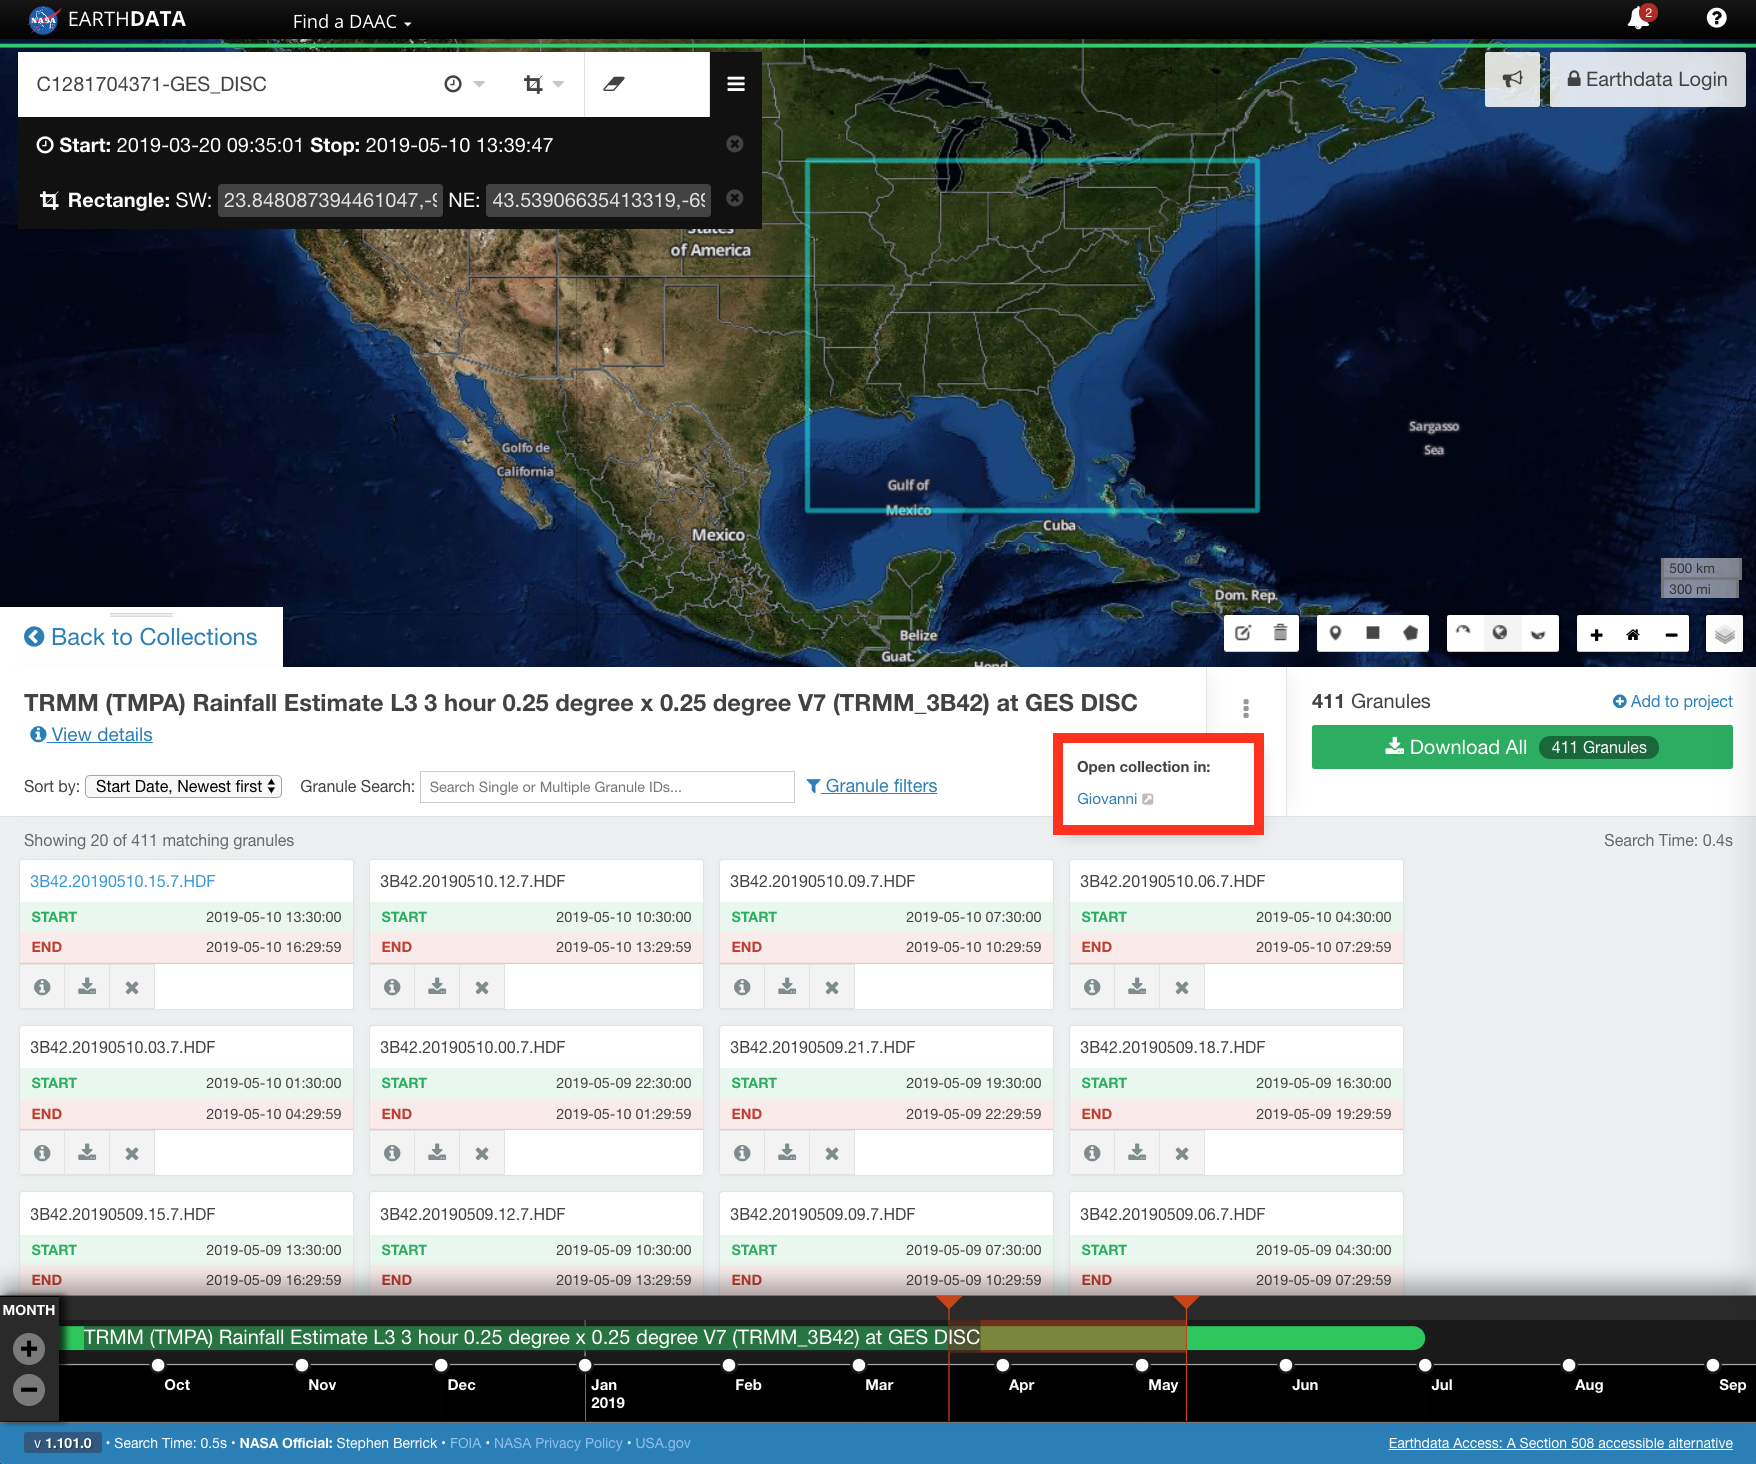
- CLICK on the selected tool in the popup from the vertical ellipsis. This will open the tool in a new tab/window.
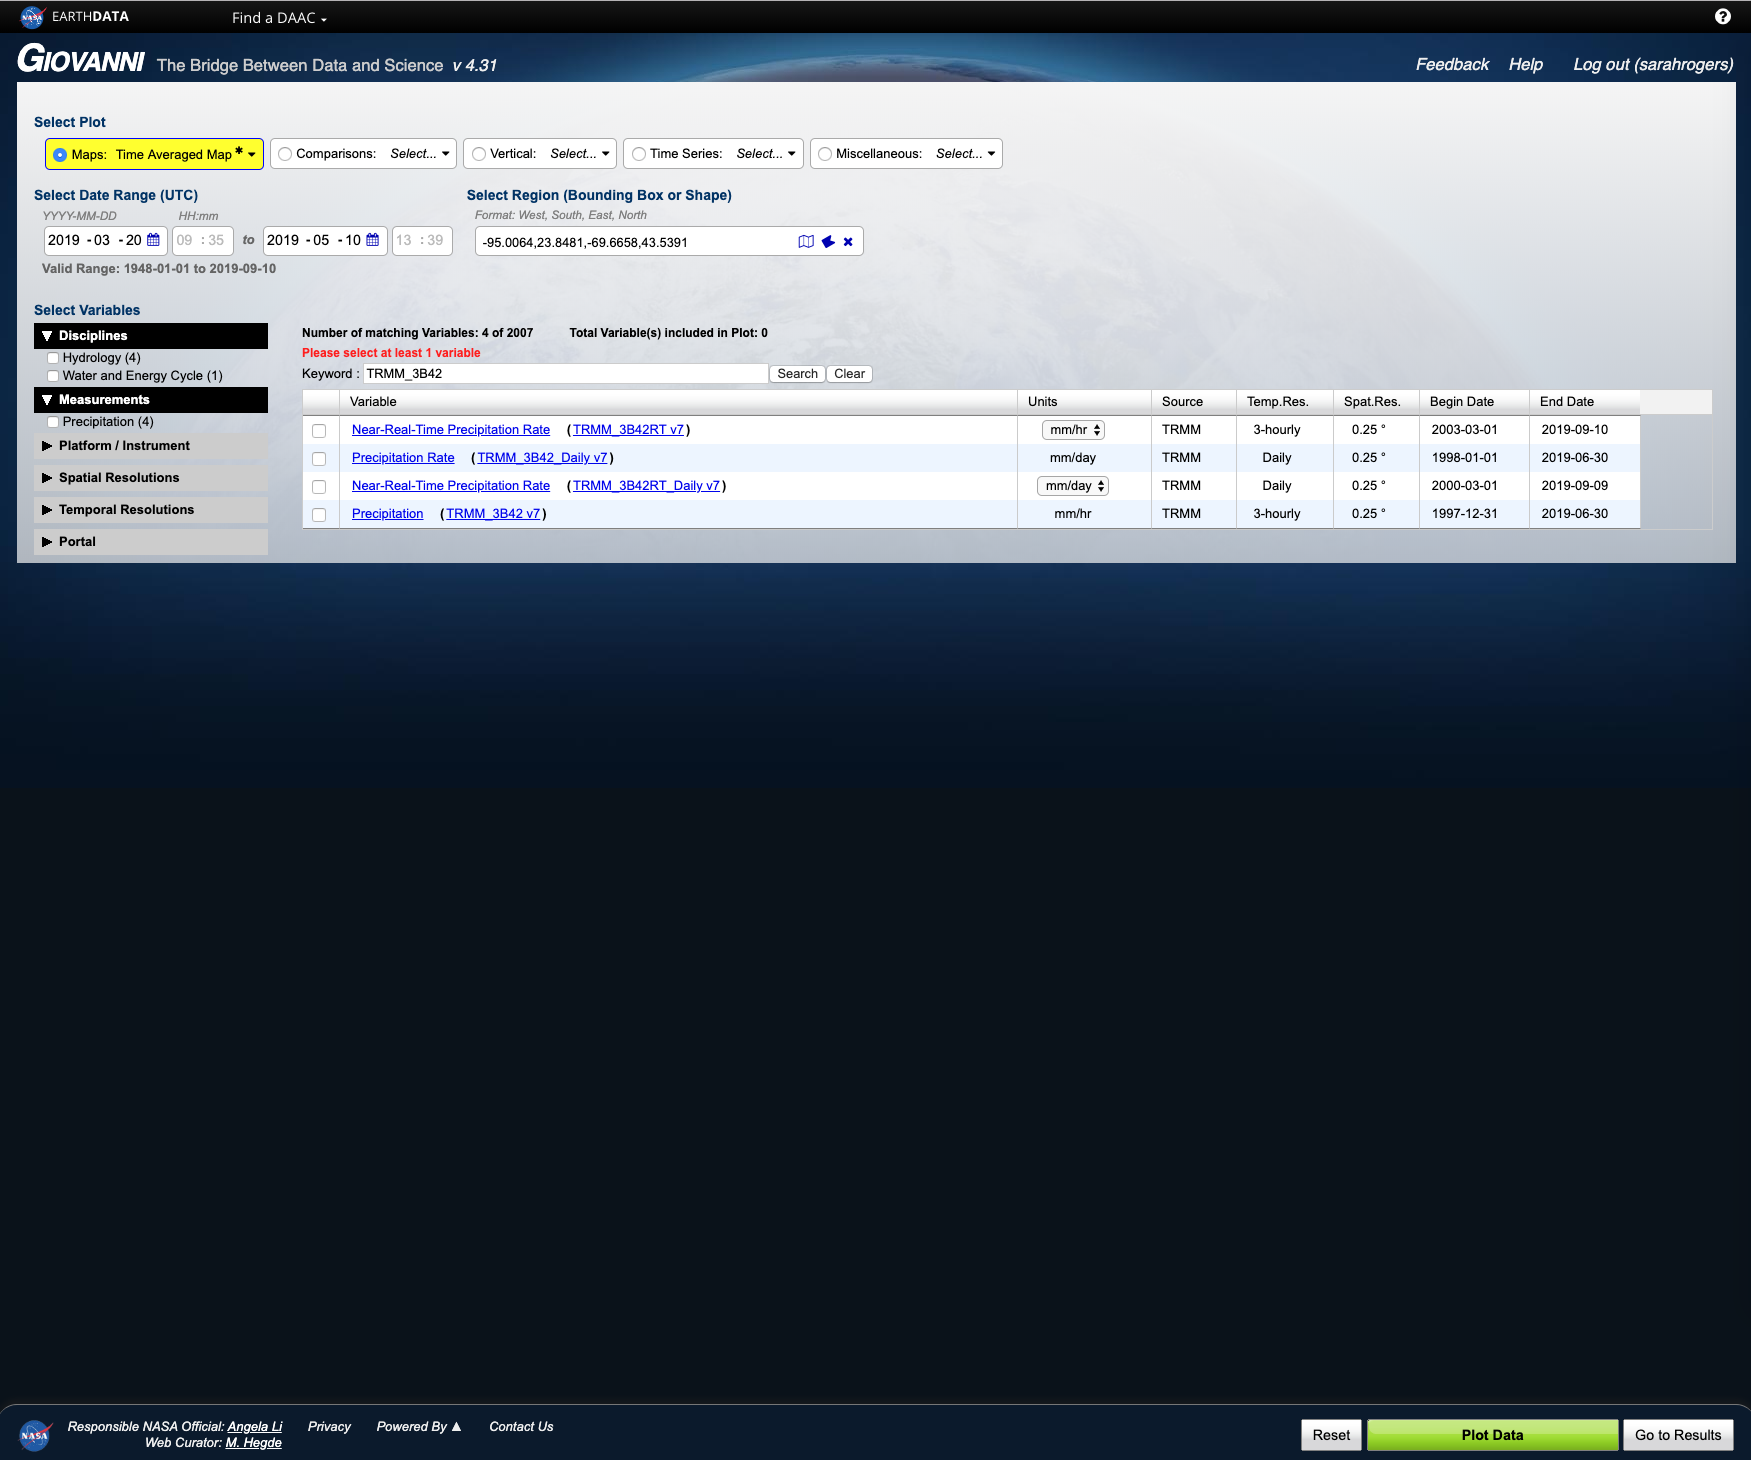
- The tool and smart handoff will process and open in a new tab/window with the spatial, temporal, and collection information from Earthdata Search preserved.
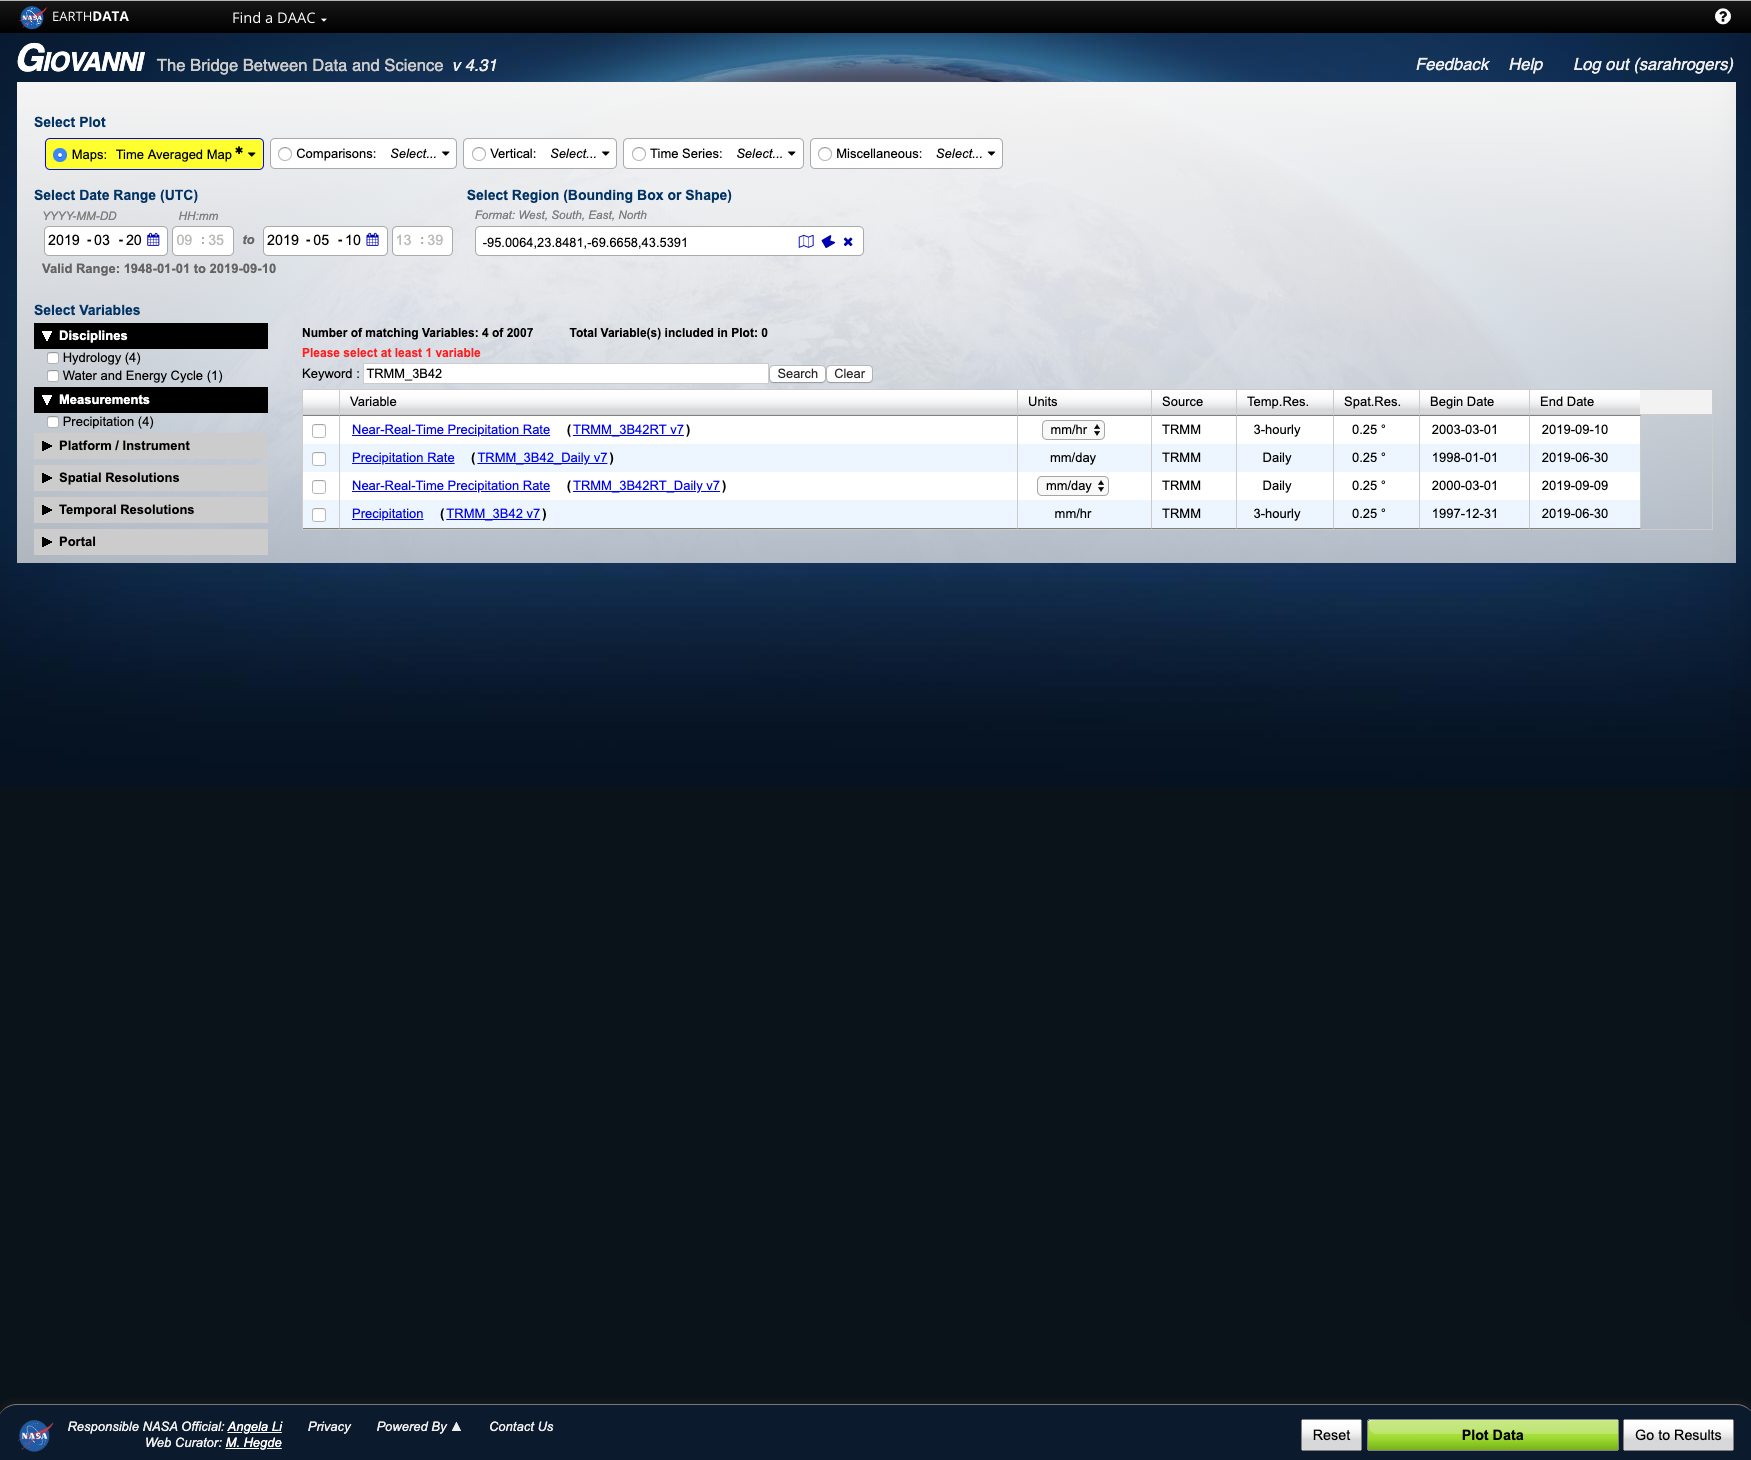
The screenshot below shows the results of a smart handoff from Earthdata Search to Giovanni. Other tools may also be available for a smart handoff, depending on functionality.
Smart handoff from the 'My Project' page.
Smart handoff from the 'My Project' page.-
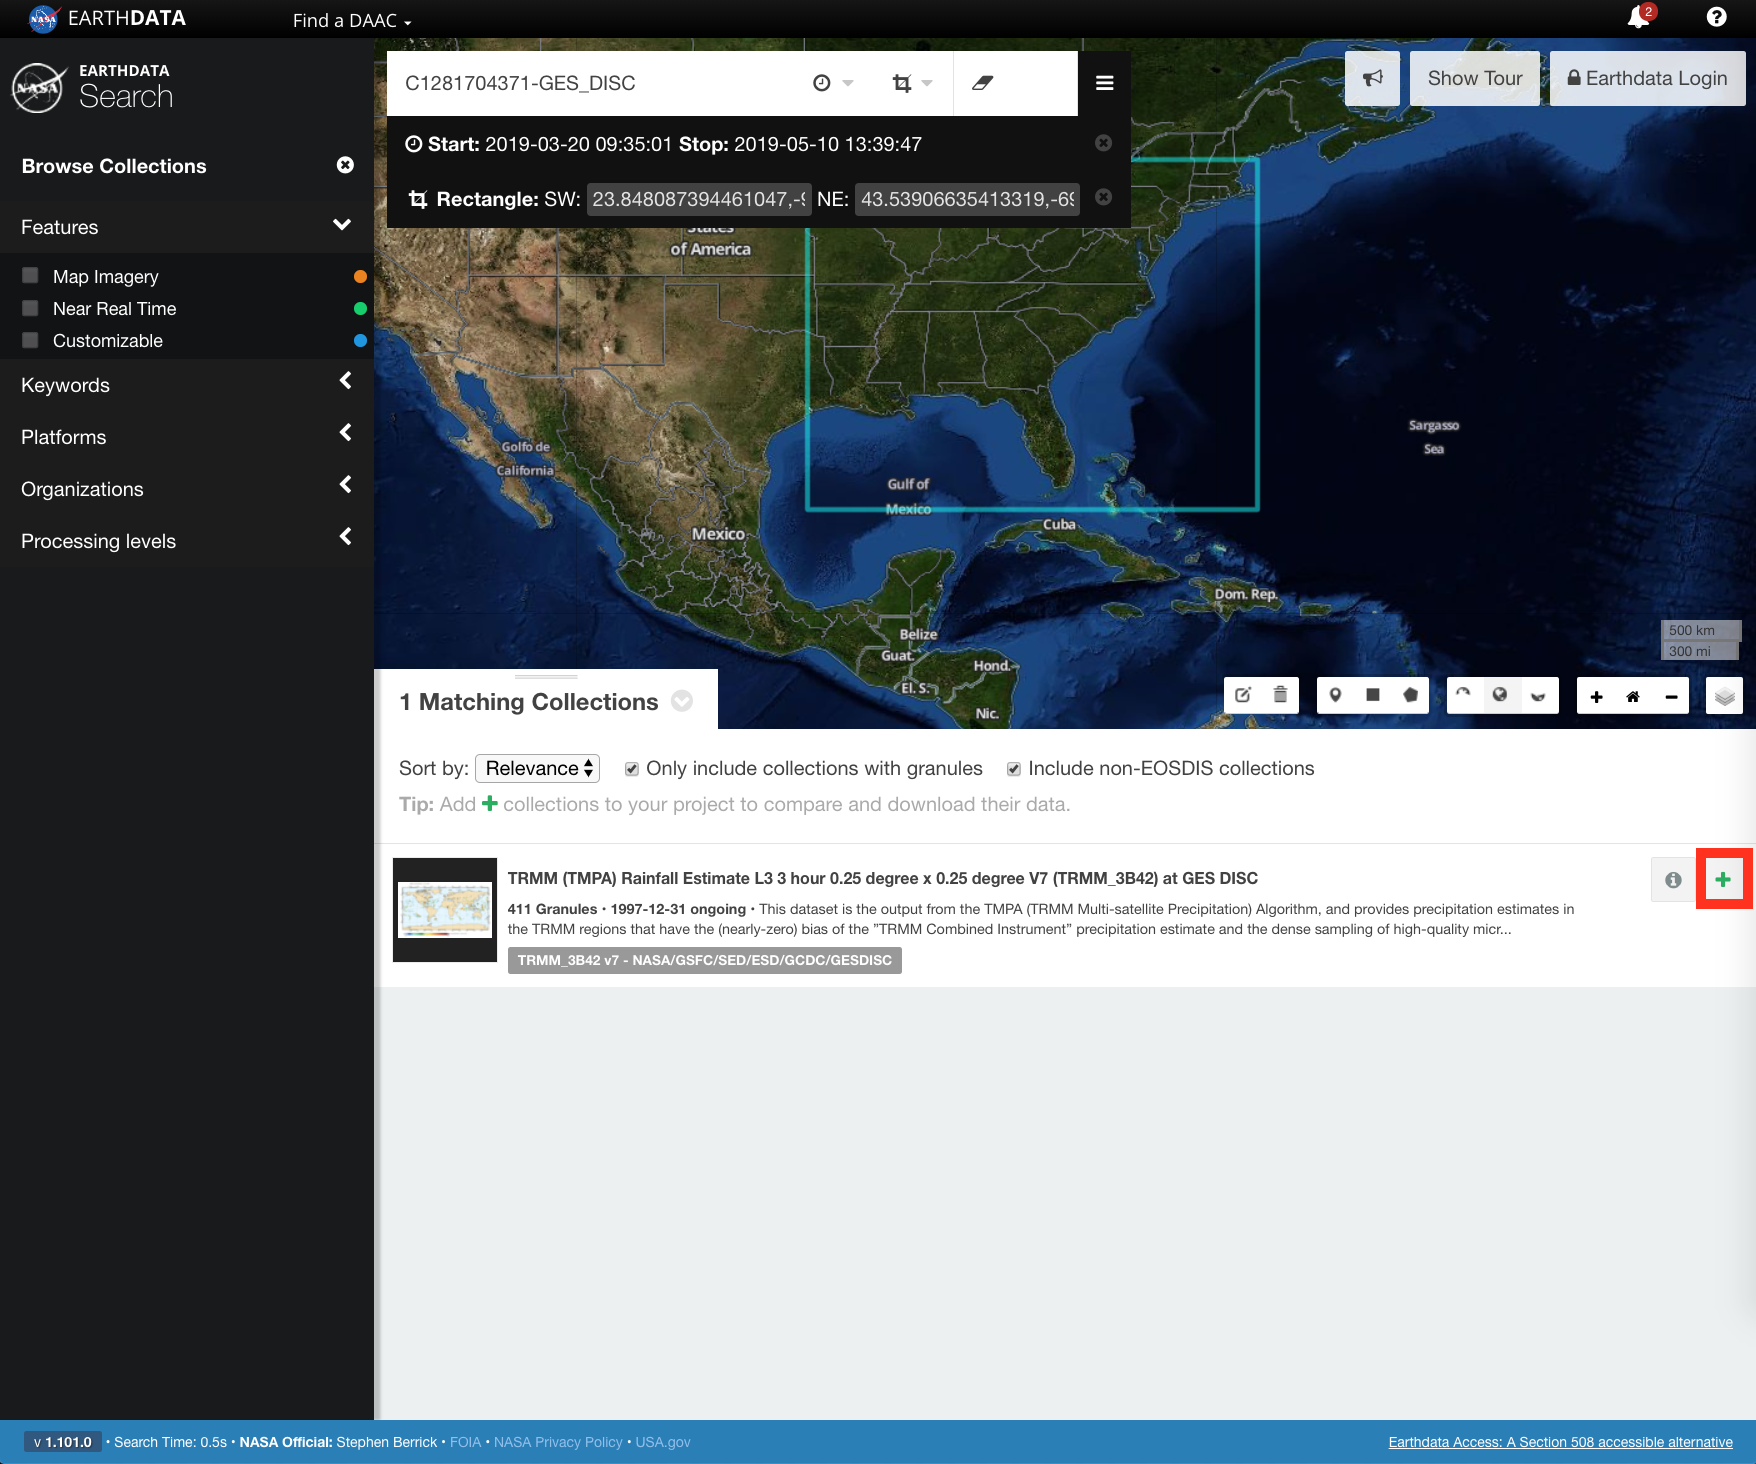
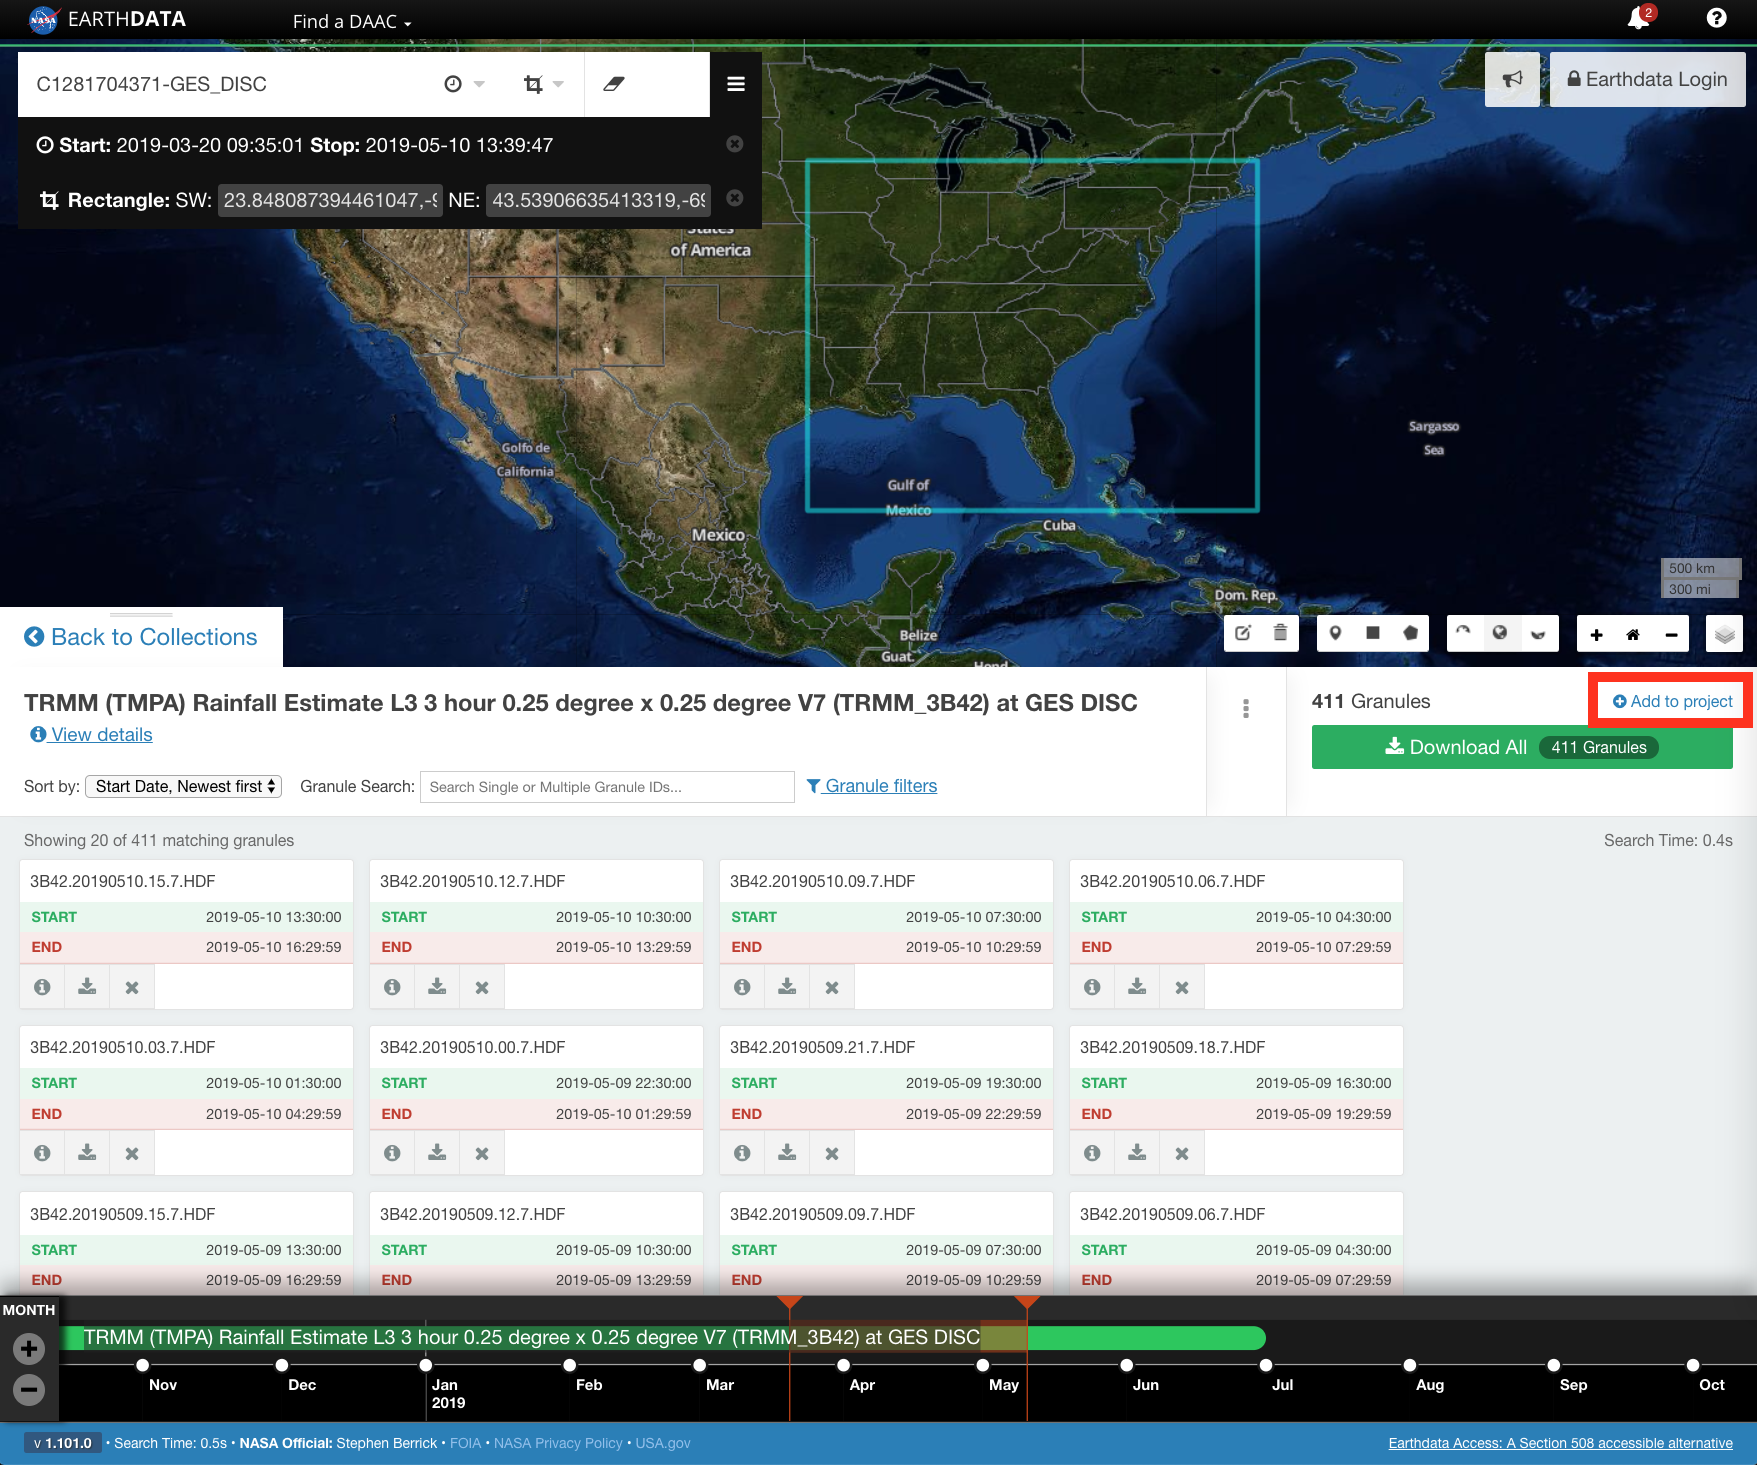
CLICK on a collection capable of the smart handoff feature to view the granule results page. Alternatively, CLICK on Add collection to current project to add all of the granules in the collection that match the spatial and temporal restraints to 'My Project'.Apply any spatial and/or temporal constraints to the data before following the steps below. These constraints will be preserved during a smart handoff. For instructions on how to search using Earthdata Search, please see the section on How To Search using Earthdata Search. - CLICK Add to project to add the granules that match the spatial and temporal restraints to 'My Project'.
- CLICK on My Project.
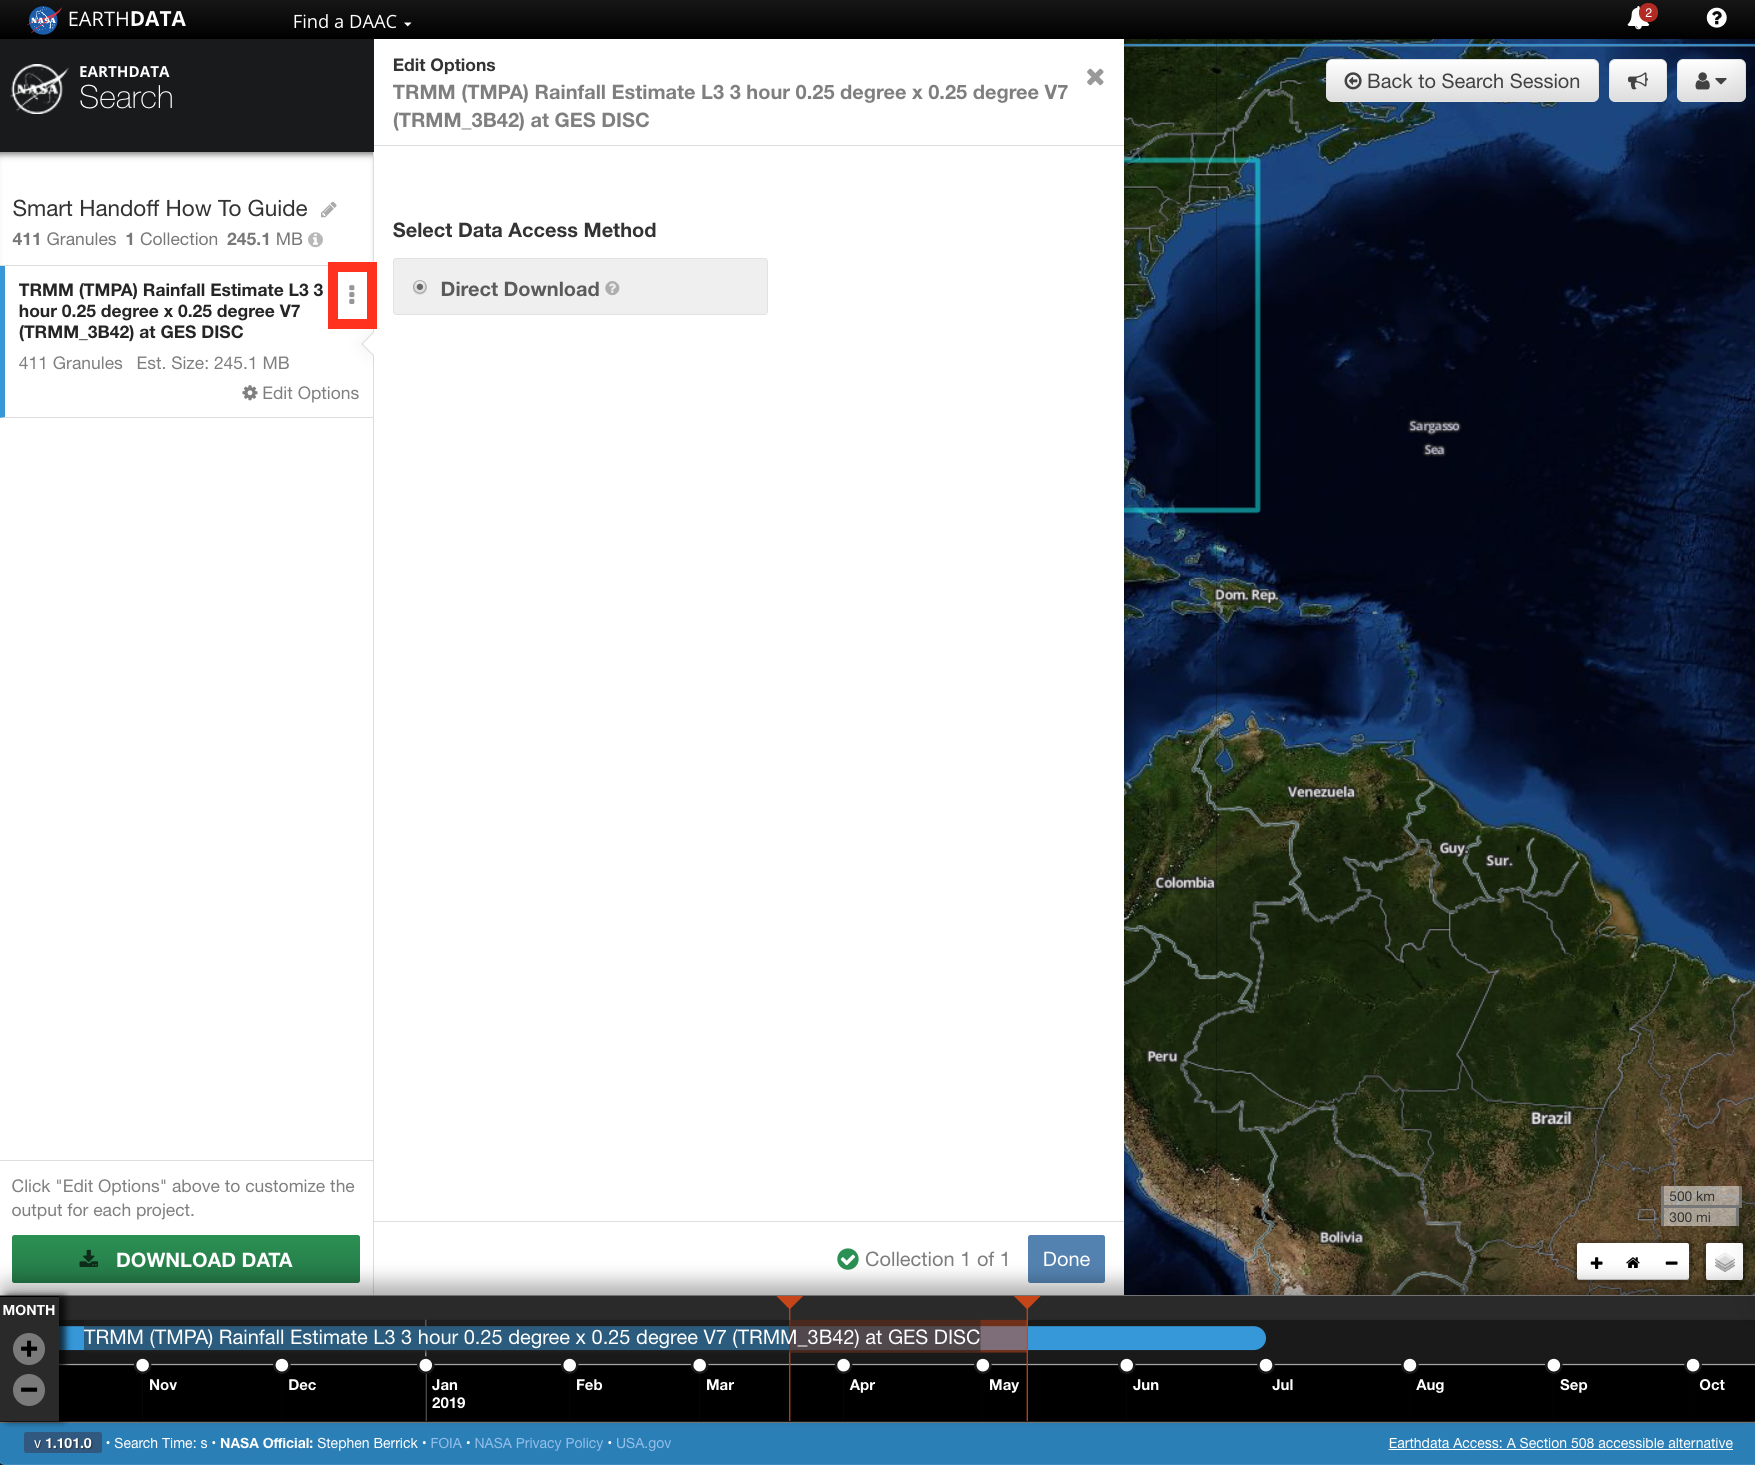
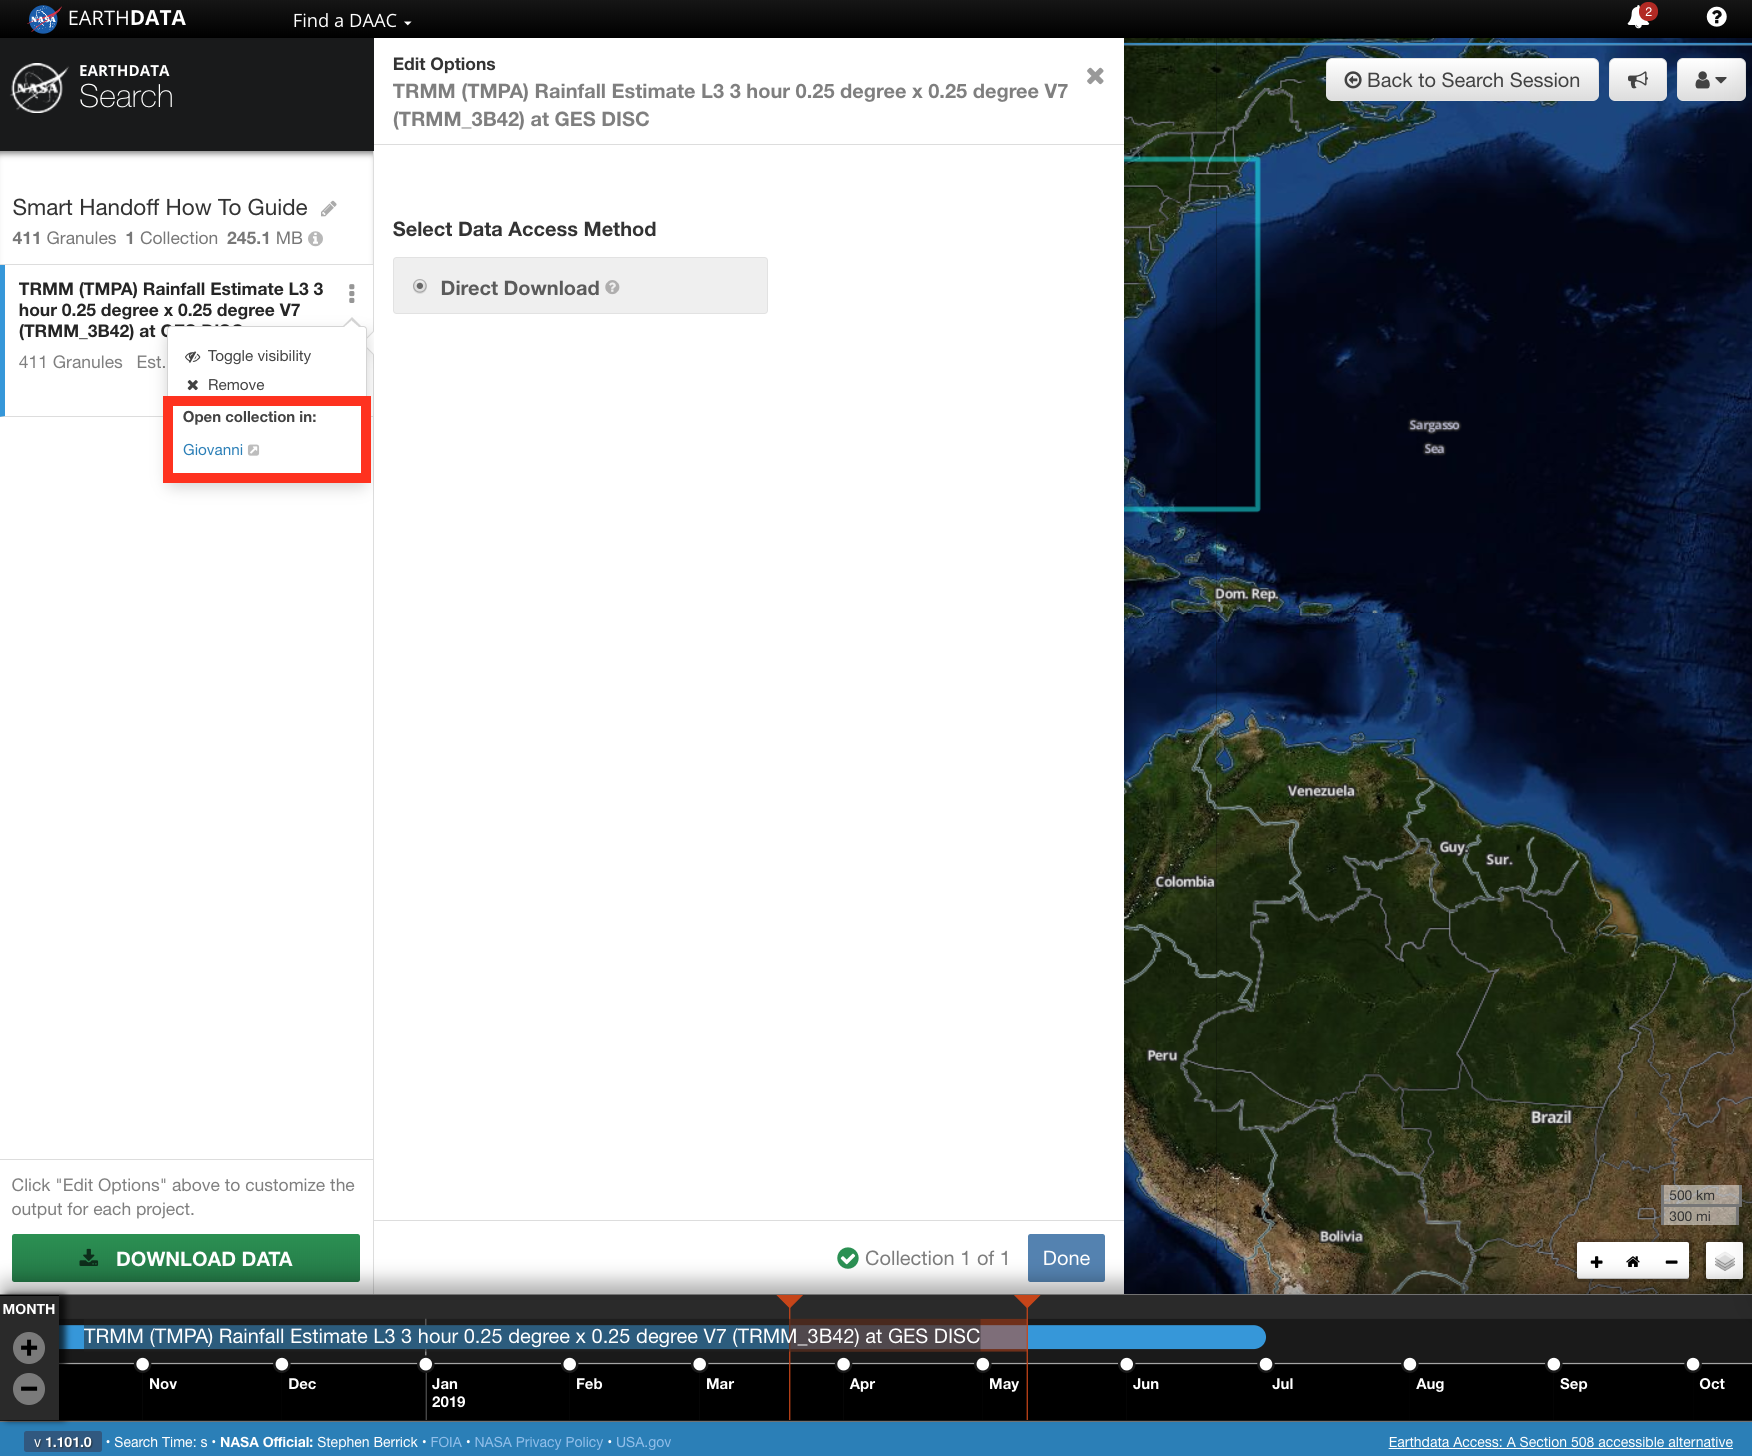
- CLICK on the vertical ellipsis next to the collection name. This will display a list of tools supported by the smart handoff feature.
If there are multiple collections in the project, only those collections that are capable of the smart handoff feature will display the vertical ellipsis next to the collection name. The smart handoff feature can only be used for one collection at a time. - CLICK on the selected tool in the popup from the vertical ellipsis. This will open a new tab/window.
- The tool and smart handoff will process and open in a new tab/window with the spatial, temporal, and collection information from Earthdata Search preserved.
The screenshot below shows the results of a smart handoff from Earthdata Search to Giovanni. Other tools may also be available for a smart handoff, depending on functionality.
Smart handoff from the 'Collection Details' page.
Smart handoff from the 'Collection Details' page.-
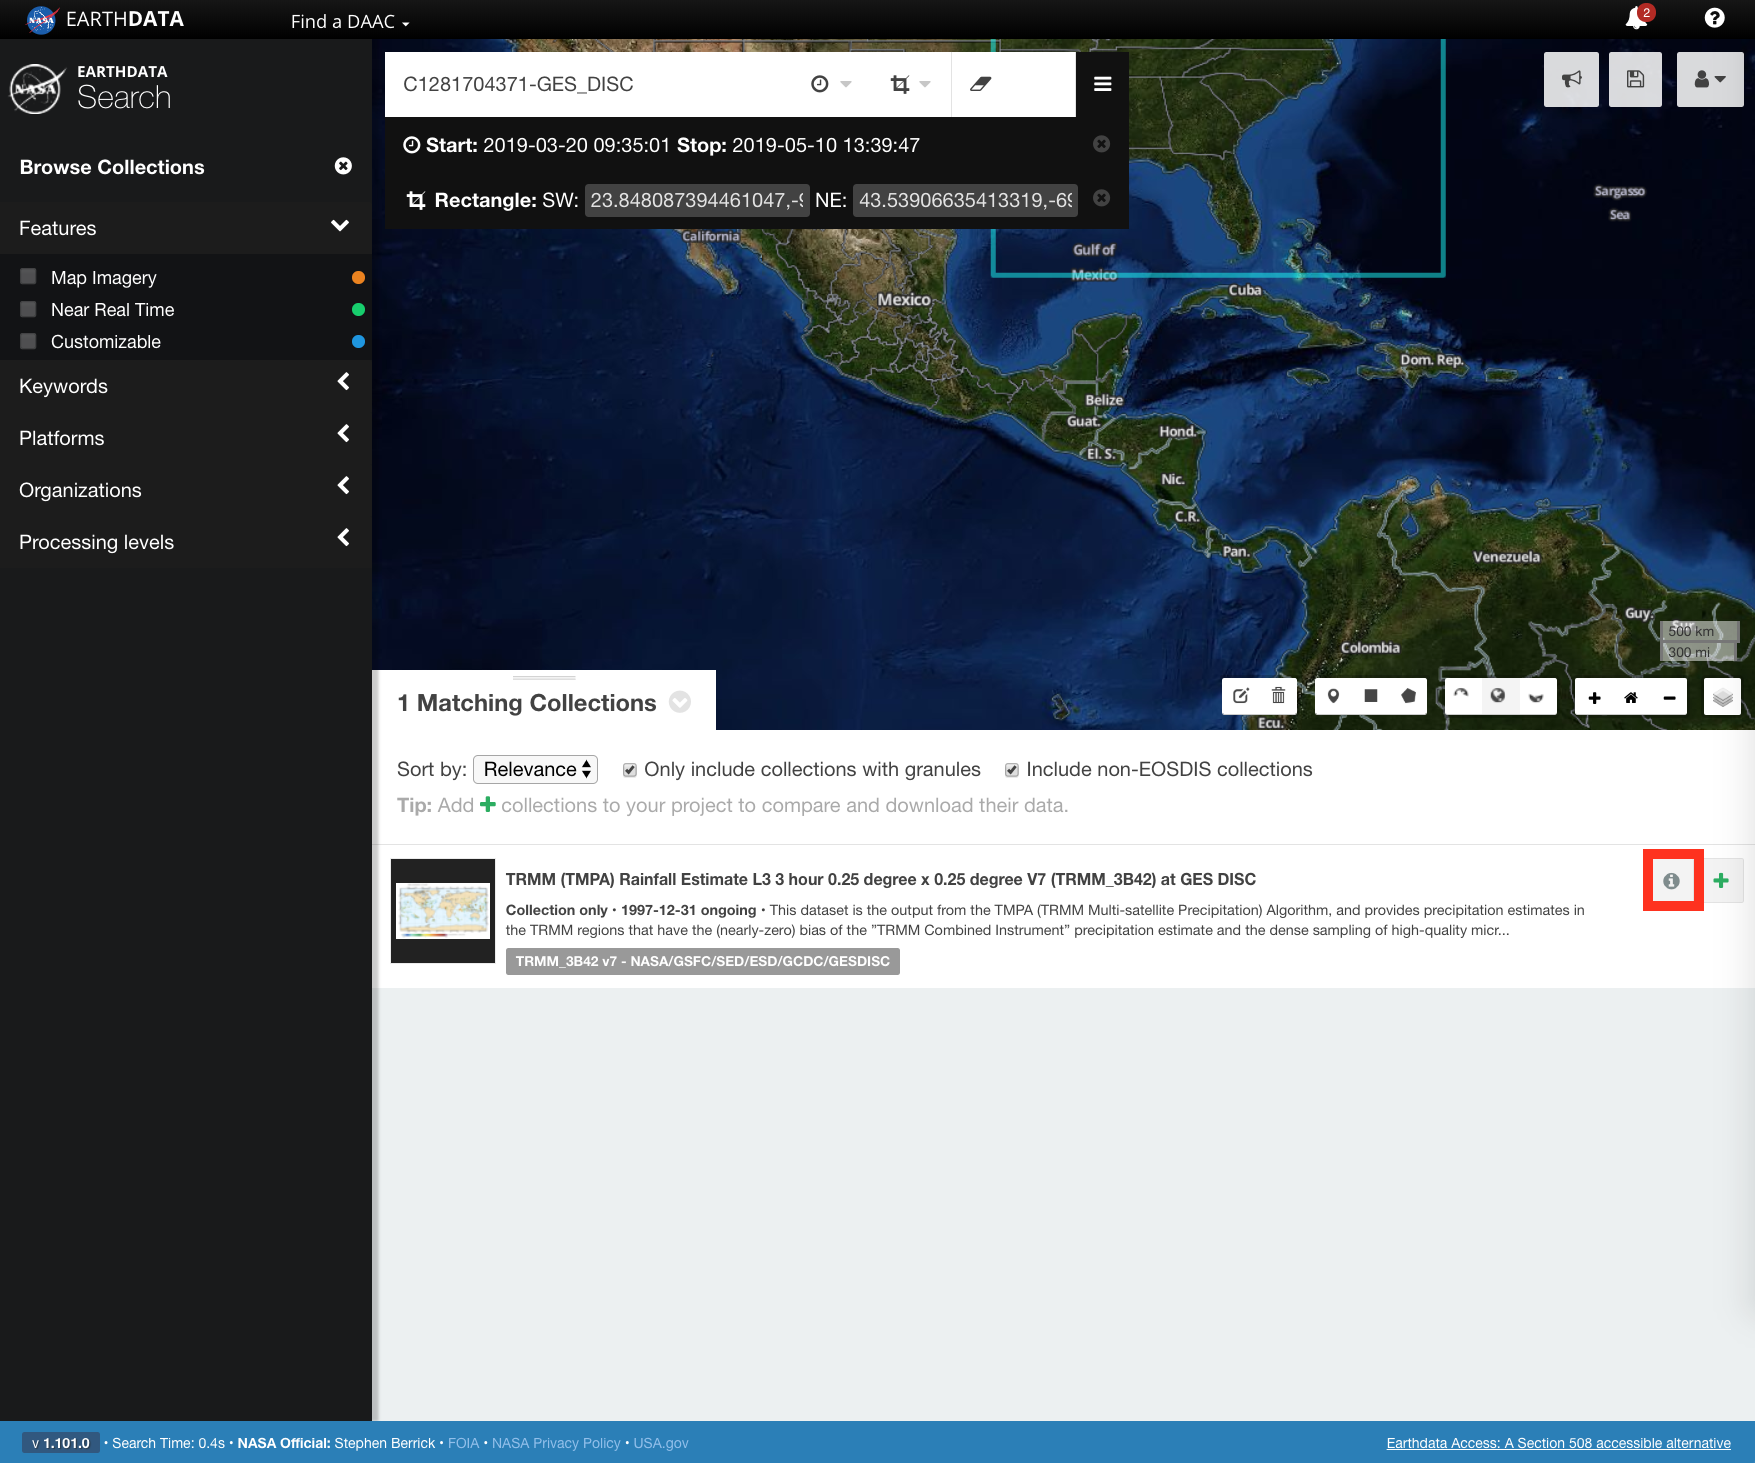
CLICK on the View collection details button on a collection capable of the smart handoff feature.Apply any spatial and/or temporal constraints to the data before following the steps below. These constraints will be preserved during a smart handoff. For instructions on how to search using Earthdata Search, please see the section on How To Search using Earthdata Search. - CLICK on the vertical ellipsis on the collection details page. This will display a list of tools supported by the smart handoff feature.
- CLICK on the selected tool in the popup from the vertical ellipsis. This will open a new tab/window.
- The tool and smart handoff will process and open in a new tab/window with the spatial, temporal, and collection information from Earthdata Search preserved.
The screenshot below shows the results of a smart handoff from Earthdata Search to Giovanni. Other tools may also be available for a smart handoff, depending on functionality.
- How to Set a Collection Thumbnail in Earthdata Search
-
Earthdata Search can display a thumbnail preview of a collection. This can be a screenshot of a PDF or a sample browse image. Including a preview image contributes to the overall design aesthetic of Earthdata Search and helps users better understand what is available within a collection.
Step-by-step guide
The following steps assume you are using NASA's Metadata Management Tool (MMT) to update your collection's metadata.
Log into MMT. Search for your collection using collection search located in the top-right portion of the UI. In the resulting search result table, click on the desired collection. Click the "Edit Record" link. Click on "Related URLs" Add a new Related URL and choose the following options:- URL Content Type: Visualization URL
- Type: Get Related Visualization
- Subtype: No selection needed
- URL: Enter direct link to the desired asset (e.g. PNG file)
<AssociatedBrowseImageUrls>
<ProviderBrowseUrl>
<URL>https://example.url/file.png</URL>
<Description>Brief description of file</Description>
</ProviderBrowseUrl>
</AssociatedBrowseImageUrls>In the ISO example you can remove the XML comments
ISO 19115-2 MENDS/SMAP
...<gmd:identificationInfo><gmd:MD_DataIdentification><!-- Show a collection ICON on EDSC --><gmd:graphicOverview><gmd:MD_BrowseGraphic><gmd:fileName><gmx:FileName src="EXAMPLE URL">EXAMPLE URL</gmx:FileName><!--The former is preferred, butthisworks.<gco:CharacterString>EXAMPLE URL</gco:CharacterString>--></gmd:fileName><!-- If URLContentType does not exist thedefaultis VisualizationURLIf Type: doesn't exist thedefaultis GET RELATED VISUALIZATIONifSubtype: doesn't exist thedefaultis nothingCurrently Order is important. --><gmd:fileDescription><gco:CharacterString>Description: This is a test url to demonstrate how to get a collection ICON on to EDSC URLContentType: VisualizationURL Type: GET RELATED VISUALIZATION</gco:CharacterString></gmd:fileDescription></gmd:MD_BrowseGraphic></gmd:graphicOverview>If the thumbnail is not present upon refresh, please use the feedback module (by clicking on the bullhorn icon at the top of the Earthdata Search UI) to alert the Earthdata Search team. As mentioned above, the steps outlined in this article require the use of the MMT to update your collection's metadata record. If you have not yet transitioned to using the MMT, the examples below are provided for which fields needs to be updated in DIF10, ECHO, and ISO 19115-2 (MENDS) formats.
DIF10
<Multimedia_Sample>
<URL>https://example.url/file.png</URL>
<Caption>Short Caption</Caption>
<Description>Brief description of file</Description>
</Multimedia_Sample>ECHO
- How to Set the Maximum Granules per Order for a Collection in Earthdata Search
-
This describes how to limit the number of granules per order for a collection in Earthdata Search by setting a tag on the collection.
This functionality allows providers to specify collection-specific order limits as needed to prevent large orders from adversely impacting provider operations.
For a properly tagged collection, clicking "Download Granules" in Earthdata Search when too many granules are selected will display an error message, and the order will not be allowed.
The tag is
edsc.limited_collections, and the order limit is specified in the tag data field "limit".Step-by-step guide
- The ability to tag collections is granted through the TAG_GROUP system object identity. In MMT, this is obtained via membership in the permissions group "Tagging Group SYS." If you need tagging access, contact CMR or Earthdata Search developer operations.
- If you do not already have one, generate an ECHO token. (Note: the
idfield in the response to the following command is your new token.)
curl -XPOST \
<a href="https://cmr.earthdata.nasa.gov/legacy-services/rest/tokens">https://cmr.earthdata.nasa.gov/legacy-services/res...</a> \
-H 'cache-control: no-cache'\
-H 'content-type: application/xml'\
-d '<token>
<username>my_earthdata-username</username>
<password>my_earthdata_password</password>
<client_id>client_id_of_my_choosing</client_id>
<user_ip_address>valid_ip_address_of_my_choosing_example_127.0.0.1</user_ip_address>
</token>’ - Tag each collection to be limited with the
edsc.limited_collectionstag, setting desired the order limit:
--- Example: to tag a single collection C12345-DAAC_NAME with theedsc.limited_collectionstag and set the order limit to 2000 granules, create a tag association as follows:
curl -XPOST \
-i \
-H "Content-Type: application/json"\
-H "Echo-Token: <token from first step>"\
<a href="https://cmr.earthdata.nasa.gov/search/tags/edsc.limited_collections/associations">https://cmr.earthdata.nasa.gov/search/tags/edsc.li...</a> \
-d '[{"concept_id":"C12345-DAAC_NAME", "data":{"limit":2000}}]'
---to tag multiple collections and set limits,
curl -XPOST \
-i \
-H "Content-Type: application/json"\
-H "Echo-Token: <token from first step>"\
<a href="https://cmr.earthdata.nasa.gov/search/tags/edsc.limited_collections/associations">https://cmr.earthdata.nasa.gov/search/tags/edsc.li...</a> \
-d '[{"concept_id":"C00001-DAAC_NAME", "data":{"limit":2000}}, \
"C00002-DAAC_NAME", "data":{"limit":2000}}, \
"C00003-DAAC_NAME", "data":{"limit":1000}}, \
"C00004-DAAC_NAME", "data":{"limit":3000}}, \
"C00005-DAAC_NAME", "data":{"limit":2300}}, \
"C00006-DAAC_NAME", "data":{"limit":100}}, \
"C00007-DAAC_NAME", "data":{"limit":2000}}, \
"C00008-DAAC_NAME", "data":{"limit":5000}}, \
"C00009-DAAC_NAME","data":{"limit":500}}, \
<"C00010-DAAC_NAME", "data":{"limit":800}}]'
To show all tags for a collection (tags will be returned in the field labeled "tags"):
curl -s "https://cmr.earthdata.nasa.gov/search/collections.json?include_tags=*&concept_id=C12345-DAAC_NAME"To show all collections that have the order limit tag:
curl "https://cmr.earthdata.nasa.gov/search/collections?tag_key=edsc.limited_collections" - How to Set Granule Thumbnails in Earthdata Search
-
Granules (the individual files that make up a collection or dataset) can be associated with preview images. They can be either PDFs of composite data or browse images associated with the actual data. To add thumbnails to your collection's granules, follow the steps below.
Step-by-step guide
Providers create and update granule metadata with a variety of different tools. As such, this article will not detail how to create and update metadata, but focus on what metadata should be provided.
Add an OnlineResourceURL that follows the following format:- ECHO10 Granule Metadata
<OnlineResources>
<OnlineResource>
<URL>example URL</URL>
<Type>BROWSE</Type>
<MimeType>image/jpeg</MimeType>
</OnlineResource>
</OnlineResources> - ISO19115 Granule Metadata
<gmd:graphicOverview>
<gmd:MD_BrowseGraphic>
<gmd:fileName>
<code><gmx:FileName src=EXAMPLE URL/>
</gmd:fileName>
<gmd:fileDescription gco:nilReason="missing"/>
<gmd:fileType>
<gco:CharacterString>image/jpeg</gco:CharacterString>
</gmd:fileType>
</gmd:MD_BrowseGraphic>
</gmd:graphicOverview>
Note, CMR indexes granules on ingest. When granules are ingested, CMR will look for the presence of a BROWSE OnlineResource. If one is found, the "browse_flag" will be toggled from false to true. Earthdata Search looks for "browse_flag: true" and will then pick up the image linked in the Online Resource URL. - ECHO10 Granule Metadata
- Where can I find out more information about Earthdata Search APIs?
- Where can I go to interact with other users and NASA subject matter experts on a variety of Earth science research and applications topics?
-
Please visit the Earthdata Forum at https://forum.earthdata.nasa.gov
